- The 3 point problem

Содержание
- 2. This presentation is to be completed in conjunction with exercise sheet 2. Objectives: By the end
- 3. The 3 point problem: Example Here is our original map. Fill in the example on exercise
- 4. Step 1: Draw a line between the outcrop at the highest elevation and the outcrop at
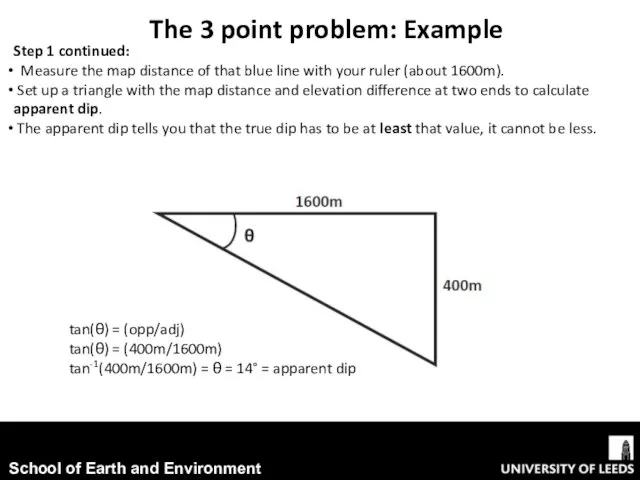
- 5. The 3 point problem: Example Step 1 continued: Measure the map distance of that blue line
- 6. The 3 point problem: Example Step 2: Now, along the blue line you drew, you want
- 7. The 3 point problem: Example Step 3: Now, measure 401m along the blue line away from
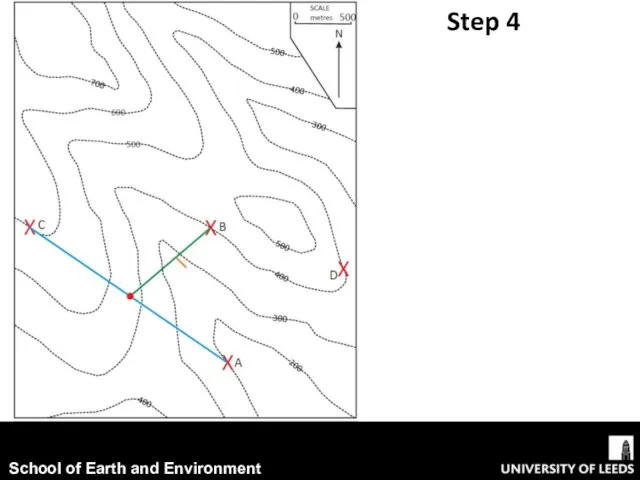
- 8. The 3 point problem: Example Step 4: The dip is perpendicular (at a right angle) to
- 9. The 3 point problem: Example Step 5: To figure out the true dip angle, extend the
- 10. The 3 point problem: Example Step 5 continued: Set up another triangle with the elevation difference
- 11. The 3 point problem: Example Step 5: To figure out the outcrop pattern, continue making strike
- 12. The 3 point problem: Example Step 5 continued: Now draw in your structure contours.
- 13. The 3 point problem: Example Step 5 continued: After you’ve drawn in your structure contours (they
- 14. The 3 point problem: Example Step 5 continued: Now roughly connect up your yellow dots and
- 15. The 3 point problem: Problem Now have a go at the next problem by yourself, by
- 16. Scale= 500m/2.5cm = 20m per mm; Therefore distance from C to A = 107mm= 2140m tan(θ)
- 17. Step 2 tan(10.6°) = (200m/adj) adj = (200m/tan(10.6°)) = 1069m
- 18. Step 3 Step 4
- 19. Step 5 tan(θ) = (opp/adj) tan(θ) = (200m/1000m) tan-1(200m/1000m) = θ = 11.3° True dip= 11.3°
- 20. Step 5 Now draw in the structure contours. As the length of the opposite of the
- 21. Step 5 Now add in the areas the coal seam will outcrop at.
- 22. Step 5 Now fill in the outcrop pattern (remembering your Law of “V’s”).
- 23. Questions Deduce the dip and strike of the coal seam which is seen to outcrop at
- 24. Summary We have now worked through how to find the direction of strike and calculate the
- 26. Скачать презентацию
This presentation is to be completed in conjunction with exercise
This presentation is to be completed in conjunction with exercise
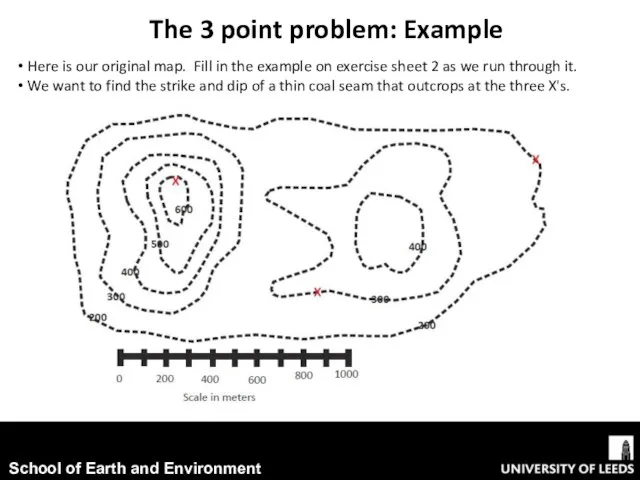
The 3 point problem: Example
Here is our original map. Fill
The 3 point problem: Example
Here is our original map. Fill
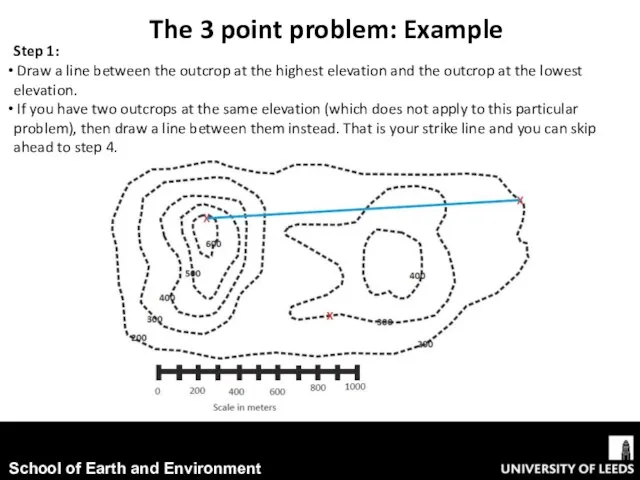
Step 1:
Draw a line between the outcrop at the highest
Step 1:
Draw a line between the outcrop at the highest
The 3 point problem: Example
Step 1 continued:
Measure the map distance
The 3 point problem: Example
Step 1 continued:
Measure the map distance
The 3 point problem: Example
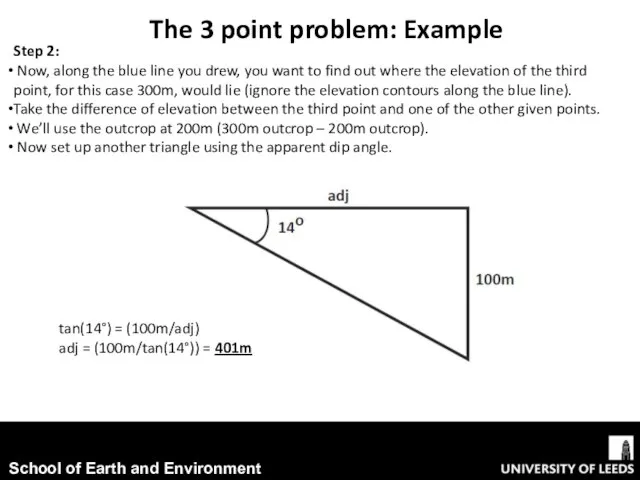
Step 2:
Now, along the blue line
The 3 point problem: Example
Step 2:
Now, along the blue line
The 3 point problem: Example
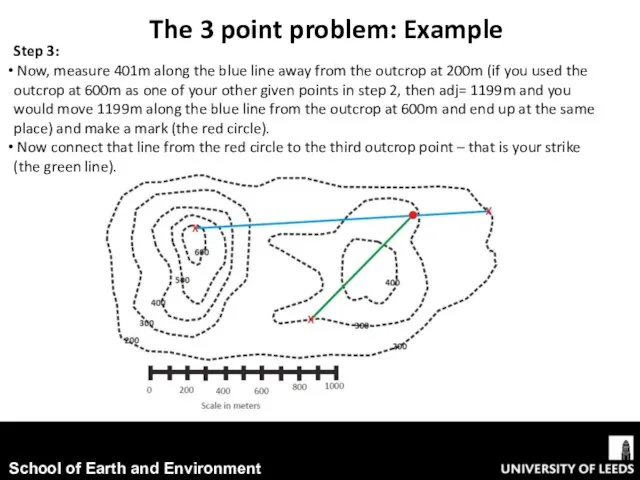
Step 3:
Now, measure 401m along the
The 3 point problem: Example
Step 3:
Now, measure 401m along the
The 3 point problem: Example
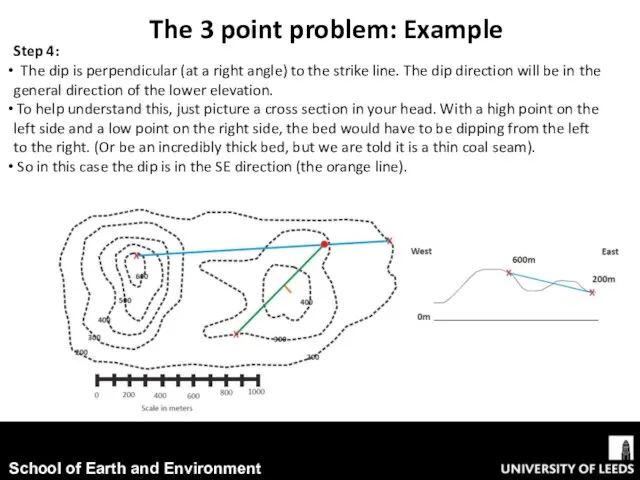
Step 4:
The dip is perpendicular (at
The 3 point problem: Example
Step 4:
The dip is perpendicular (at
The 3 point problem: Example
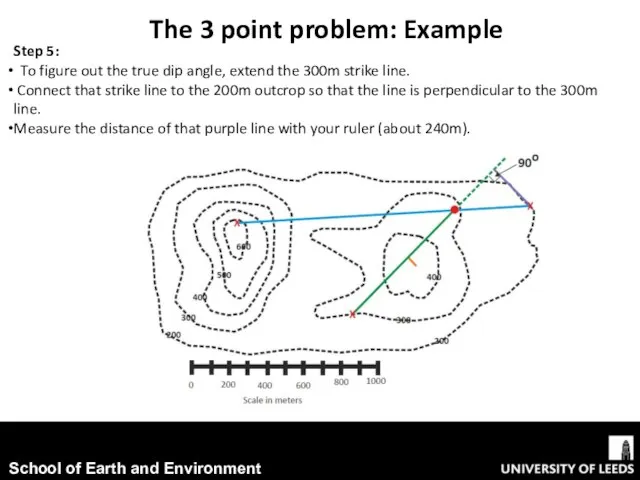
Step 5:
To figure out the true
The 3 point problem: Example
Step 5:
To figure out the true
The 3 point problem: Example
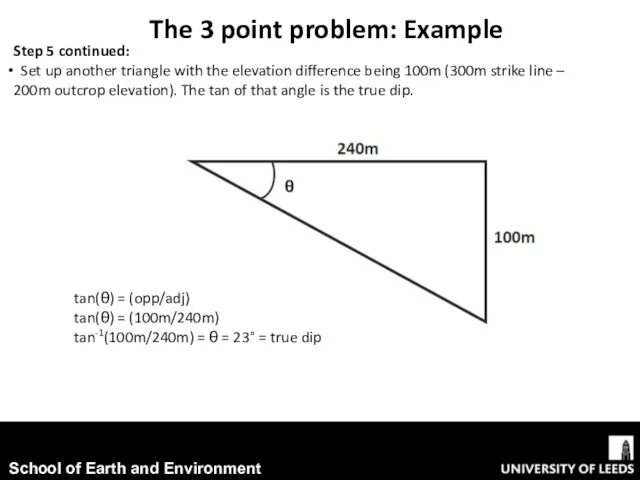
Step 5 continued:
Set up another triangle
The 3 point problem: Example
Step 5 continued:
Set up another triangle
The 3 point problem: Example
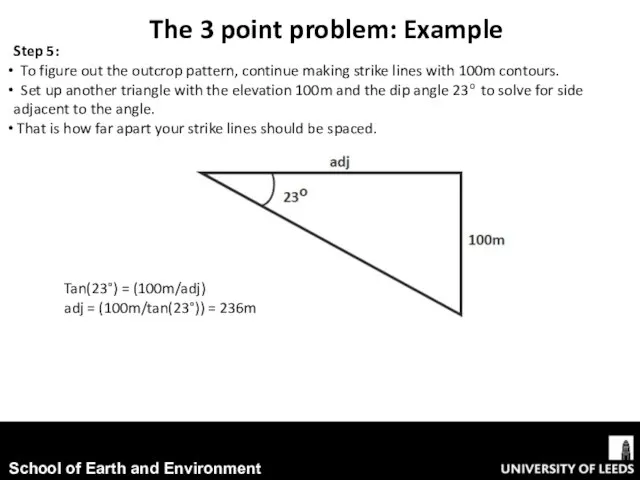
Step 5:
To figure out the outcrop
The 3 point problem: Example
Step 5:
To figure out the outcrop

The 3 point problem: Example
Step 5 continued:
Now draw in your
The 3 point problem: Example
Step 5 continued:
Now draw in your
The 3 point problem: Example
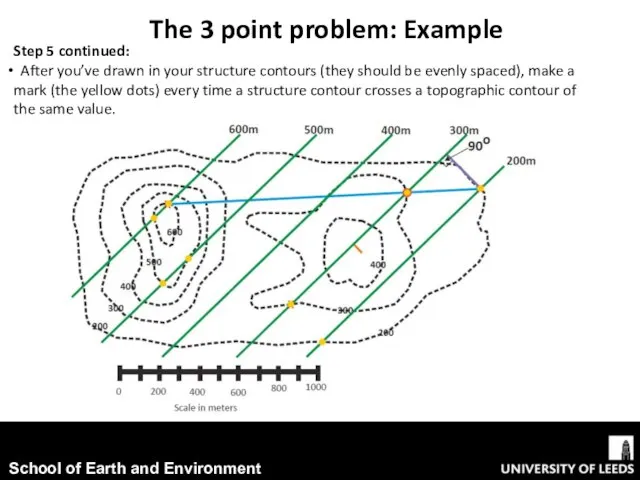
Step 5 continued:
After you’ve drawn in
The 3 point problem: Example
Step 5 continued:
After you’ve drawn in
The 3 point problem: Example
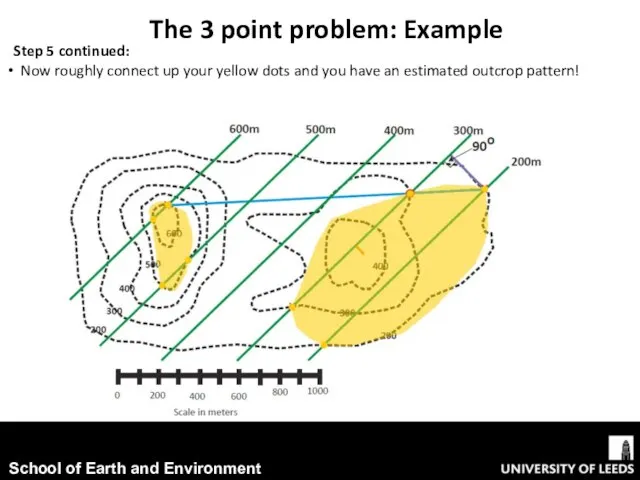
Step 5 continued:
Now roughly connect up
The 3 point problem: Example
Step 5 continued:
Now roughly connect up

The 3 point problem: Problem
Now have a go at the
The 3 point problem: Problem
Now have a go at the
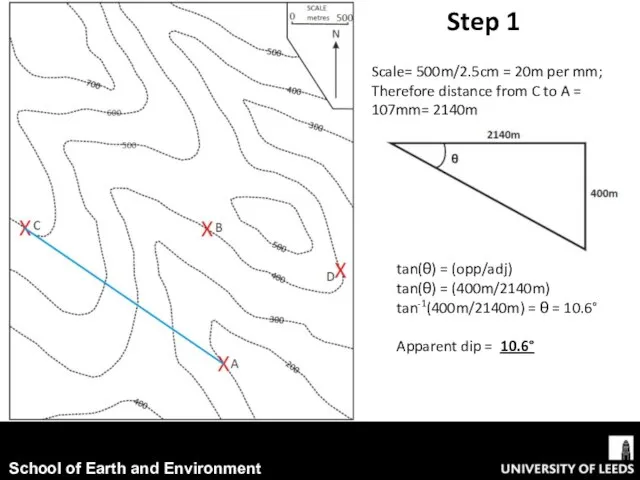
Scale= 500m/2.5cm = 20m per mm; Therefore distance from C to
Scale= 500m/2.5cm = 20m per mm; Therefore distance from C to
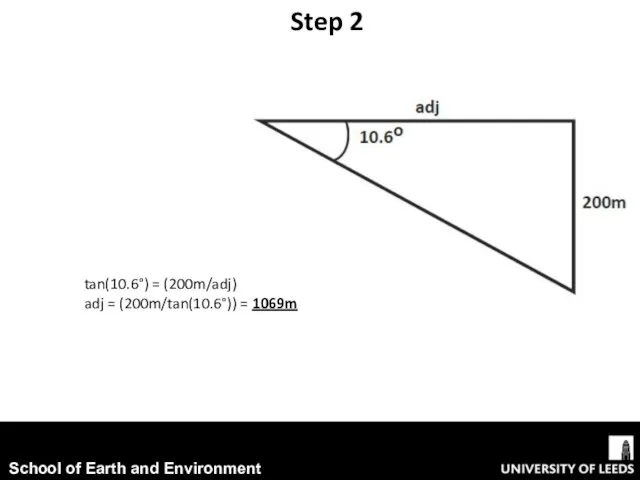
Step 2
tan(10.6°) = (200m/adj)
adj = (200m/tan(10.6°)) = 1069m
Step 2
tan(10.6°) = (200m/adj)
adj = (200m/tan(10.6°)) = 1069m
Step 3
Step 4
Step 3
Step 4
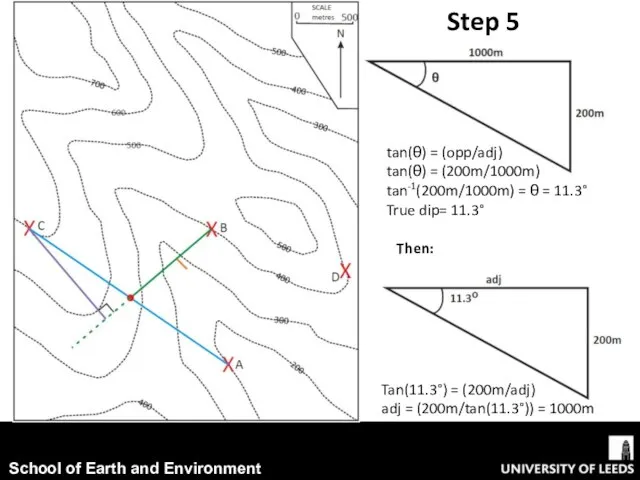
Step 5
tan(θ) = (opp/adj)
tan(θ) = (200m/1000m)
tan-1(200m/1000m) = θ = 11.3°
True
Step 5
tan(θ) = (opp/adj)
tan(θ) = (200m/1000m)
tan-1(200m/1000m) = θ = 11.3°
True
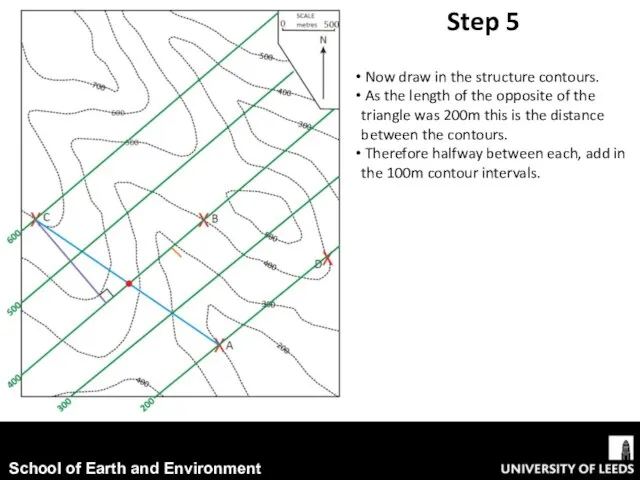
Step 5
Now draw in the structure contours.
As the length
Step 5
Now draw in the structure contours.
As the length
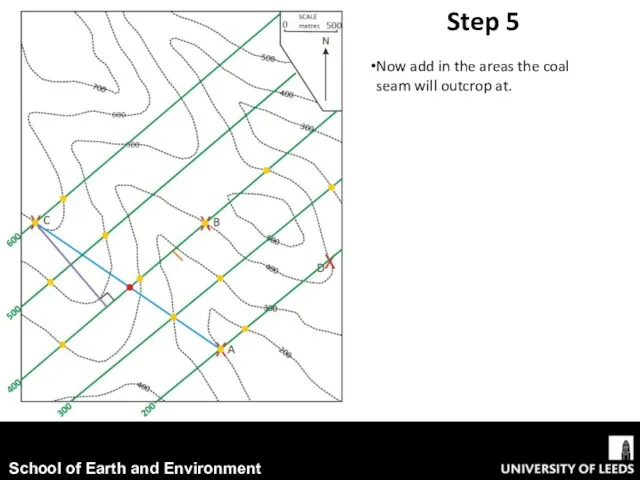
Step 5
Now add in the areas the coal
seam will outcrop
Step 5
Now add in the areas the coal
seam will outcrop
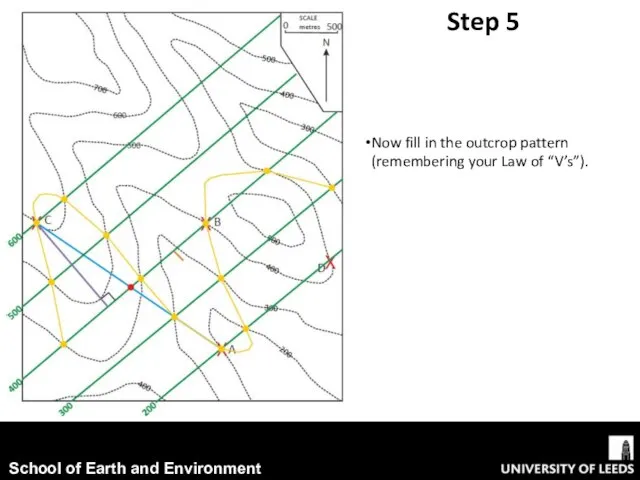
Step 5
Now fill in the outcrop pattern
(remembering your Law of
Step 5
Now fill in the outcrop pattern
(remembering your Law of
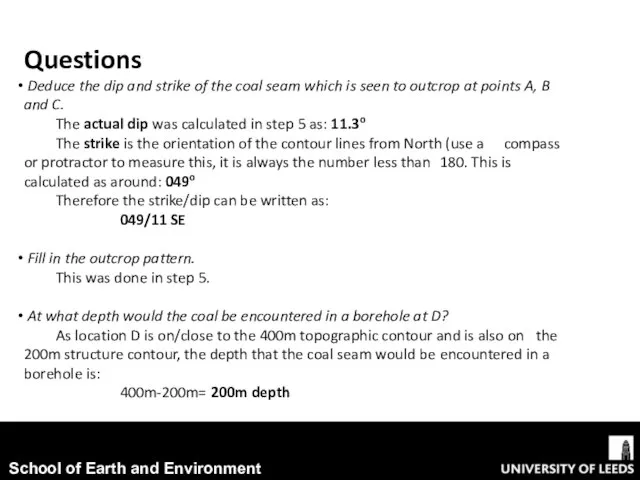
Questions
Deduce the dip and strike of the coal seam which
Questions
Deduce the dip and strike of the coal seam which
Summary
We have now worked through how to find the direction
Summary
We have now worked through how to find the direction
 Зорина Индия
 20120421_dose_chichikova
 Виды привода механизмов СН электростанций. Их области применения. (Лекция 2)
 Beydzh_2016
 Организация и планирование производства
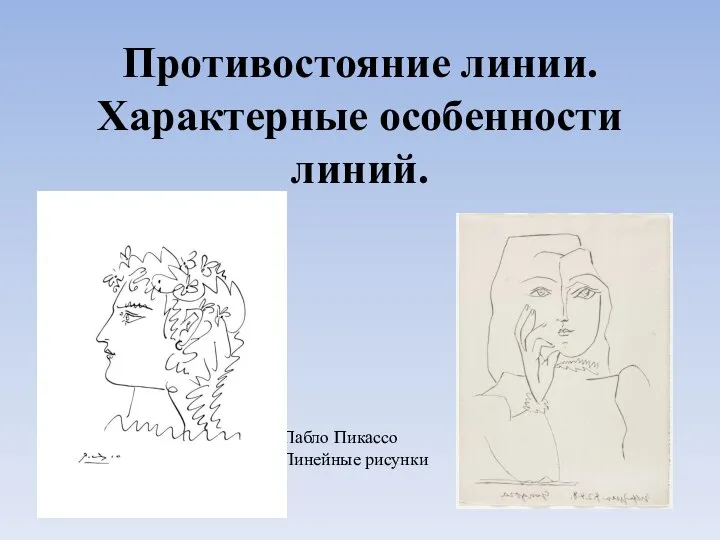 Противостояние линии. Характерные особенности линий
 Перенос электродного металла
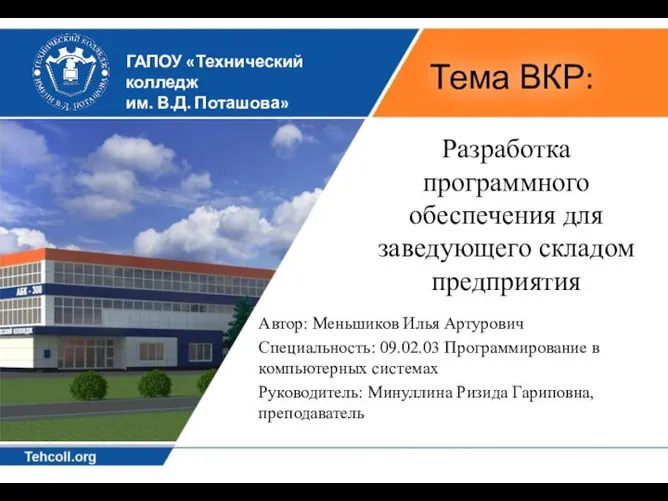 Разработка программного обеспечения для заведующего складом предприятия
 Основные показатели надежности систем внутридомового электроснабжения. Тема 1
 Training for hoisting & handling equipments
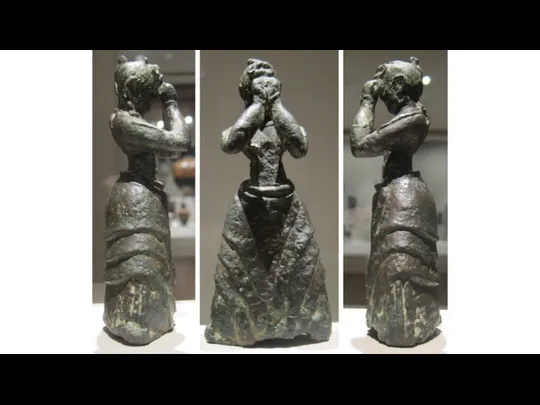 Бронзовый век изделия
 Виды грунтовок
 С Днём рождения, РДШ!!!
 Архитектура уникальных зданий
 20170811_igra_7-8_kl_umniki_i_umnitsy
 Mariana Ro
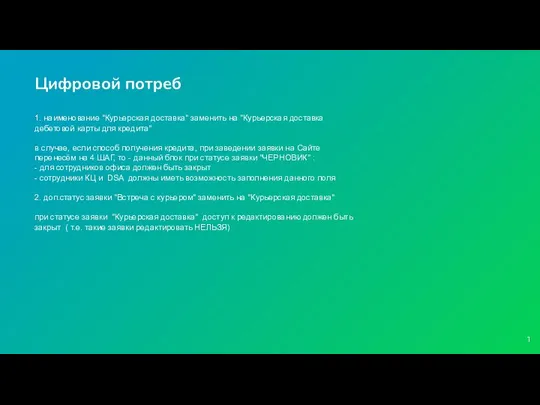 08.09 Цифровой потреб
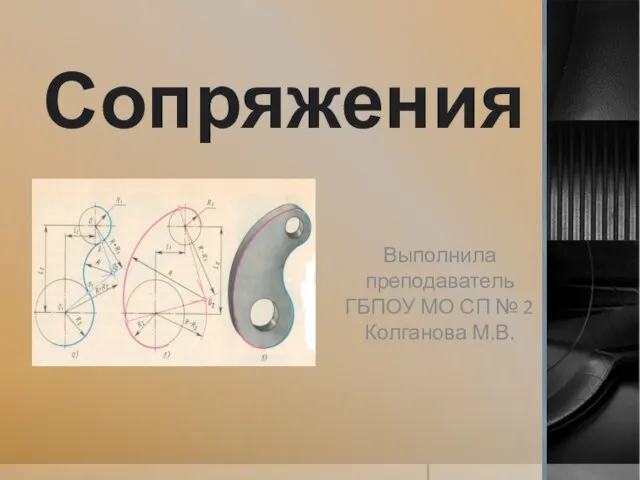 сопряжения
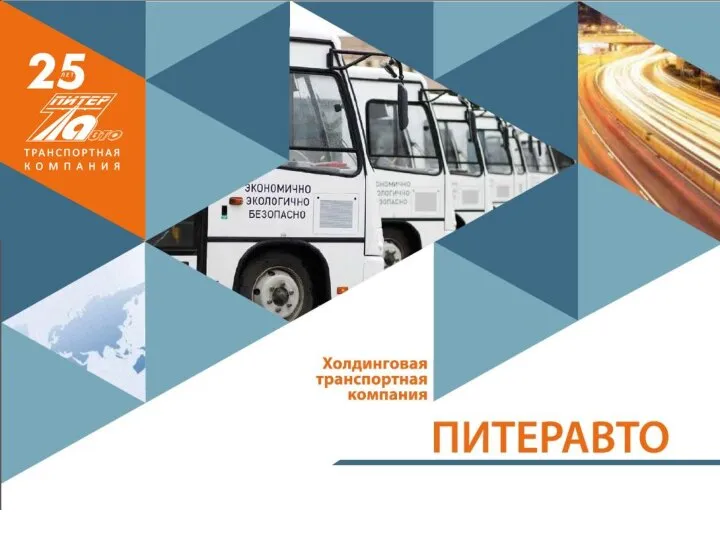 Информация по вакансии. ПитерАвто
 Экстремизму и терроризму нет - НЕТ!
 Общие положения по организации связи в СВ. Безопасность связи в условиях информационной войны. (Тема 1.10)
 רוצה +שם פועל
 Понятие об обработке металлов резанием
 Человек и его украшения
 Новая жизнь старых вещей
 Устройство оснований и полов. (Тема 7)
 Финансовый консультант
 С юбилеем тебя, Юлай! Фотоальбом