- Basic of Digital Audio

Содержание
- 2. 2- Basic of Sound 2.1 Basic of Digital Audio Sound: a travelling wave that is an
- 3. How sound waves interact When two or more sound waves meet, they add to and subtract
- 4. 2- Speech Signal Frequency:300Hz-3kHz Sound Frequency
- 5. Audio signals Analog Signal: an electrical representation of sound originated by microphone, tape head. Loudspeakers or
- 6. Lifecycle of sound in Multimedia System
- 7. Procedure of audio digitalization conversion to a stream of numbers, and preferably these numbers should be
- 8. Procedure of audio digitalization Illustration Sampling means dividing continuous time into discrete time Quantization means measuring
- 9. Understanding sample rate Sample rate indicates the number of digital snapshots taken of an audio signal
- 10. 2- To reproduce a given frequency, the sample rate must be at least twice that frequency.
- 11. Understanding bit depth When a sound wave is sampled, each sample is assigned the amplitude value
- 12. dB(Decibel) dB is commonly used in acoustics as a unit of sound volume. 0dB is the
- 13. dBFS(dB relative to full scale) dBFS(dB relative to full scale) is a unit of measurement for
- 14. 2- Data Size =Sample Rate×Bit Size×#Channel/8(Byte/s) Affects of Data Size
- 15. 2- An audio file format is a file format for storing digital audio data on a
- 16. 2- The bit layout of the audio data (excluding metadata) is called the audio coding format
- 17. 2- *.WAV Standard audio file container format used mainly in Windows PCs. Commonly used for storing
- 18. DRM Dataflow Diagram
- 19. 2- Audio Acquisition i) Sound Recorder Software(eg. Sound Recorder in Win 7) ii) Recording Studio iii)
- 20. 2- 2.5 Digital Audio Compression Standards Introduction to Digital Audio Compression Compression Encoding: the process of
- 21. 2- Lossless Compression less space without losing any information. compression ratio of about 2:1 Lossy Compression
- 22. 2- Audio Compression Standards
- 23. 2- Comparison between common audio formats
- 24. 2- 1993, MPEG-1 Audio Layer III a digital audio coding format which uses a form of
- 25. 2- 2.6 Sound Card and Electroacoustic Equipment Sound Card An internal expansion card that facilitates input
- 26. 2- Integrated sound hardware on PC motherboards In the late 1990s many computer manufacturers began to
- 27. 2- Architecture of Sound Card Mixer receives inputs from both external connectors and D/A. It selects
- 28. 2- Audio Codec A single chip in soundcard encodes analog audio as digital signals and decodes
- 29. 2- Device Driver A low-level program that controls a device attached to a computer. Provides a
- 30. 2- General Characteristics It can be used in multimedia applications such as music composition, audio editing,
- 31. 2- Example Enjoy multi-channel cinematic sound Many sound cards come with 5.1 channel outputs so you
- 32. 2- Example Independent input sources Many sound cards come with independent line-in and microphone connectors, which
- 33. 2- Example Control and customize your audio Many sound cards come with audio processing software, which
- 34. 2- Audio Performance Sample Rate: 11.025 kHz (Speech) 22.05 kHz (Music) 44.1 kHz (Hi-Fi) Bit Size:
- 35. 2- Connectivity Input:line in jack, microphone in jack Output: headphone, mono, 2 channels(Stereo)、2.1/4.1/5.1 Channels (Surround) Quality
- 36. 2- Processor CODEC (Dependent of CPU, Cheap) DSP(Independent of CPU) Quality Parameters
- 37. 2- What is MIDI? MIDI (Musical Instrument Digital Interface): a technology to synthesize music using electronic
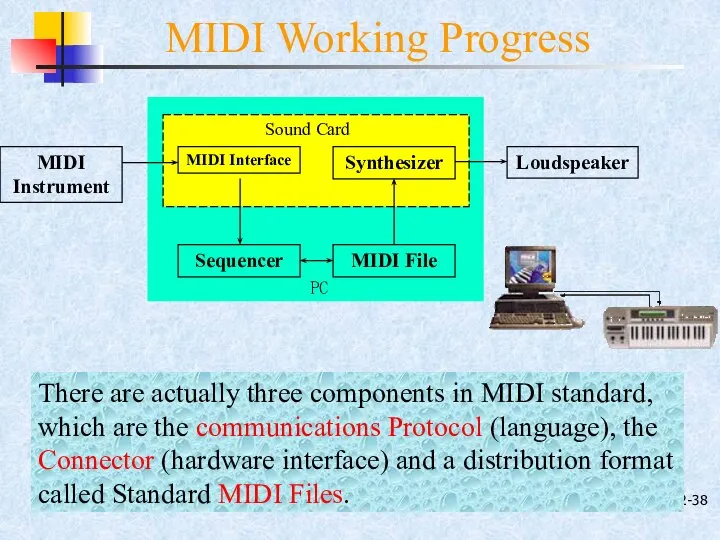
- 38. 2- There are actually three components in MIDI standard, which are the communications Protocol (language), the
- 39. 2- The MIDI protocol is an entire music description language in binary form like CPU machine
- 40. 2- MIDI connector is a 5-pin DIN connector used to send MIDI messages . A single
- 41. 2- When MIDI messages are stored on disks, they are commonly saved in the Standard MIDI
- 42. 2- Sequencer is the key component for MIDI music creation. A MIDI Sequencer (or simply sequencer)
- 43. 2- Example Drum sample 1 Drum sample 2 Bass sample 1 Bass sample 2 A combination
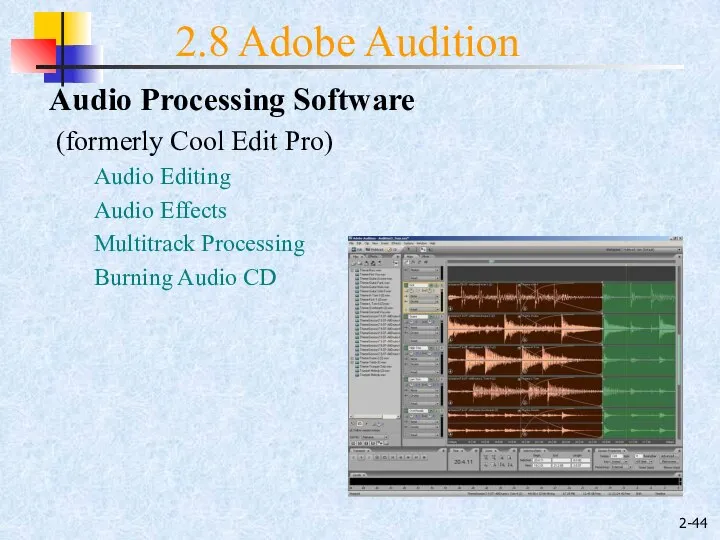
- 44. 2- Audio Processing Software (formerly Cool Edit Pro) Audio Editing Audio Effects Multitrack Processing Burning Audio
- 45. History 1990s, Syntrillium Software, Cool Edit, 2003, Adobe purchased Cool Edit Pro, Adobe Audition 1 2006,
- 46. Creative Cloud With the introduction of Creative Cloud branding, Adobe's licensing scheme was changed to that
- 47. Download and install apps Sync files and folders Add fonts Search for assets on Creative Cloud
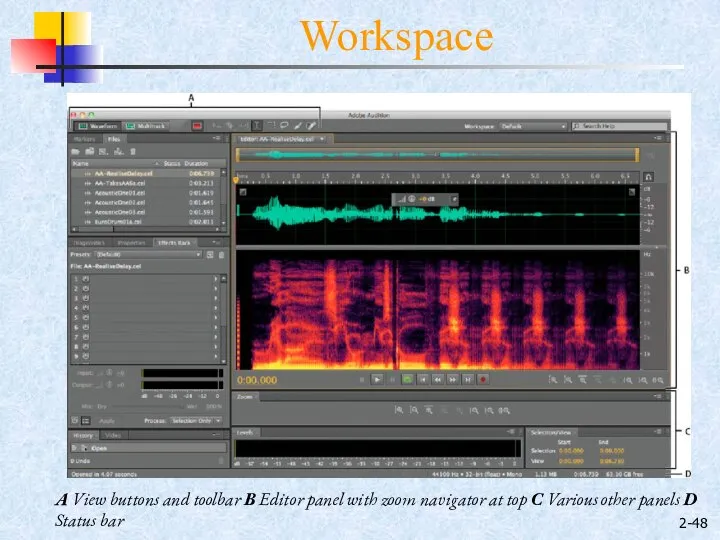
- 48. 2- Workspace A View buttons and toolbar B Editor panel with zoom navigator at top C
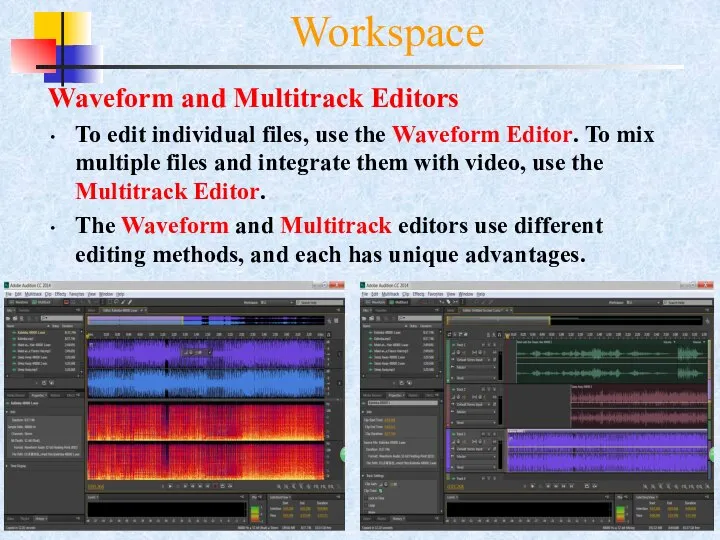
- 49. 2- Waveform and Multitrack Editors To edit individual files, use the Waveform Editor. To mix multiple
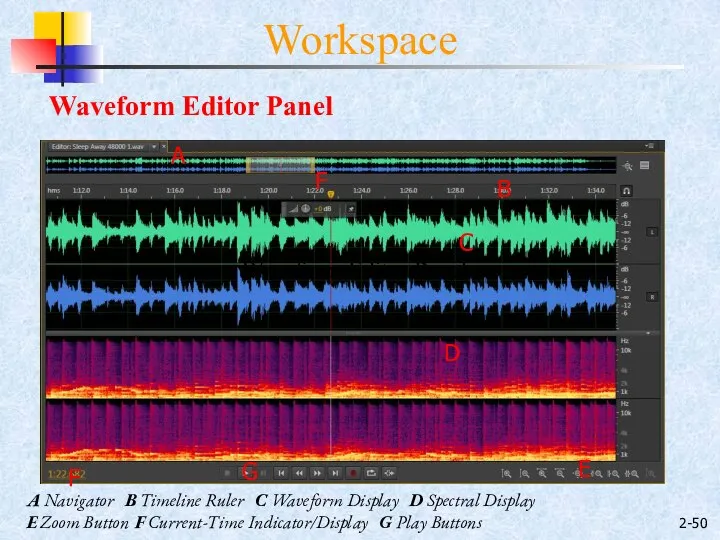
- 50. 2- Workspace A Navigator B Timeline Ruler C Waveform Display D Spectral Display E Zoom Button
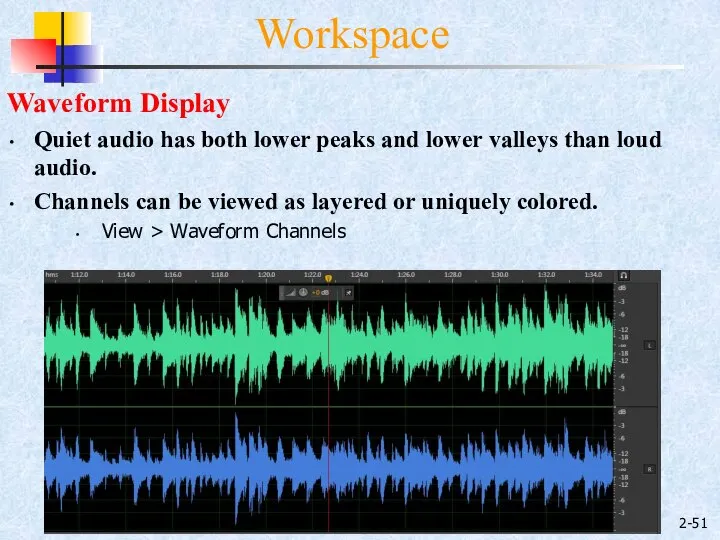
- 51. 2- Waveform Display Quiet audio has both lower peaks and lower valleys than loud audio. Channels
- 52. Spectral Display This view lets you analyze audio data to see which frequencies are most prevalent.
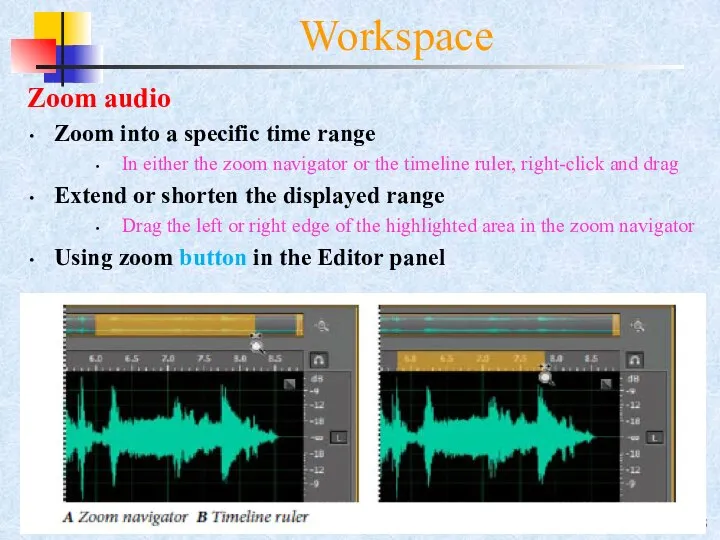
- 53. 2- Zoom audio Zoom into a specific time range In either the zoom navigator or the
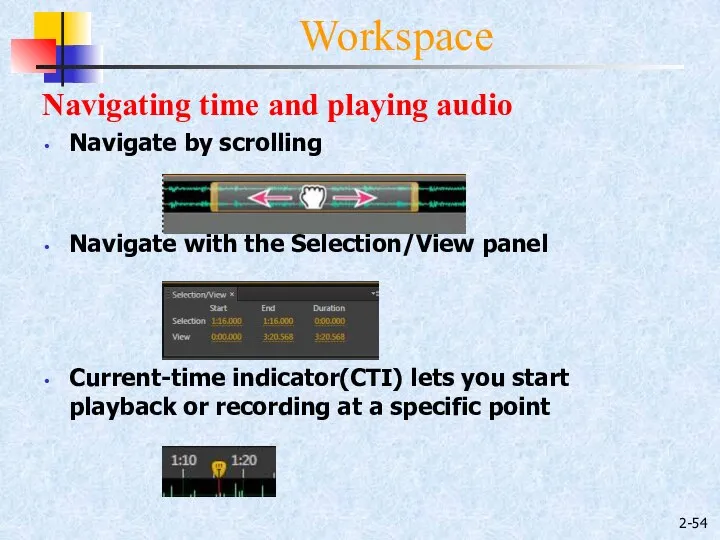
- 54. 2- Workspace Navigating time and playing audio Navigate by scrolling Navigate with the Selection/View panel Current-time
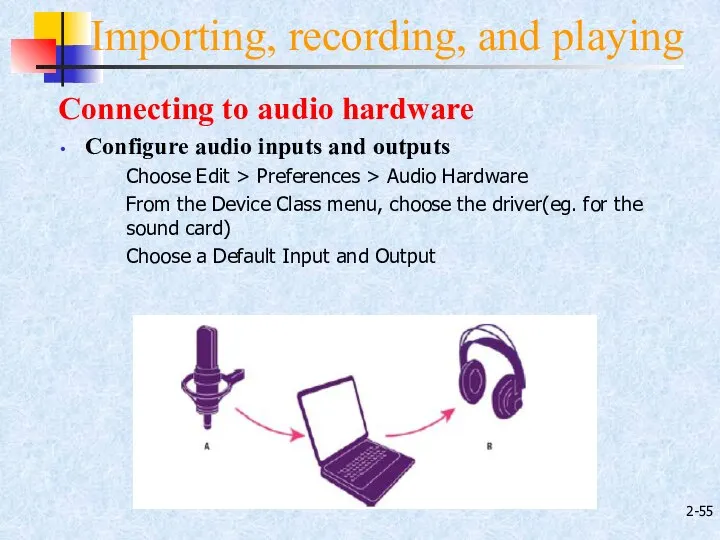
- 55. 2- Importing, recording, and playing Connecting to audio hardware Configure audio inputs and outputs Choose Edit
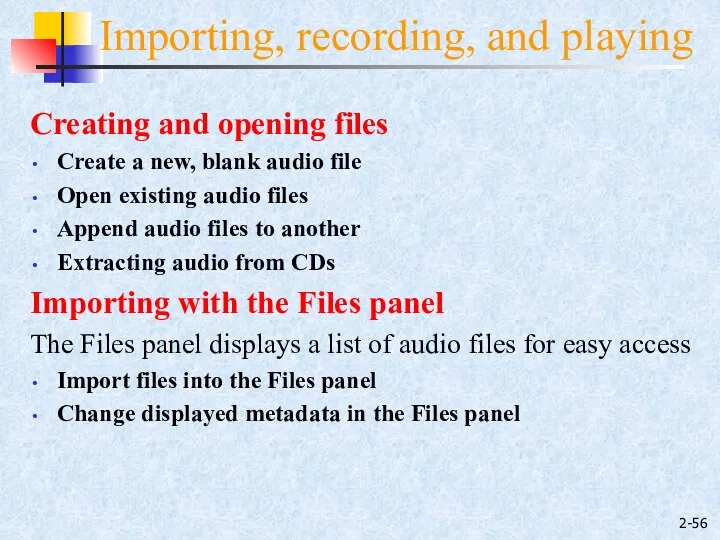
- 56. 2- Importing, recording, and playing Creating and opening files Create a new, blank audio file Open
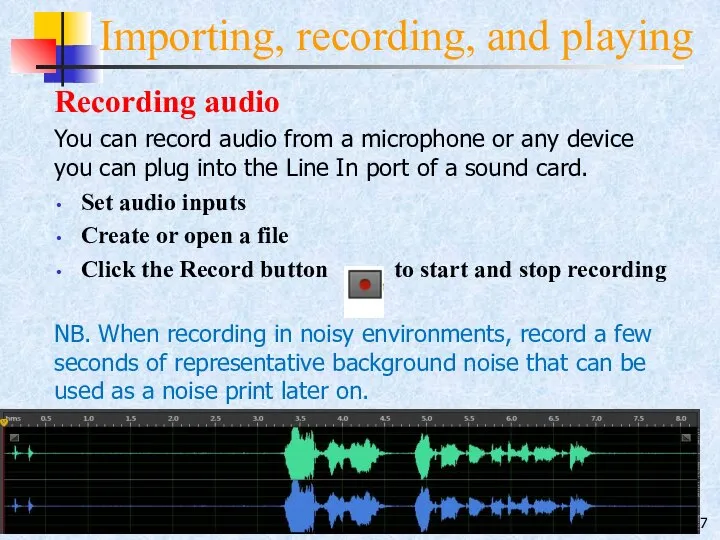
- 57. 2- Importing, recording, and playing Recording audio You can record audio from a microphone or any
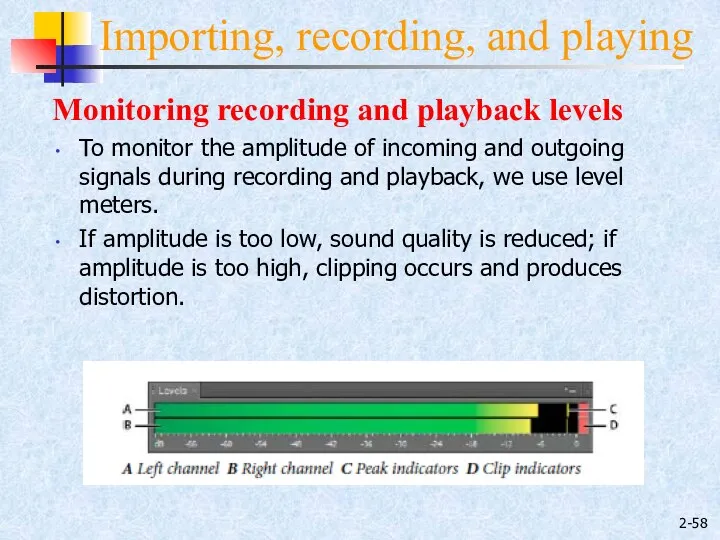
- 58. 2- Importing, recording, and playing Monitoring recording and playback levels To monitor the amplitude of incoming
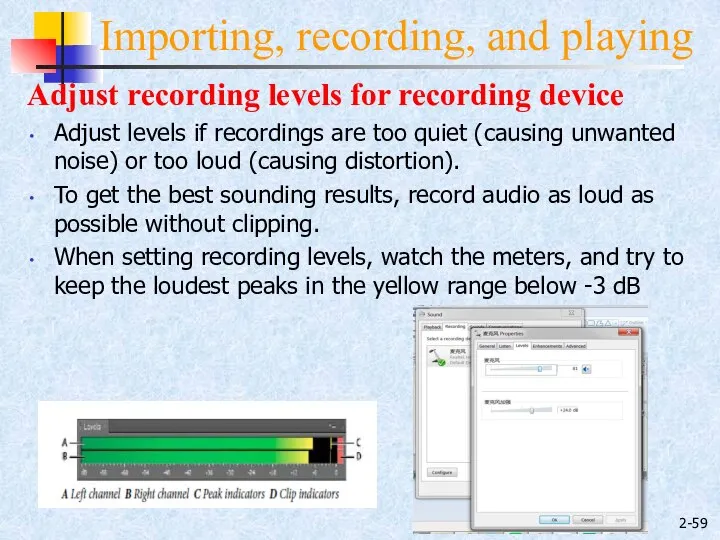
- 59. 2- Importing, recording, and playing Adjust recording levels for recording device Adjust levels if recordings are
- 60. Editing Audio Selecting audio for playing, copying, cutting, (mix)pasting, and deleting Select time ranges using Time
- 61. Editing Audio Remove artifacts automatically For the quickest repair of small, individual audio artifacts like isolated
- 62. Editing Audio Adjust amplitude using amplitude control By default, the visual amplitude control appears in a
- 63. Editing Audio History Panel The History panel lets you instantly revert back to any previous change.
- 64. Editing Audio EDIT>Converting sample types Convert the sample rate of a file Convert a waveform between
- 65. Exercise1 of Edit Audio Steps Open ex1File1 and ex1File2 Find and Copy “did” in ex1File2 Paste
- 66. Editing Audio Working with markers using mark panel Markers (sometimes called cues) are locations that you
- 67. Editing Audio Playlists A playlist is an arrangement of marker ranges that you can play back
- 68. Applying Effects Apply individual effects From any submenu in the Effects menu, choose an effect. Click
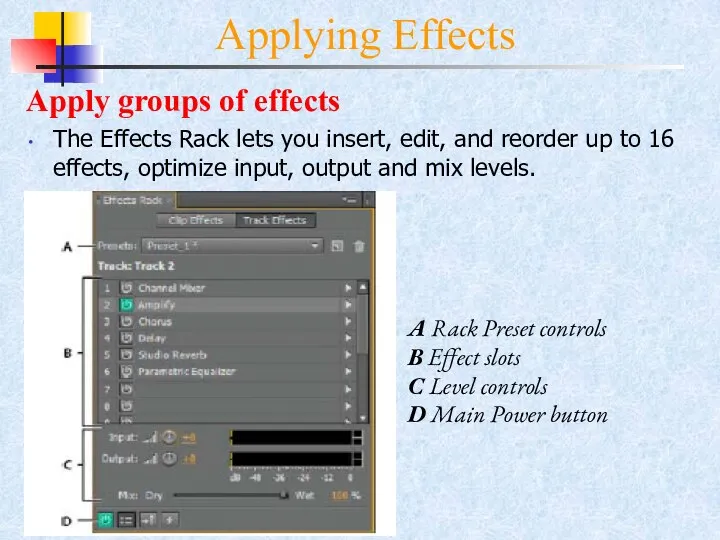
- 69. Applying Effects Apply groups of effects The Effects Rack lets you insert, edit, and reorder up
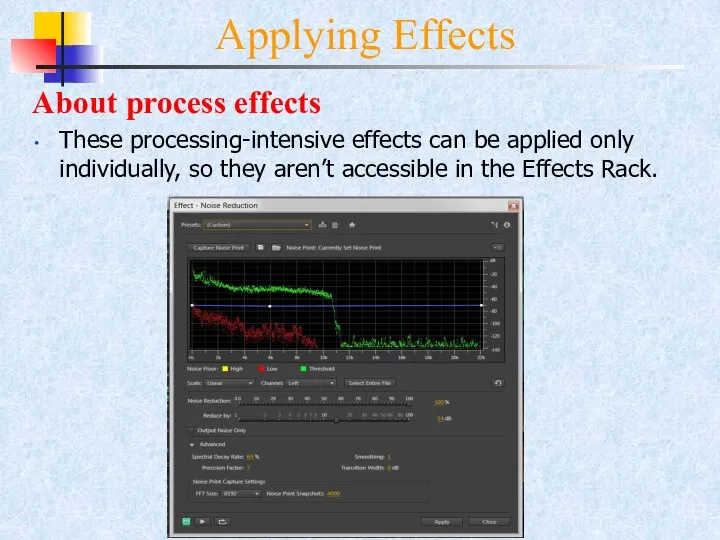
- 70. Applying Effects About process effects These processing-intensive effects can be applied only individually, so they aren’t
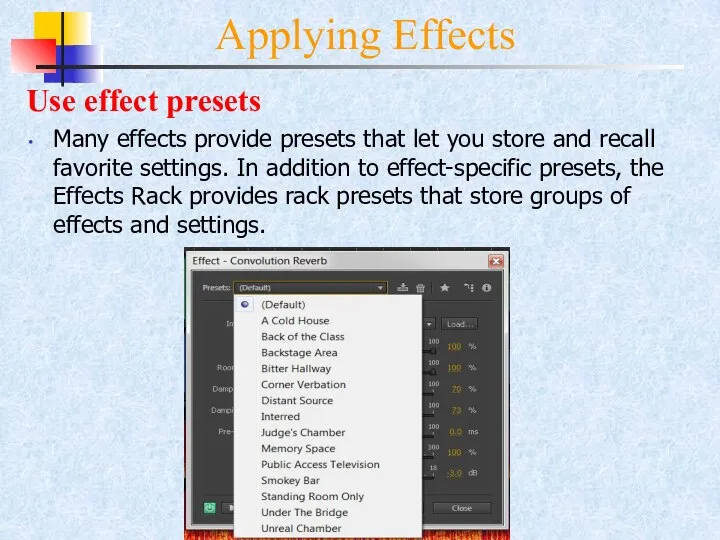
- 71. Applying Effects Use effect presets Many effects provide presets that let you store and recall favorite
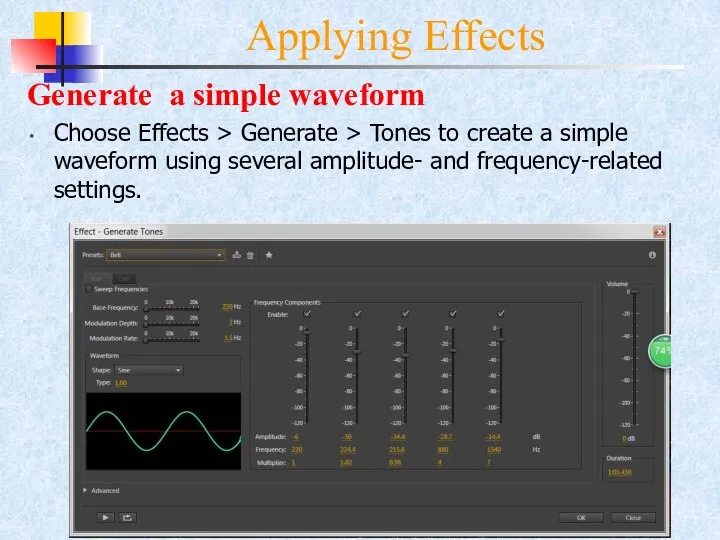
- 72. Applying Effects Generate a simple waveform Choose Effects > Generate > Tones to create a simple
- 73. Applying Effects Generate Noise Generating noise is useful for creating soothing sounds like waterfalls and for
- 74. Applying Effects Reverb effects In a room, sound bounces off the walls, ceiling, and floor on
- 75. Applying Effects Background Noise Reduction The Noise Reduction effect dramatically reduces background and broadband noise with
- 76. Exercise3 of Noise Reduction Steps Create audio file Record “I finished my work on Monday” Mix
- 77. 2- Mixing multitrack sessions The Multitrack Editor can mix together multiple audio tracks to create layered
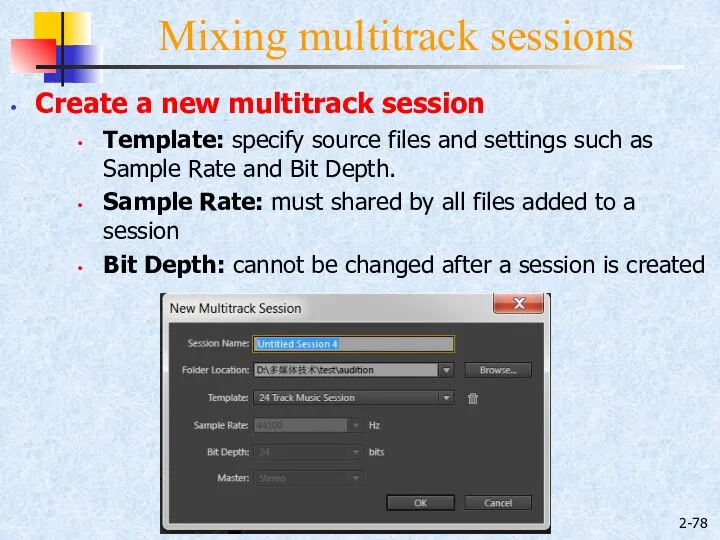
- 78. 2- Mixing multitrack sessions Create a new multitrack session Template: specify source files and settings such
- 79. 2- Mixing multitrack sessions Insert an audio file into a track Place CTI at the desired
- 80. 2- Mixing multitrack sessions Session (*.sesx) files Adobe Audition save multitrack sessions in session (.sesx) files
- 81. 2- Mixing multitrack sessions A Track controls B Zoom navigator C Vertical scroll bar D Track
- 82. 2- Mixing multitrack sessions Arranging and editing tracks Add or delete tracks Name tracks Move tracks
- 83. 2- Mixing multitrack sessions Editing multitrack clips Move a clip Copy a clip Remove a selected
- 84. 2- Mixing multitrack sessions Export multitrack mixdown files After you finish mixing a session, you can
- 85. Exercise 4 of Sound Remove Steps Mix cough with music in multitrack Remove cough using Sound
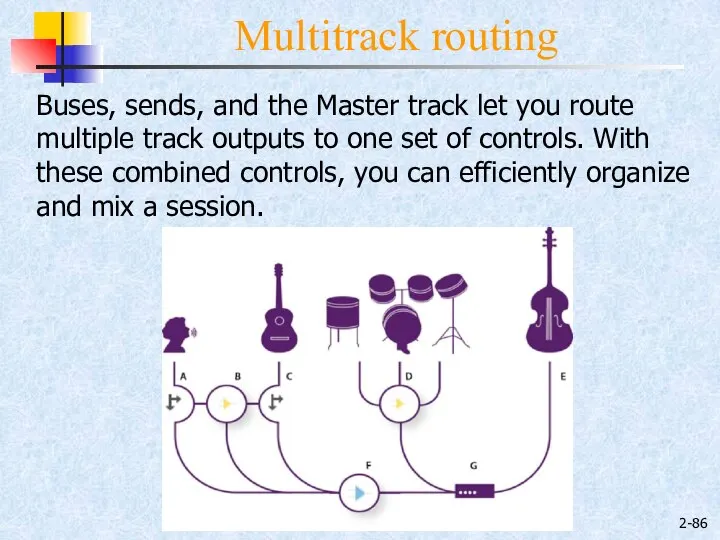
- 86. 2- Multitrack routing Buses, sends, and the Master track let you route multiple track outputs to
- 87. 2- Mixing multitrack sessions Audio tracks Audio tracks contain either imported audio or clips recorded in
- 88. 2- Mixing multitrack sessions Assign audio inputs and outputs to tracks In the Inputs/Outputs area of
- 89. 2- Mixing multitrack sessions Bus tracks With bus tracks, you can combine the outputs of several
- 90. 2- Mixing multitrack sessions Sends Sends let you route audio from a track to multiple buses,
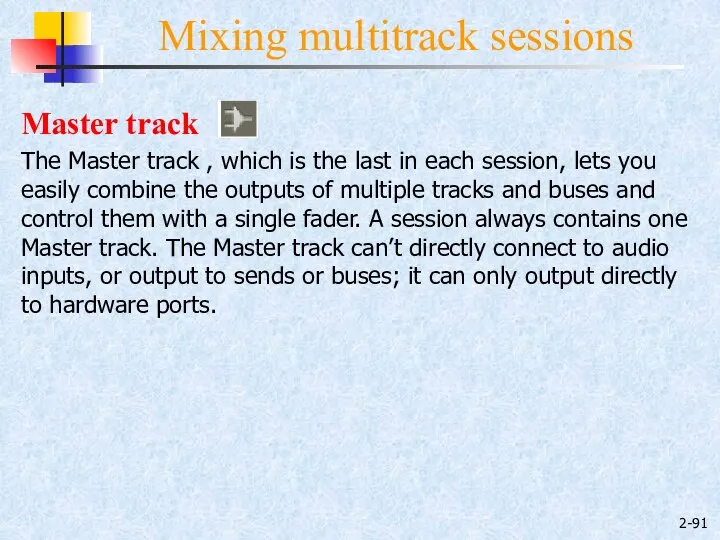
- 91. 2- Mixing multitrack sessions Master track The Master track , which is the last in each
- 92. Exercise 5 of Multitrack routing Ex4.mp3 Clip1 Clip2 Clip3 Clip4 Bus A Master Bus B reverb
- 94. Скачать презентацию
2-
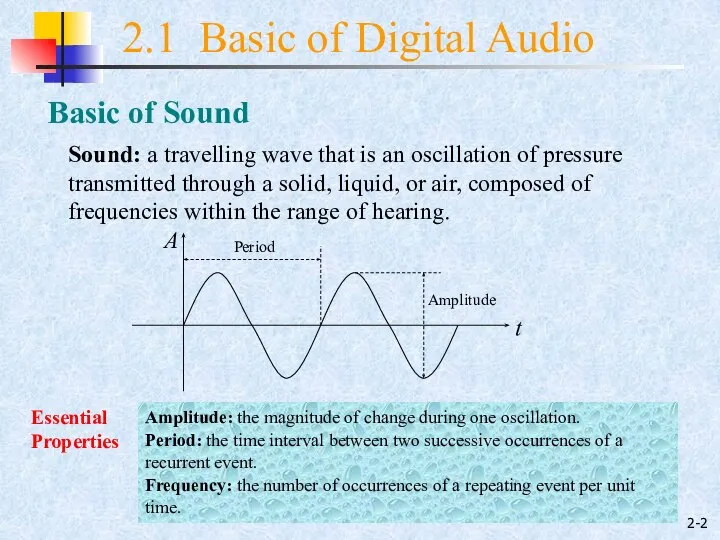
Basic of Sound
2.1 Basic of Digital Audio
Sound: a travelling wave that
2-
Basic of Sound
2.1 Basic of Digital Audio
Sound: a travelling wave that
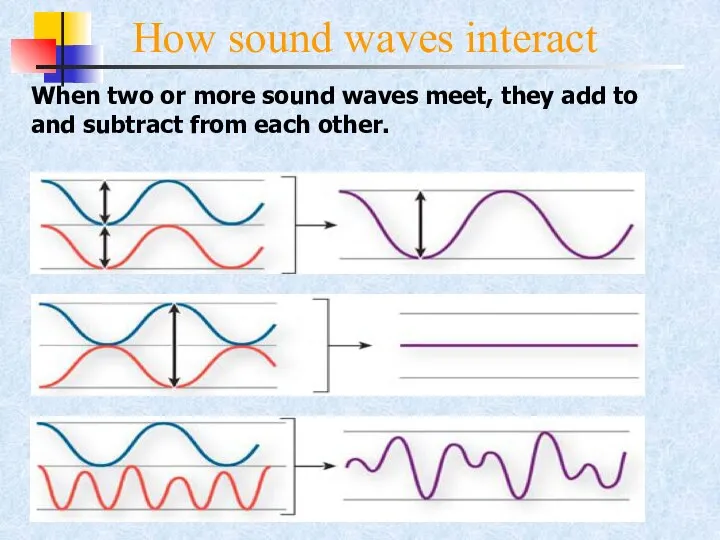
How sound waves interact
When two or more sound waves meet, they
How sound waves interact
When two or more sound waves meet, they
2-
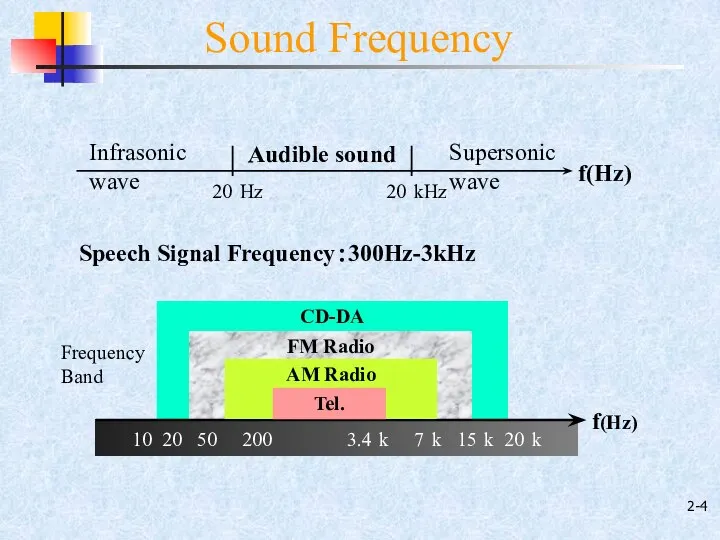
Speech Signal Frequency:300Hz-3kHz
Sound Frequency
2-
Speech Signal Frequency:300Hz-3kHz
Sound Frequency
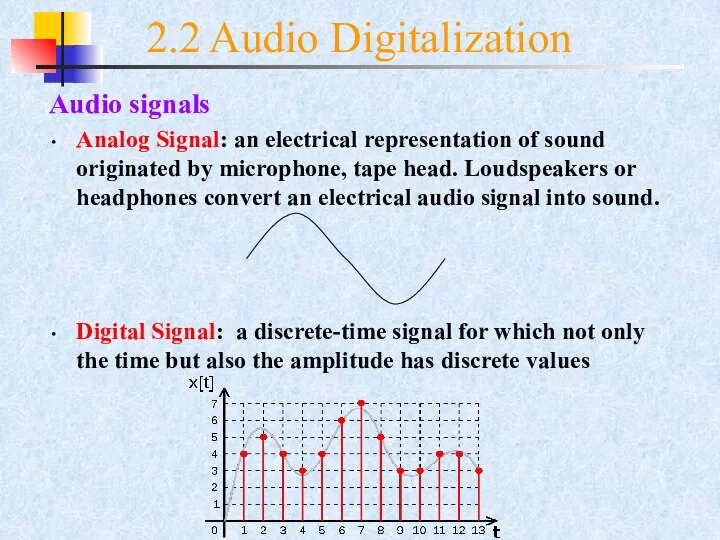
Audio signals
Analog Signal: an electrical representation of sound originated by microphone,
Audio signals
Analog Signal: an electrical representation of sound originated by microphone,
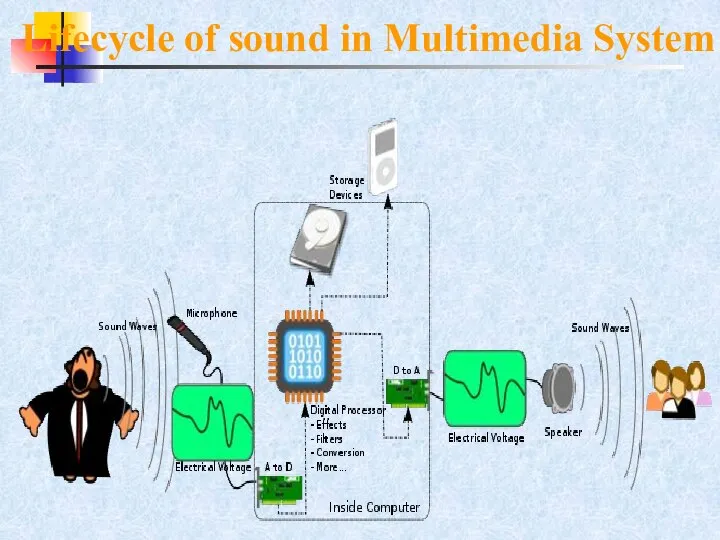
Lifecycle of sound in Multimedia System
Lifecycle of sound in Multimedia System
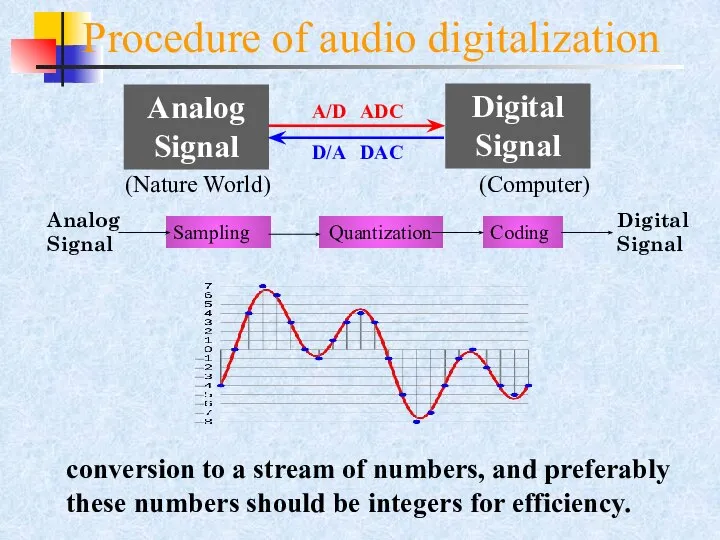
Procedure of audio digitalization
conversion to a stream of numbers, and preferably
Procedure of audio digitalization
conversion to a stream of numbers, and preferably
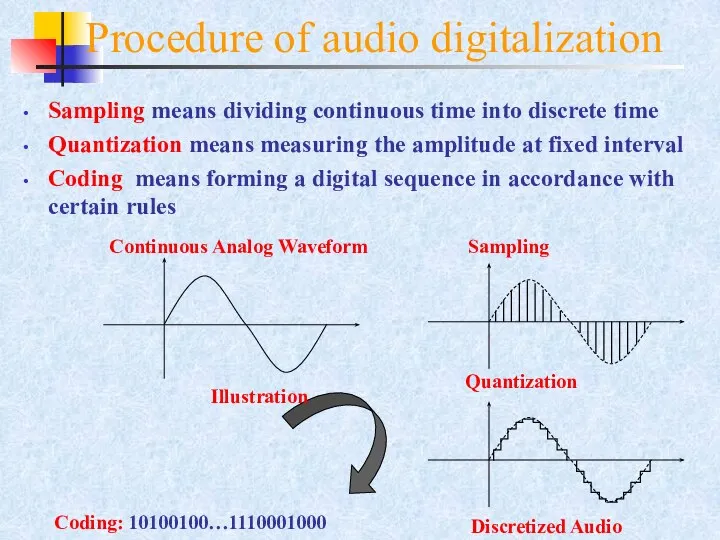
Procedure of audio digitalization
Illustration
Sampling means dividing continuous time into discrete time
Procedure of audio digitalization
Illustration
Sampling means dividing continuous time into discrete time
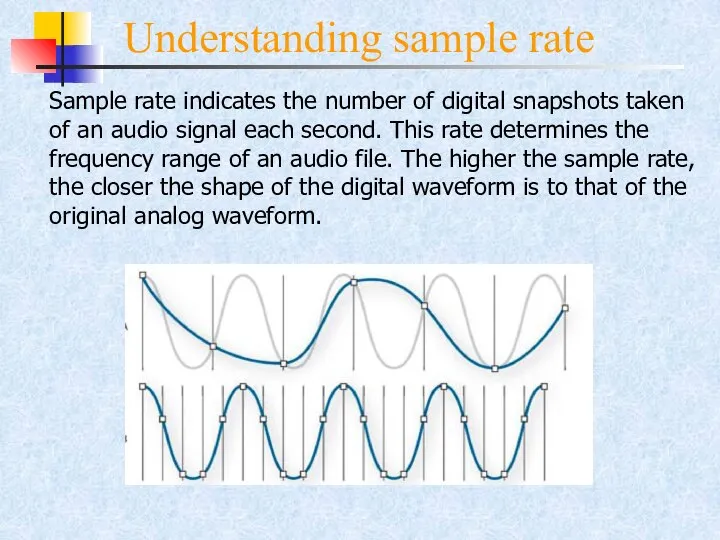
Understanding sample rate
Sample rate indicates the number of digital snapshots taken
Understanding sample rate
Sample rate indicates the number of digital snapshots taken
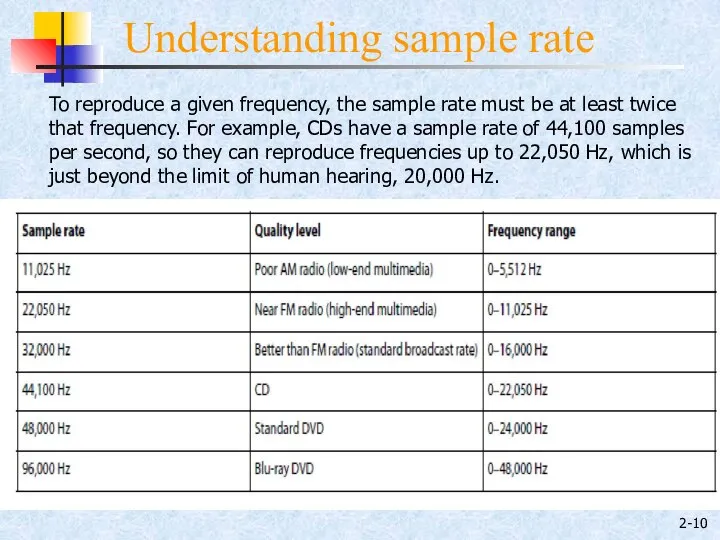
2-
To reproduce a given frequency, the sample rate must be at
2-
To reproduce a given frequency, the sample rate must be at

Understanding bit depth
When a sound wave is sampled, each sample is
Understanding bit depth
When a sound wave is sampled, each sample is

dB(Decibel)
dB is commonly used in acoustics as a unit of
dB(Decibel)
dB is commonly used in acoustics as a unit of
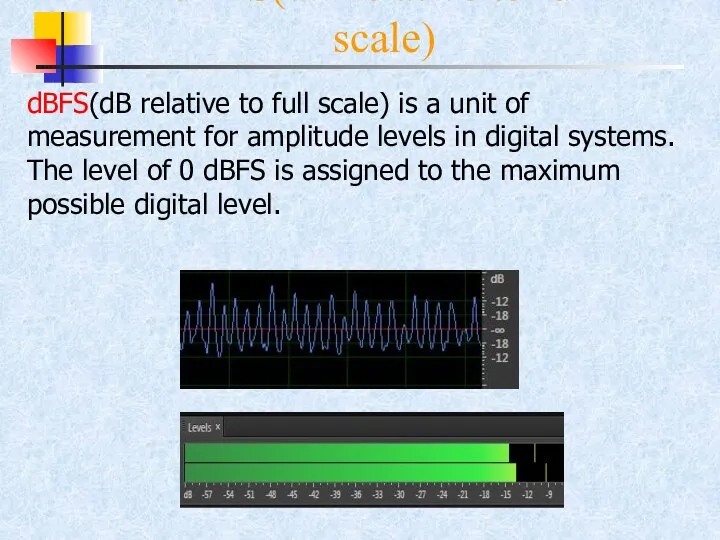
dBFS(dB relative to full scale)
dBFS(dB relative to full scale) is
dBFS(dB relative to full scale)
dBFS(dB relative to full scale) is
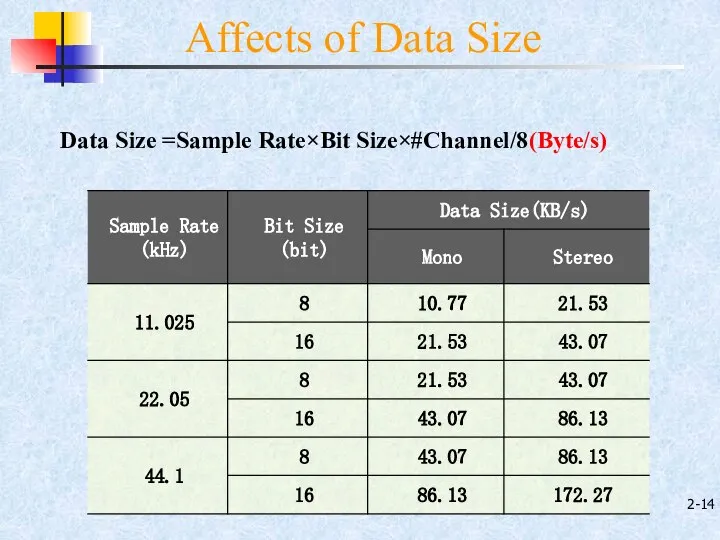
2-
Data Size =Sample Rate×Bit Size×#Channel/8(Byte/s)
Affects of Data Size
2-
Data Size =Sample Rate×Bit Size×#Channel/8(Byte/s)
Affects of Data Size
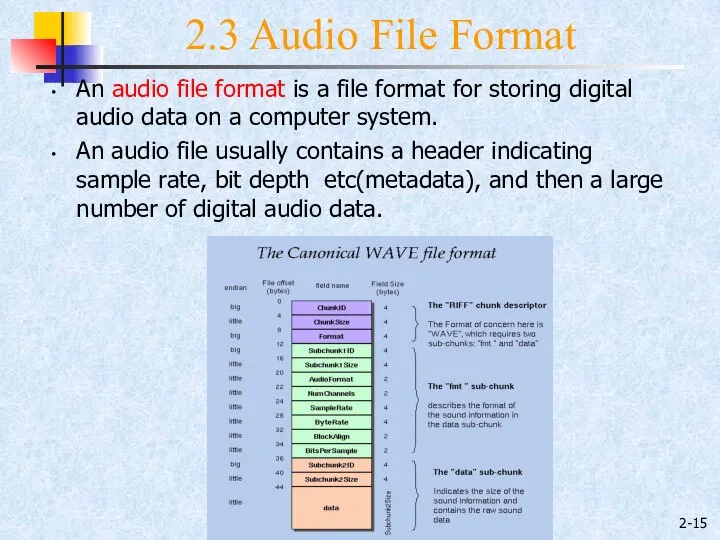
2-
An audio file format is a file format for storing digital
2-
An audio file format is a file format for storing digital
2-
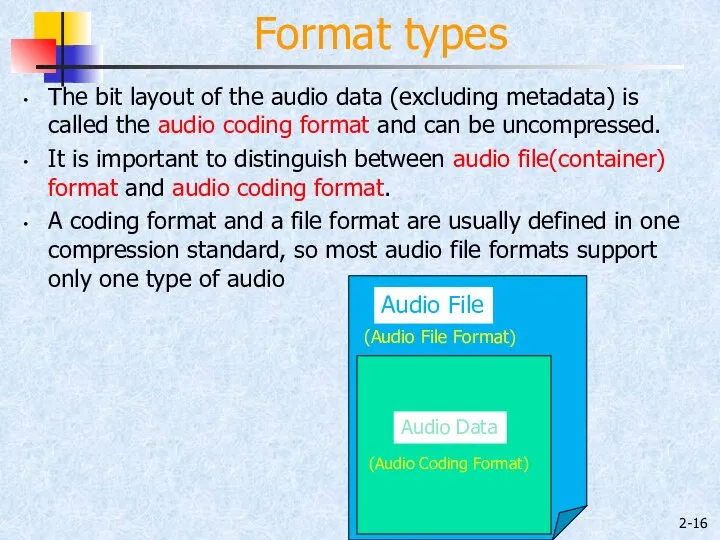
The bit layout of the audio data (excluding metadata) is called
2-
The bit layout of the audio data (excluding metadata) is called
2-
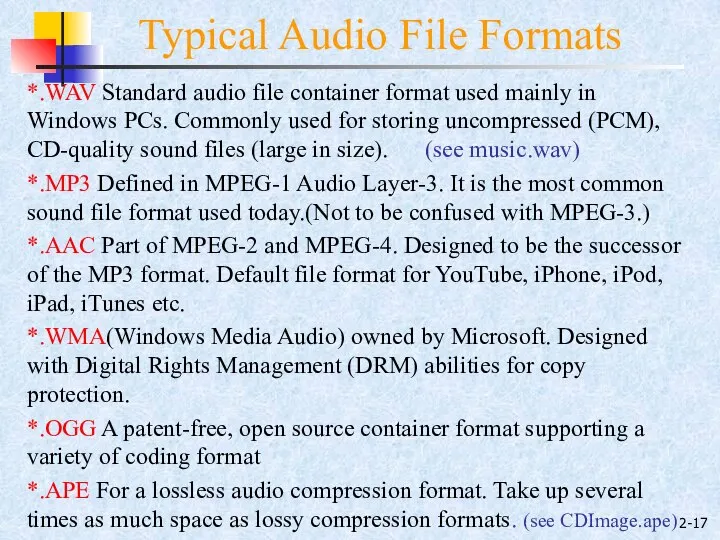
*.WAV Standard audio file container format used mainly in Windows PCs.
2-
*.WAV Standard audio file container format used mainly in Windows PCs.
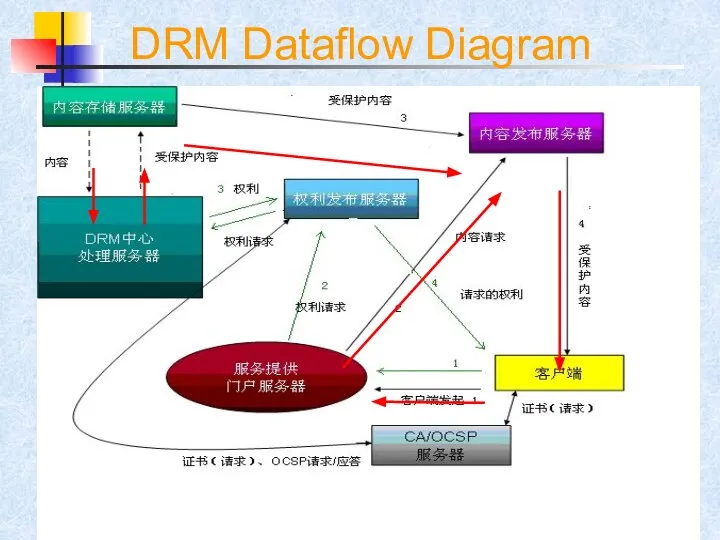
DRM Dataflow Diagram
DRM Dataflow Diagram
2-
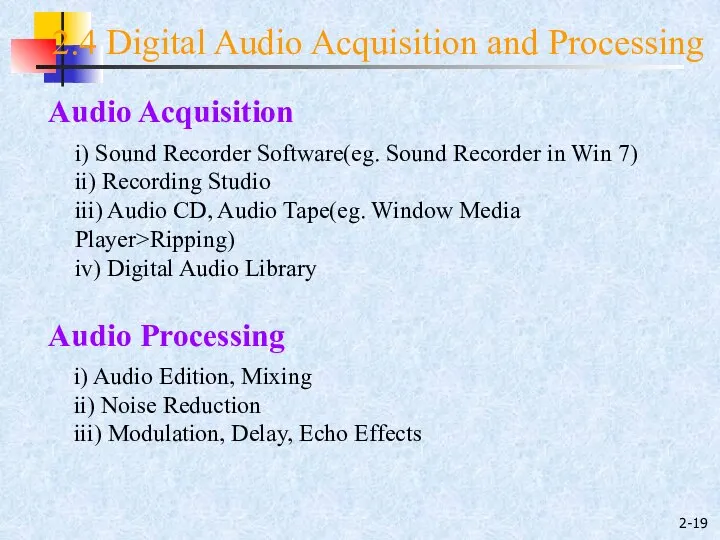
Audio Acquisition
i) Sound Recorder Software(eg. Sound Recorder in Win 7)
ii)
2-
Audio Acquisition
i) Sound Recorder Software(eg. Sound Recorder in Win 7)
ii)
2-
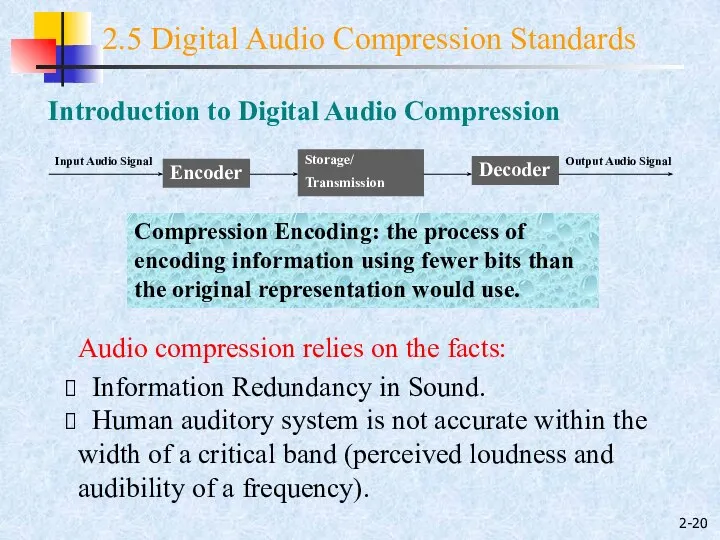
2.5 Digital Audio Compression Standards
Introduction to Digital Audio Compression
Compression Encoding: the
2-
2.5 Digital Audio Compression Standards
Introduction to Digital Audio Compression
Compression Encoding: the
2-
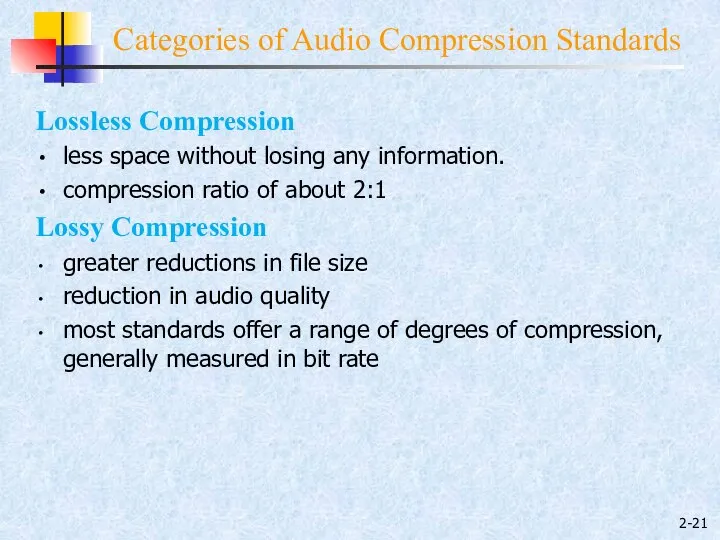
Lossless Compression
less space without losing any information.
compression ratio of about 2:1
Lossy
2-
Lossless Compression
less space without losing any information.
compression ratio of about 2:1
Lossy
2-
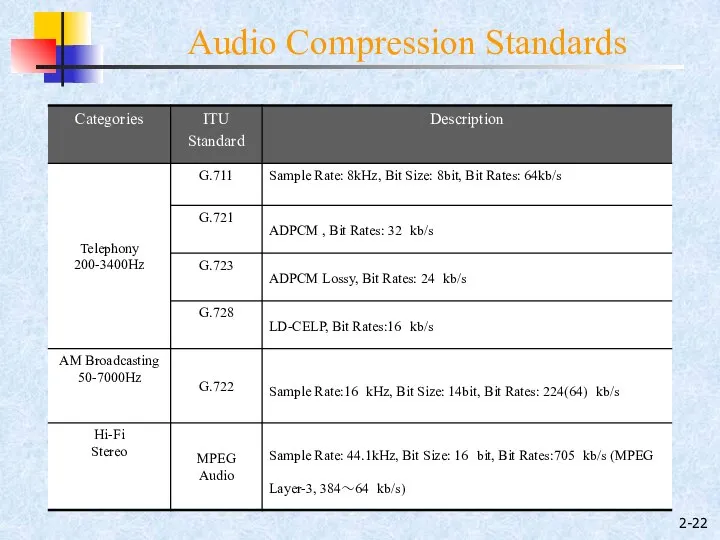
Audio Compression Standards
2-
Audio Compression Standards
2-
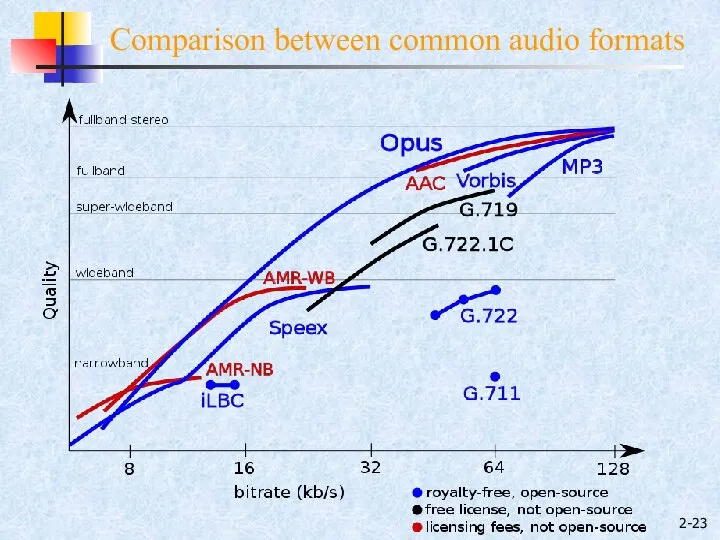
Comparison between common audio formats
2-
Comparison between common audio formats

2-
1993, MPEG-1 Audio Layer III
a digital audio coding format which uses
2-
1993, MPEG-1 Audio Layer III
a digital audio coding format which uses
2-
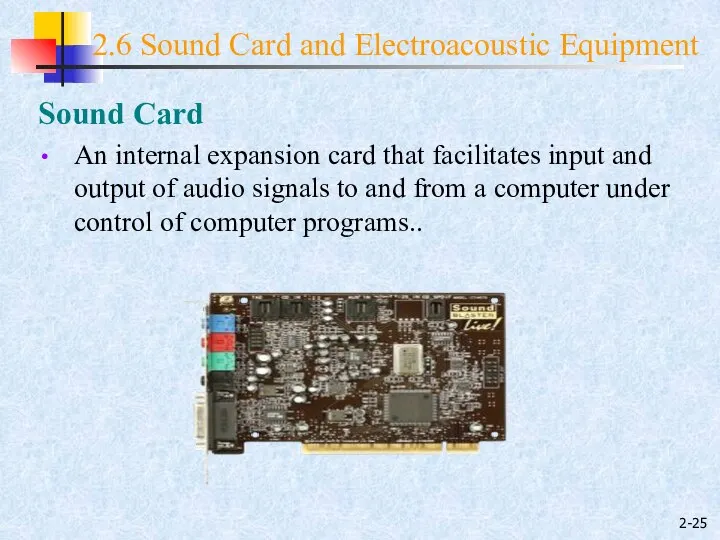
2.6 Sound Card and Electroacoustic Equipment
Sound Card
An internal expansion card that
2-
2.6 Sound Card and Electroacoustic Equipment
Sound Card
An internal expansion card that
2-
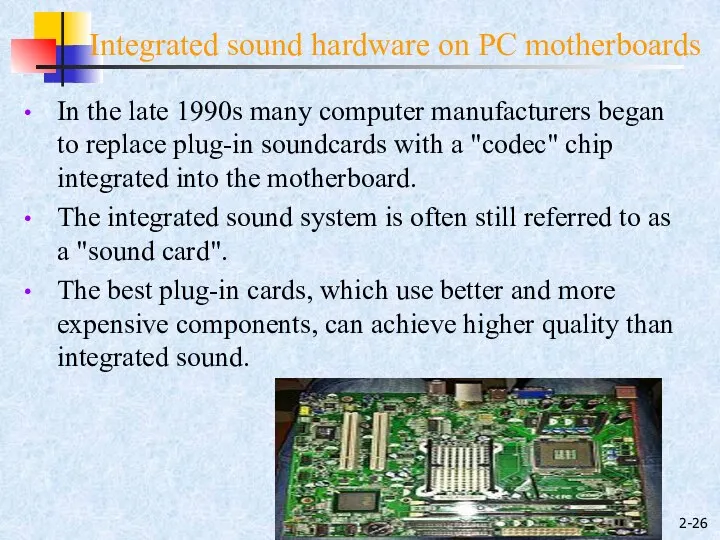
Integrated sound hardware on PC motherboards
In the late 1990s many computer
2-
Integrated sound hardware on PC motherboards
In the late 1990s many computer
2-
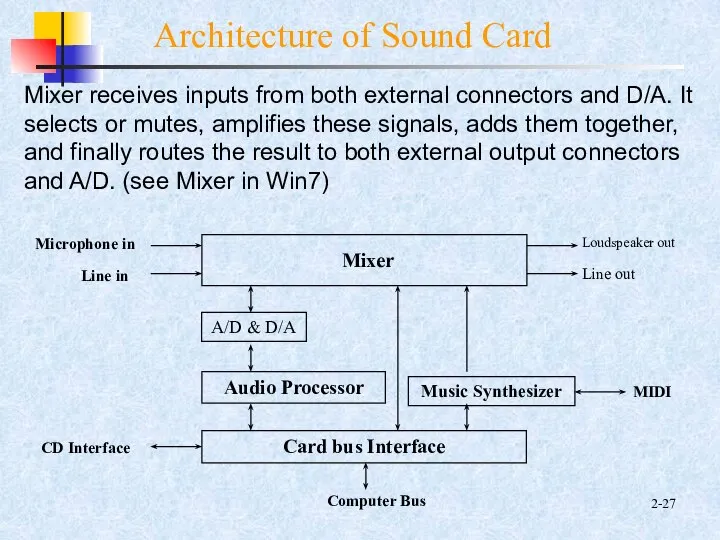
Architecture of Sound Card
Mixer receives inputs from both external connectors and
2-
Architecture of Sound Card
Mixer receives inputs from both external connectors and
2-
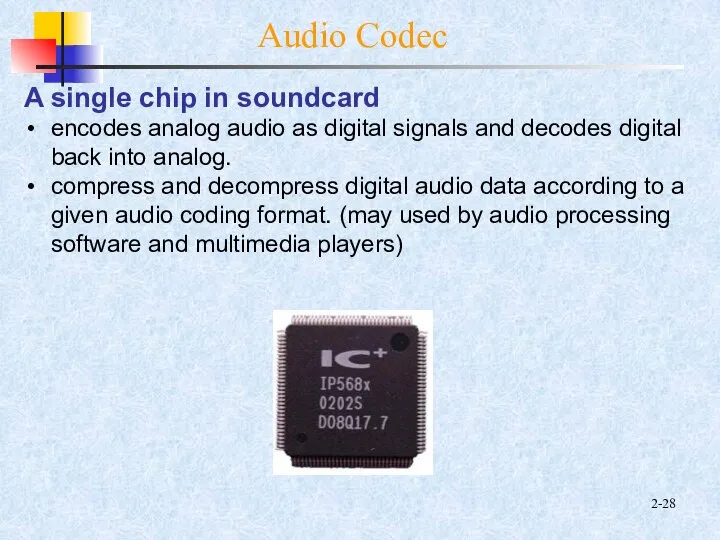
Audio Codec
A single chip in soundcard
encodes analog audio as digital signals
2-
Audio Codec
A single chip in soundcard
encodes analog audio as digital signals
2-
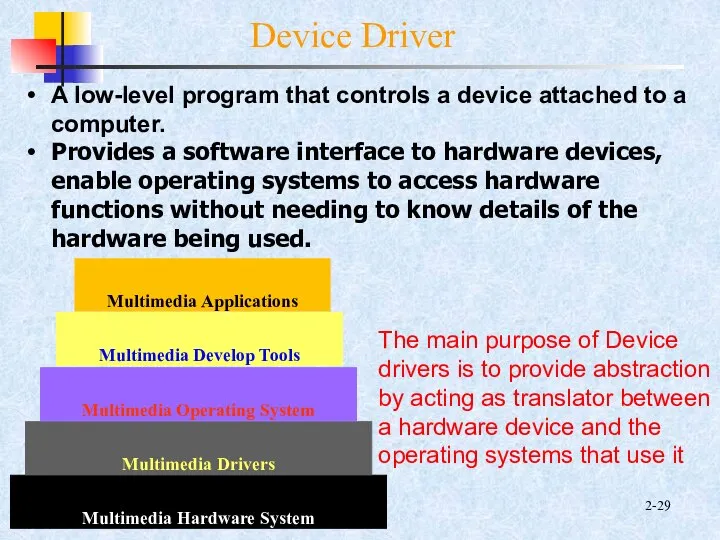
Device Driver
A low-level program that controls a device attached to a
2-
Device Driver
A low-level program that controls a device attached to a

2-
General Characteristics
It can be used in multimedia applications such as music
2-
General Characteristics
It can be used in multimedia applications such as music
2-
Example
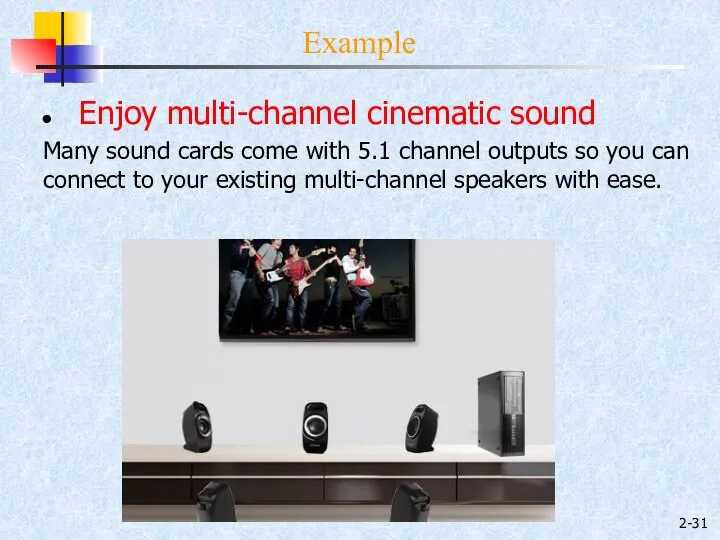
Enjoy multi-channel cinematic sound
Many sound cards come with 5.1 channel outputs
2-
Example
Enjoy multi-channel cinematic sound
Many sound cards come with 5.1 channel outputs
2-
Example
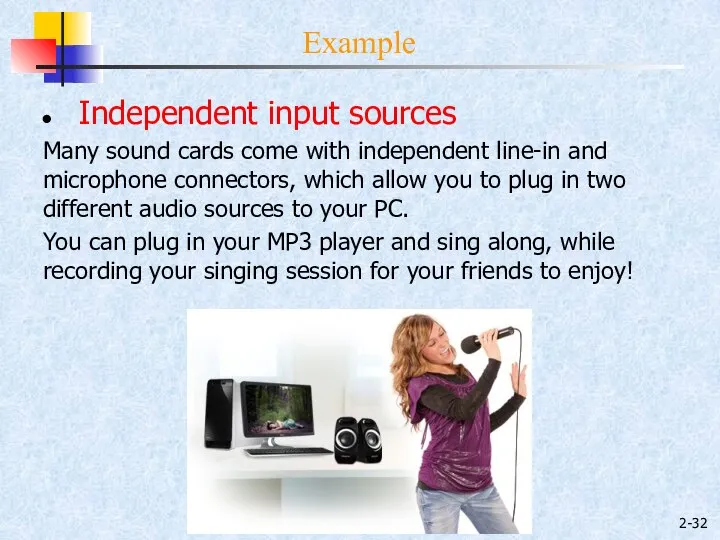
Independent input sources
Many sound cards come with independent line-in and microphone
2-
Example
Independent input sources
Many sound cards come with independent line-in and microphone
2-
Example
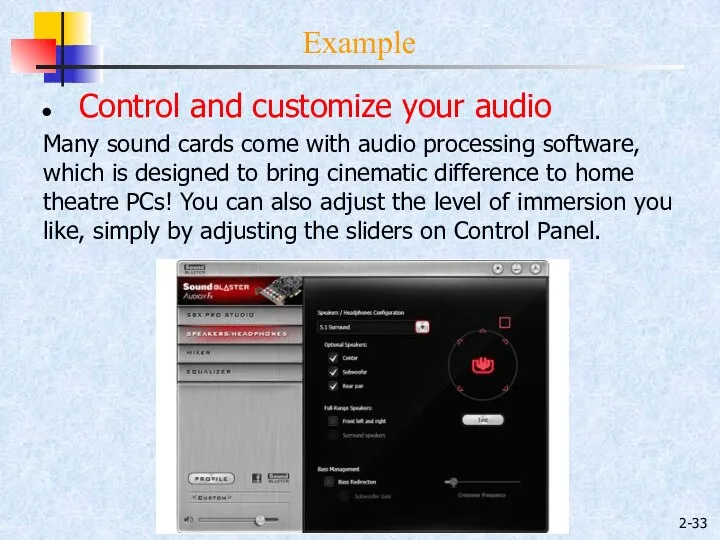
Control and customize your audio
Many sound cards come with audio processing
2-
Example
Control and customize your audio
Many sound cards come with audio processing
2-
Audio Performance
Sample Rate:
11.025 kHz (Speech)
22.05 kHz (Music)
44.1
2-
Audio Performance
Sample Rate:
11.025 kHz (Speech)
22.05 kHz (Music)
44.1
2-
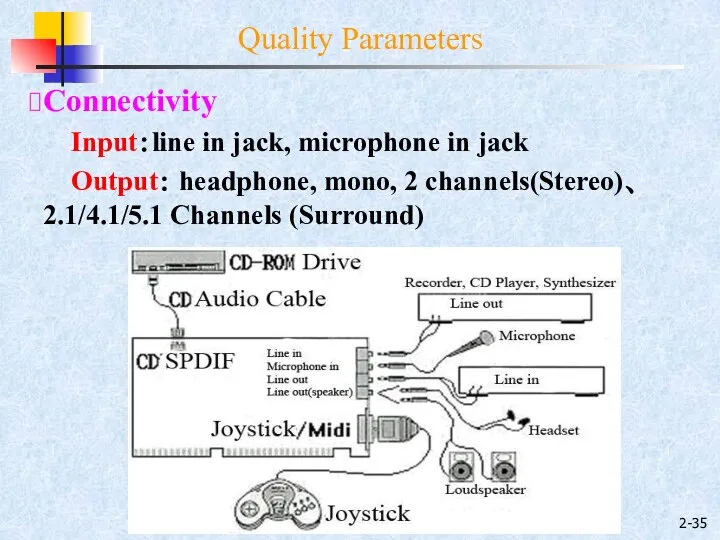
Connectivity
Input:line in jack, microphone in jack
Output: headphone, mono, 2
2-
Connectivity
Input:line in jack, microphone in jack
Output: headphone, mono, 2
2-
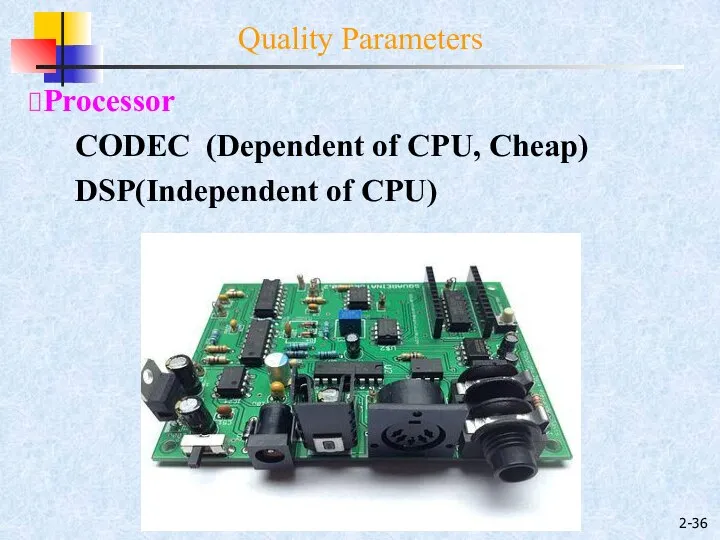
Processor
CODEC (Dependent of CPU, Cheap)
DSP(Independent of CPU)
Quality Parameters
2-
Processor
CODEC (Dependent of CPU, Cheap)
DSP(Independent of CPU)
Quality Parameters
2-
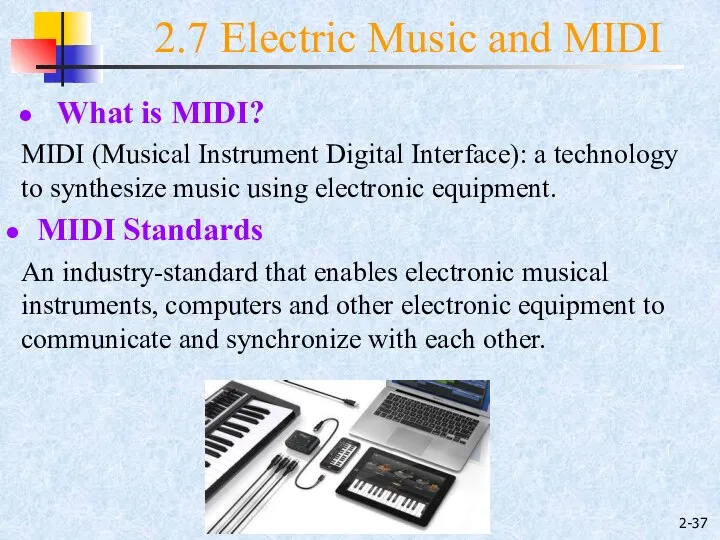
What is MIDI?
MIDI (Musical Instrument Digital Interface): a technology to synthesize
2-
What is MIDI?
MIDI (Musical Instrument Digital Interface): a technology to synthesize
2-
There are actually three components in MIDI standard, which are the
2-
There are actually three components in MIDI standard, which are the
2-
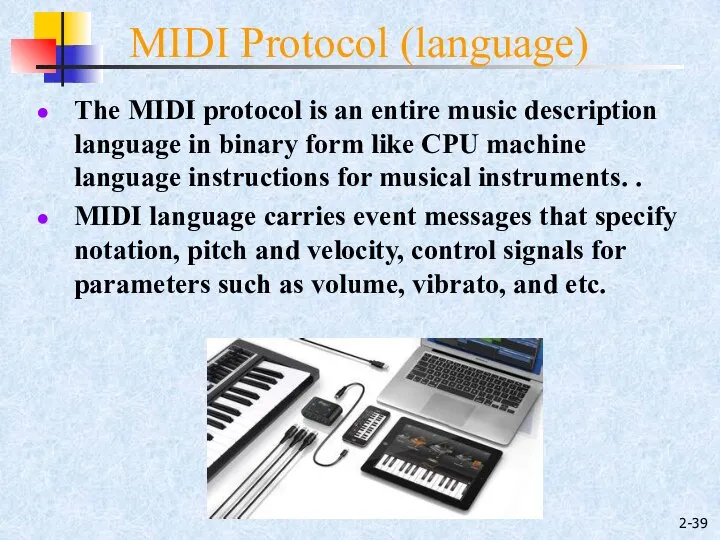
The MIDI protocol is an entire music description language in binary
2-
The MIDI protocol is an entire music description language in binary
2-
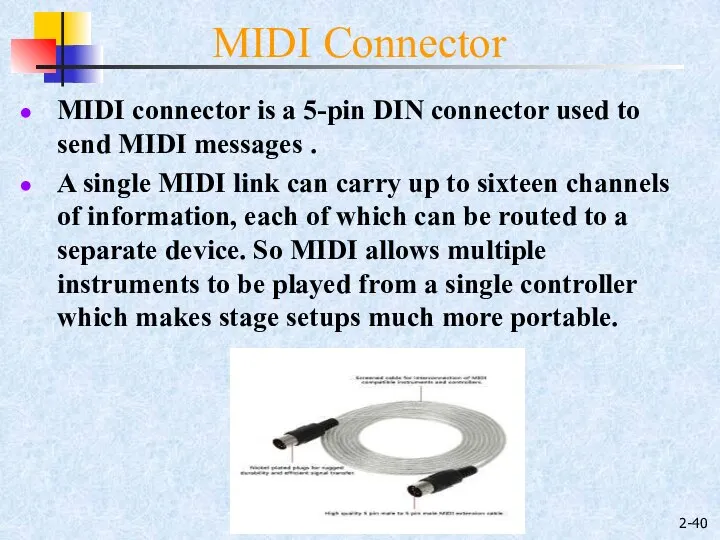
MIDI connector is a 5-pin DIN connector used to send MIDI
2-
MIDI connector is a 5-pin DIN connector used to send MIDI
2-
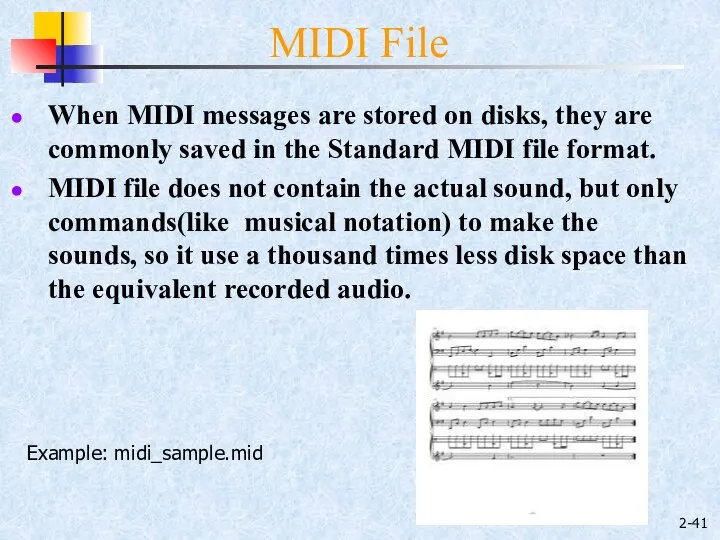
When MIDI messages are stored on disks, they are commonly saved
2-
When MIDI messages are stored on disks, they are commonly saved

2-
Sequencer is the key component for MIDI music creation.
A MIDI Sequencer
2-
Sequencer is the key component for MIDI music creation.
A MIDI Sequencer

2-
Example
Drum sample 1
Drum sample 2
Bass sample 1
Bass sample 2
A combination of
2-
Example
Drum sample 1
Drum sample 2
Bass sample 1
Bass sample 2
A combination of
2-
Audio Processing Software
(formerly Cool Edit Pro)
Audio Editing
Audio Effects
Multitrack Processing
Burning Audio
2-
Audio Processing Software
(formerly Cool Edit Pro)
Audio Editing
Audio Effects
Multitrack Processing
Burning Audio
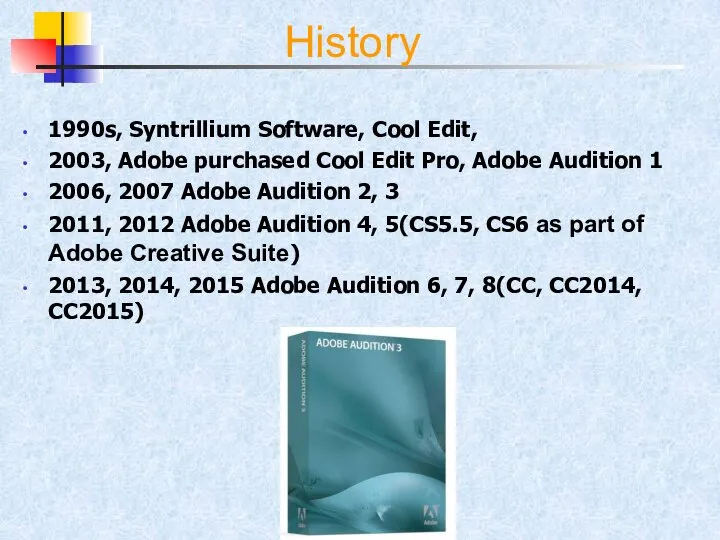
History
1990s, Syntrillium Software, Cool Edit,
2003, Adobe purchased Cool Edit Pro, Adobe
History
1990s, Syntrillium Software, Cool Edit,
2003, Adobe purchased Cool Edit Pro, Adobe
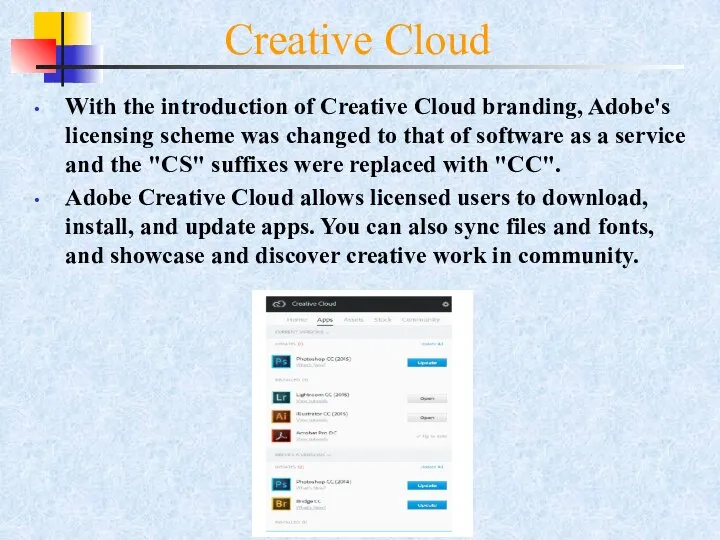
Creative Cloud
With the introduction of Creative Cloud branding, Adobe's licensing scheme
Creative Cloud
With the introduction of Creative Cloud branding, Adobe's licensing scheme
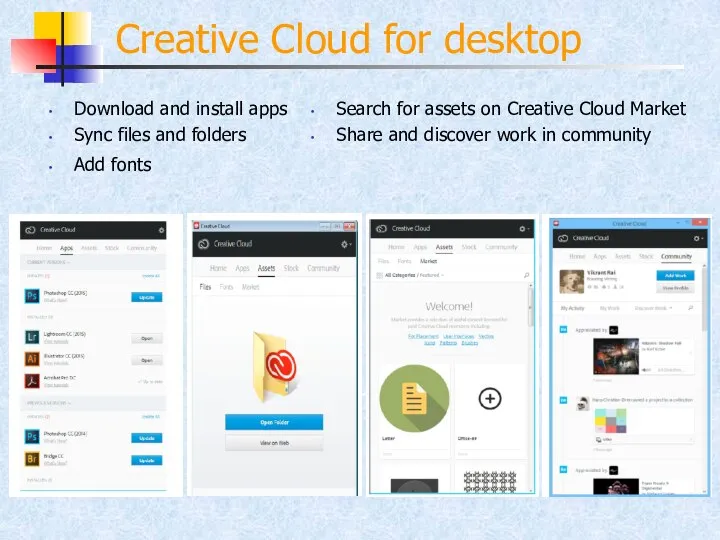
Download and install apps
Sync files and folders
Add fonts
Search for assets
Download and install apps
Sync files and folders
Add fonts
Search for assets
2-
Workspace
A View buttons and toolbar B Editor panel with zoom navigator
2-
Workspace
A View buttons and toolbar B Editor panel with zoom navigator
2-
Waveform and Multitrack Editors
To edit individual files, use the Waveform Editor.
2-
Waveform and Multitrack Editors
To edit individual files, use the Waveform Editor.
2-
Workspace
A Navigator B Timeline Ruler C Waveform Display D Spectral Display
E
2-
Workspace
A Navigator B Timeline Ruler C Waveform Display D Spectral Display
E
2-
Waveform Display
Quiet audio has both lower peaks and lower valleys than
2-
Waveform Display
Quiet audio has both lower peaks and lower valleys than
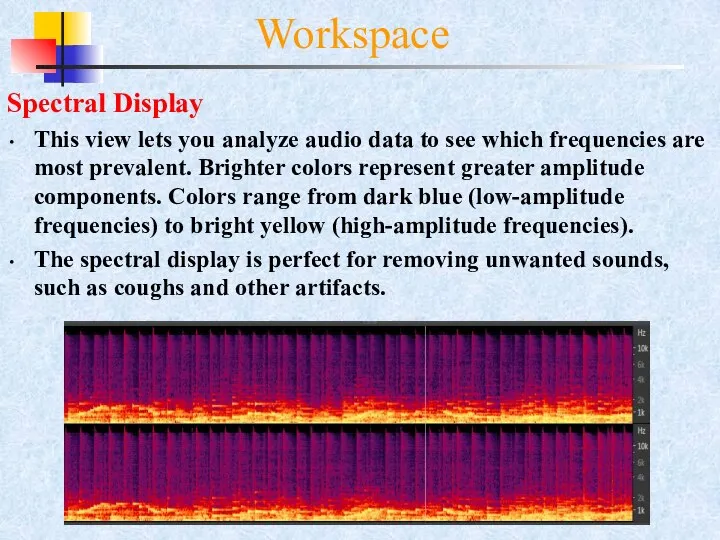
Spectral Display
This view lets you analyze audio data to see which
Spectral Display
This view lets you analyze audio data to see which
2-
Zoom audio
Zoom into a specific time range
In either the zoom navigator
2-
Zoom audio
Zoom into a specific time range
In either the zoom navigator
2-
Workspace
Navigating time and playing audio
Navigate by scrolling
Navigate with the Selection/View panel
Current-time
2-
Workspace
Navigating time and playing audio
Navigate by scrolling
Navigate with the Selection/View panel
Current-time
2-
Importing, recording, and playing
Connecting to audio hardware
Configure audio inputs and outputs
Choose
2-
Importing, recording, and playing
Connecting to audio hardware
Configure audio inputs and outputs
Choose
2-
Importing, recording, and playing
Creating and opening files
Create a new, blank audio
2-
Importing, recording, and playing
Creating and opening files
Create a new, blank audio
2-
Importing, recording, and playing
Recording audio
You can record audio from a microphone
2-
Importing, recording, and playing
Recording audio
You can record audio from a microphone
2-
Importing, recording, and playing
Monitoring recording and playback levels
To monitor the amplitude
2-
Importing, recording, and playing
Monitoring recording and playback levels
To monitor the amplitude
2-
Importing, recording, and playing
Adjust recording levels for recording device
Adjust levels
2-
Importing, recording, and playing
Adjust recording levels for recording device
Adjust levels
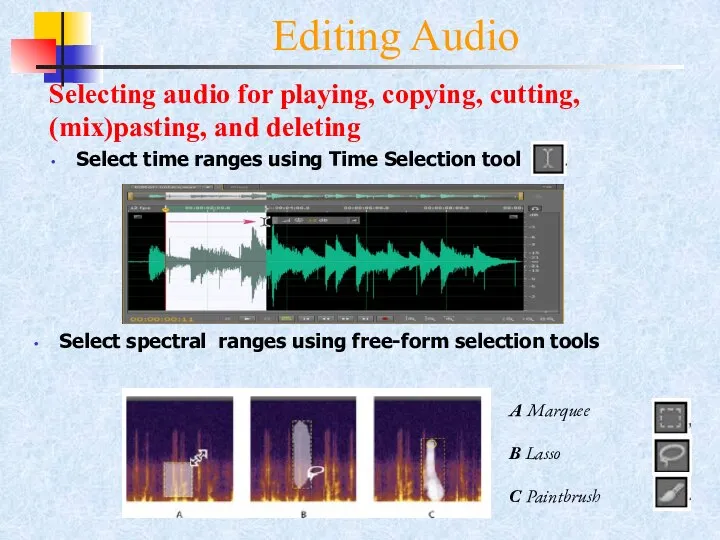
Editing Audio
Selecting audio for playing, copying, cutting, (mix)pasting, and deleting
Select
Editing Audio
Selecting audio for playing, copying, cutting, (mix)pasting, and deleting
Select

Editing Audio
Remove artifacts automatically
For the quickest repair of small, individual
Editing Audio
Remove artifacts automatically
For the quickest repair of small, individual
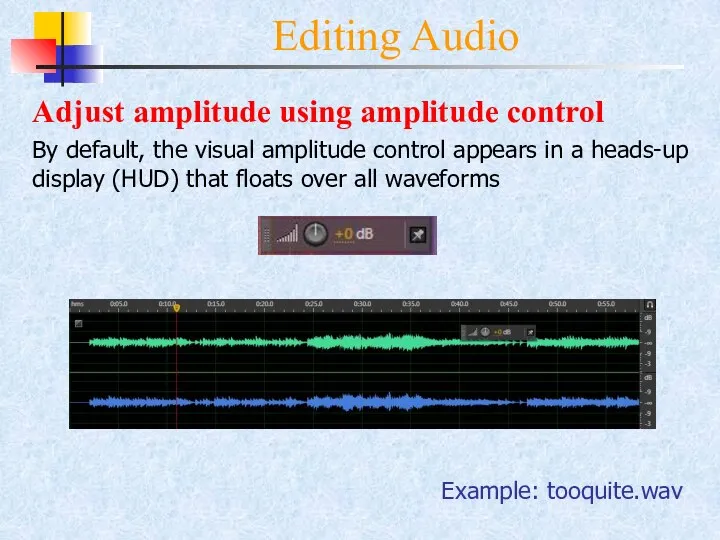
Editing Audio
Adjust amplitude using amplitude control
By default, the visual amplitude
Editing Audio
Adjust amplitude using amplitude control
By default, the visual amplitude
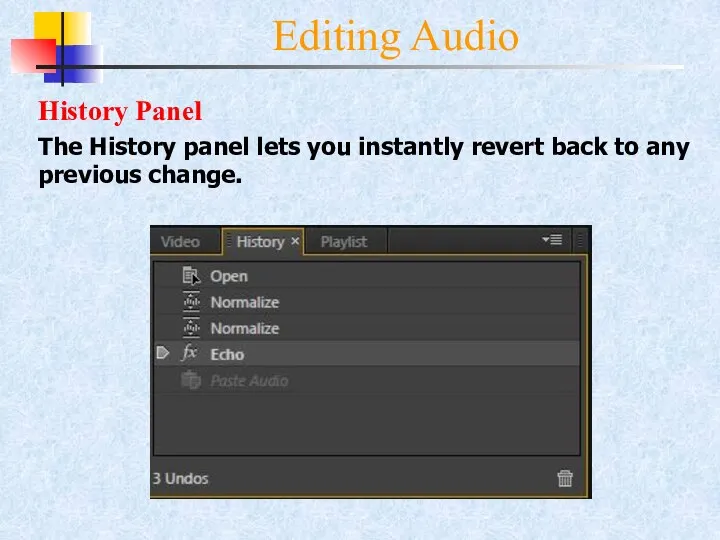
Editing Audio
History Panel
The History panel lets you instantly revert back
Editing Audio
History Panel
The History panel lets you instantly revert back
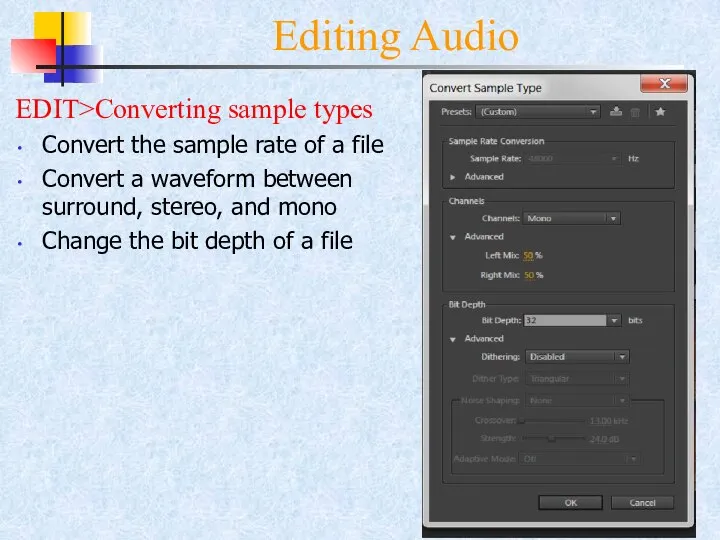
Editing Audio
EDIT>Converting sample types
Convert the sample rate of a file
Convert
Editing Audio
EDIT>Converting sample types
Convert the sample rate of a file
Convert
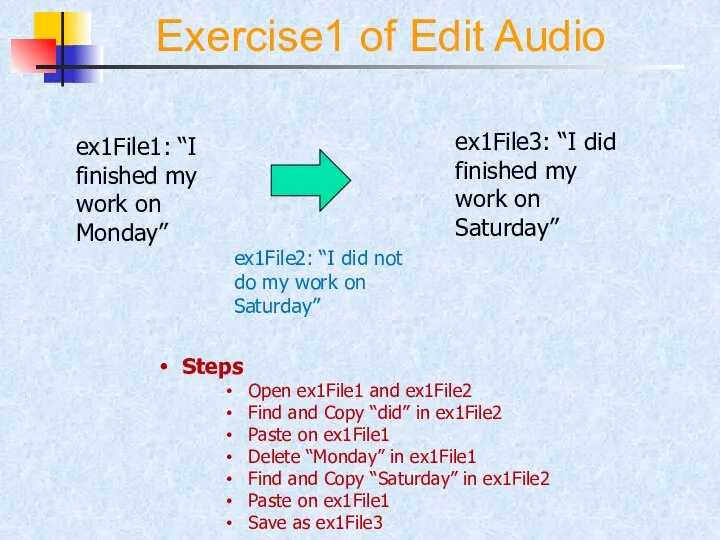
Exercise1 of Edit Audio
Steps
Open ex1File1 and ex1File2
Find and Copy “did” in
Exercise1 of Edit Audio
Steps
Open ex1File1 and ex1File2
Find and Copy “did” in
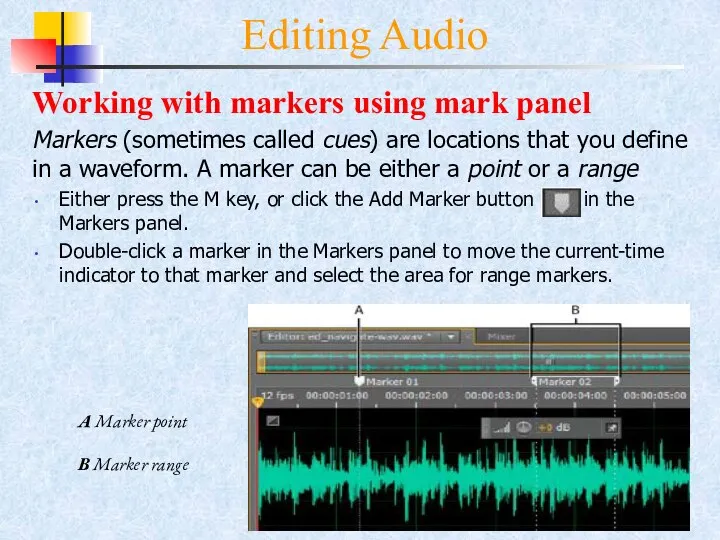
Editing Audio
Working with markers using mark panel
Markers (sometimes called cues)
Editing Audio
Working with markers using mark panel
Markers (sometimes called cues)
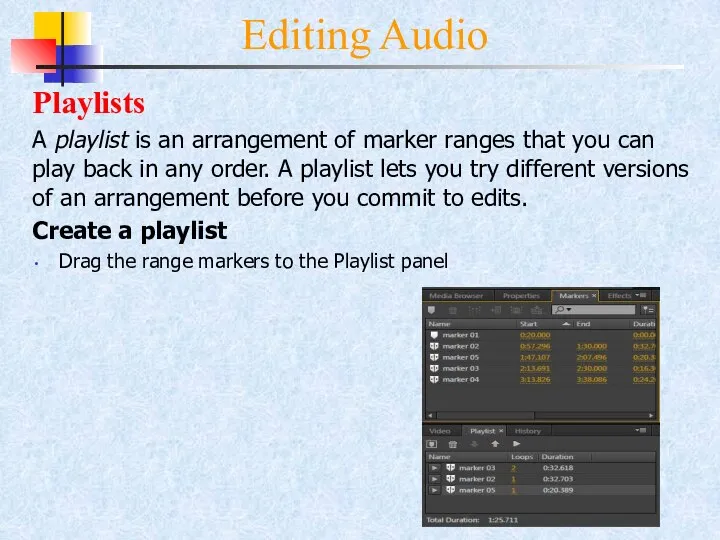
Editing Audio
Playlists
A playlist is an arrangement of marker ranges
Editing Audio
Playlists
A playlist is an arrangement of marker ranges
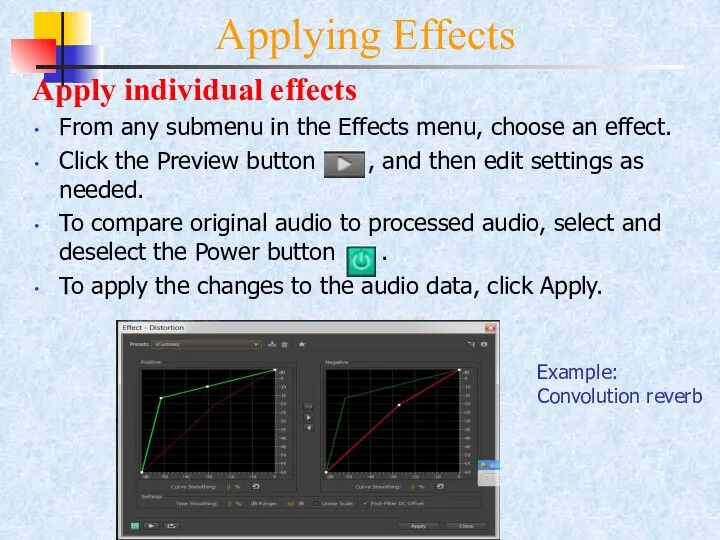
Applying Effects
Apply individual effects
From any submenu in the Effects menu,
Applying Effects
Apply individual effects
From any submenu in the Effects menu,
Applying Effects
Apply groups of effects
The Effects Rack lets you insert, edit,
Applying Effects
Apply groups of effects
The Effects Rack lets you insert, edit,
Applying Effects
About process effects
These processing-intensive effects can be applied only individually,
Applying Effects
About process effects
These processing-intensive effects can be applied only individually,
Applying Effects
Use effect presets
Many effects provide presets that let you store
Applying Effects
Use effect presets
Many effects provide presets that let you store
Applying Effects
Generate a simple waveform
Choose Effects > Generate > Tones
Applying Effects
Generate a simple waveform
Choose Effects > Generate > Tones
Applying Effects
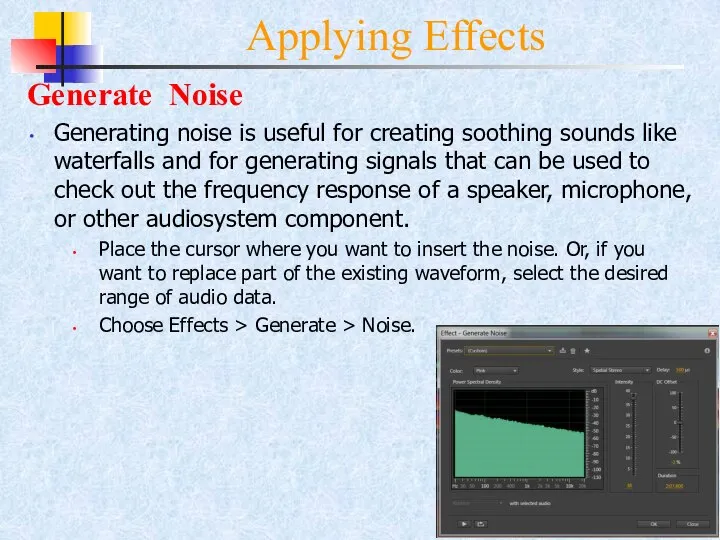
Generate Noise
Generating noise is useful for creating soothing sounds like
Applying Effects
Generate Noise
Generating noise is useful for creating soothing sounds like

Applying Effects
Reverb effects
In a room, sound bounces off the walls, ceiling,
Applying Effects
Reverb effects
In a room, sound bounces off the walls, ceiling,
Applying Effects
Background Noise Reduction
The Noise Reduction effect dramatically reduces background and
Applying Effects
Background Noise Reduction
The Noise Reduction effect dramatically reduces background and
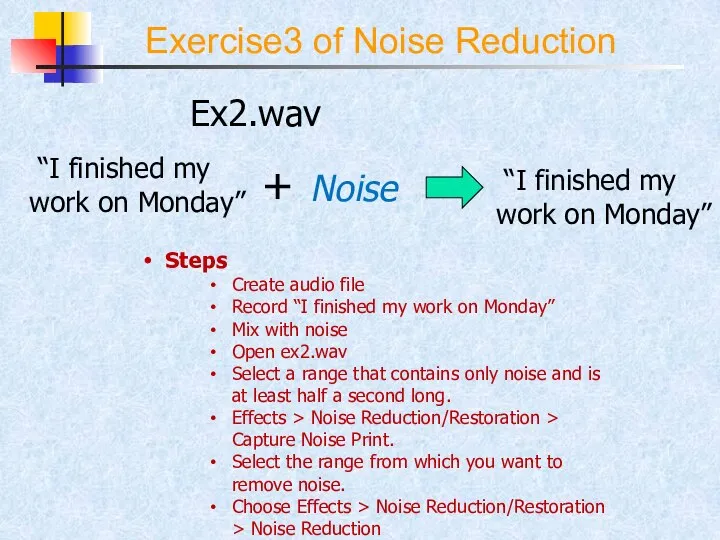
Exercise3 of Noise Reduction
Steps
Create audio file
Record “I finished my work on
Exercise3 of Noise Reduction
Steps
Create audio file
Record “I finished my work on
2-
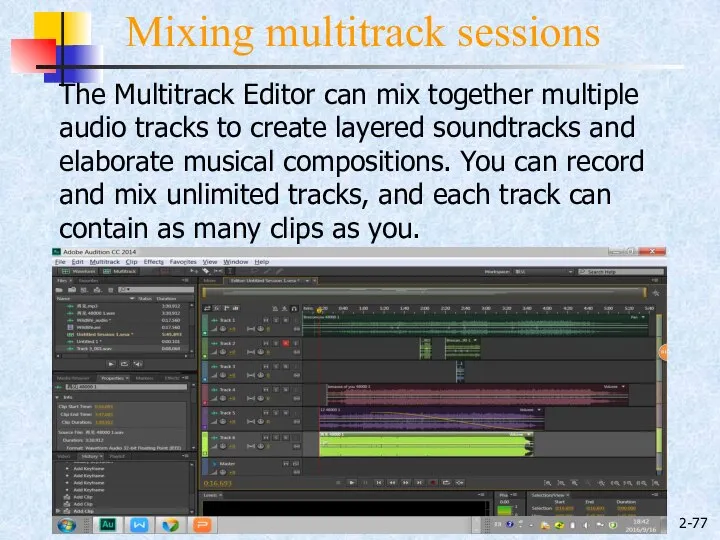
Mixing multitrack sessions
The Multitrack Editor can mix together multiple audio tracks
2-
Mixing multitrack sessions
The Multitrack Editor can mix together multiple audio tracks
2-
Mixing multitrack sessions
Create a new multitrack session
Template: specify source files and
2-
Mixing multitrack sessions
Create a new multitrack session
Template: specify source files and
2-
Mixing multitrack sessions
Insert an audio file into a track
Place CTI at
2-
Mixing multitrack sessions
Insert an audio file into a track
Place CTI at
2-
Mixing multitrack sessions
Session (*.sesx) files
Adobe Audition save multitrack sessions in session
2-
Mixing multitrack sessions
Session (*.sesx) files
Adobe Audition save multitrack sessions in session
2-
Mixing multitrack sessions
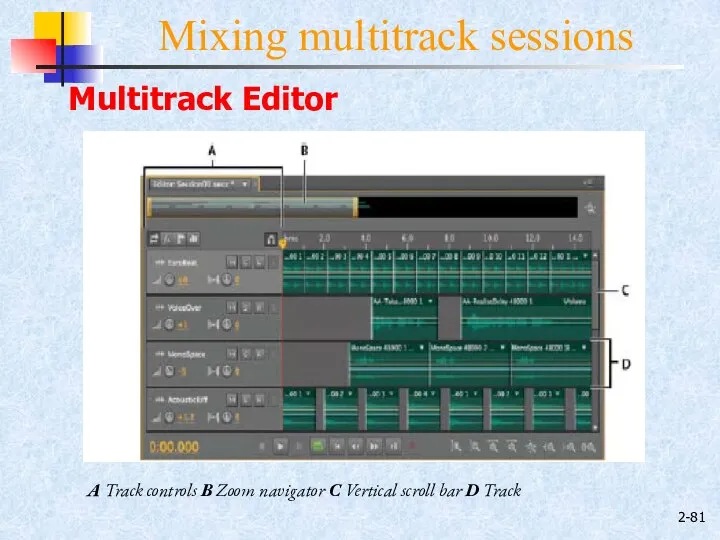
A Track controls B Zoom navigator C Vertical scroll
2-
Mixing multitrack sessions
A Track controls B Zoom navigator C Vertical scroll
2-
Mixing multitrack sessions
Arranging and editing tracks
Add or delete tracks
Name tracks
Move tracks
Mute
2-
Mixing multitrack sessions
Arranging and editing tracks
Add or delete tracks
Name tracks
Move tracks
Mute

2-
Mixing multitrack sessions
Editing multitrack clips
Move a clip
Copy a clip
Remove a selected
2-
Mixing multitrack sessions
Editing multitrack clips
Move a clip
Copy a clip
Remove a selected
2-
Mixing multitrack sessions
Export multitrack mixdown files
After you finish mixing a session,
2-
Mixing multitrack sessions
Export multitrack mixdown files
After you finish mixing a session,
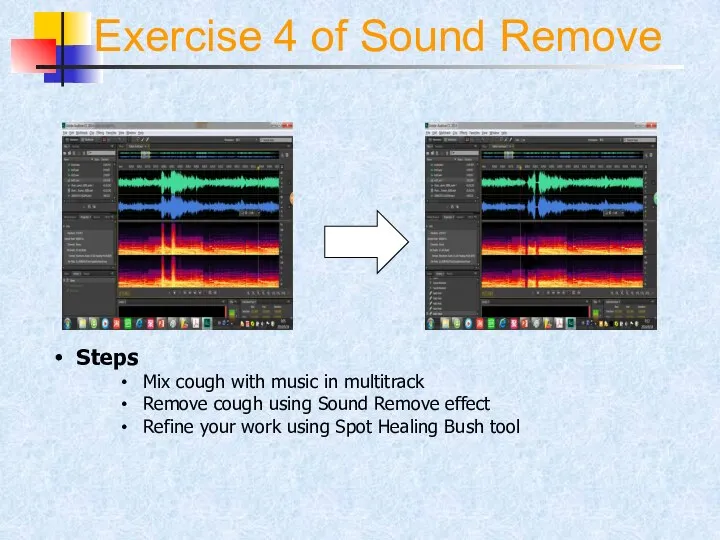
Exercise 4 of Sound Remove
Steps
Mix cough with music in multitrack
Remove
Exercise 4 of Sound Remove
Steps
Mix cough with music in multitrack
Remove
2-
Multitrack routing
Buses, sends, and the Master track let you route multiple
2-
Multitrack routing
Buses, sends, and the Master track let you route multiple
2-
Mixing multitrack sessions
Audio tracks
Audio tracks contain either imported audio or
2-
Mixing multitrack sessions
Audio tracks
Audio tracks contain either imported audio or
2-
Mixing multitrack sessions
Assign audio inputs and outputs to tracks
In the Inputs/Outputs
2-
Mixing multitrack sessions
Assign audio inputs and outputs to tracks
In the Inputs/Outputs
2-
Mixing multitrack sessions
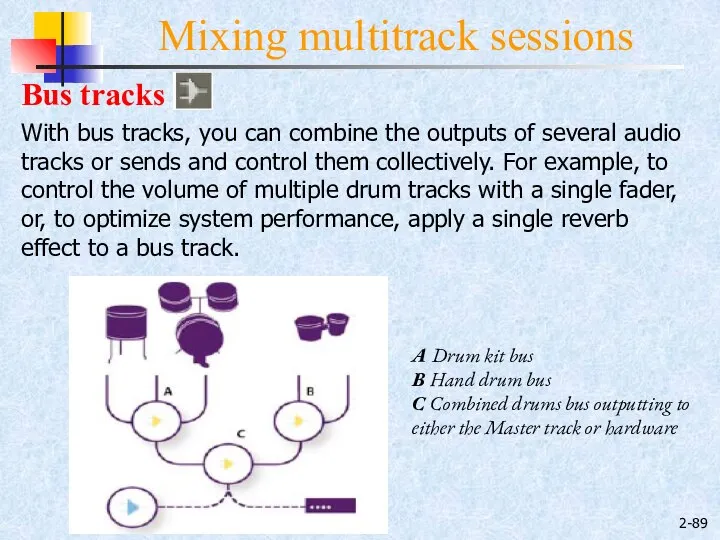
Bus tracks
With bus tracks, you can combine the
2-
Mixing multitrack sessions
Bus tracks
With bus tracks, you can combine the
2-
Mixing multitrack sessions
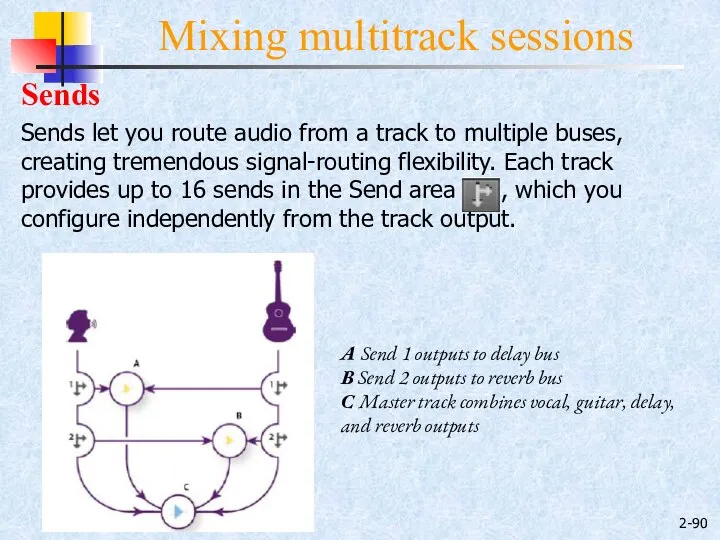
Sends
Sends let you route audio from a track
2-
Mixing multitrack sessions
Sends
Sends let you route audio from a track
2-
Mixing multitrack sessions
Master track
The Master track , which is the
2-
Mixing multitrack sessions
Master track
The Master track , which is the
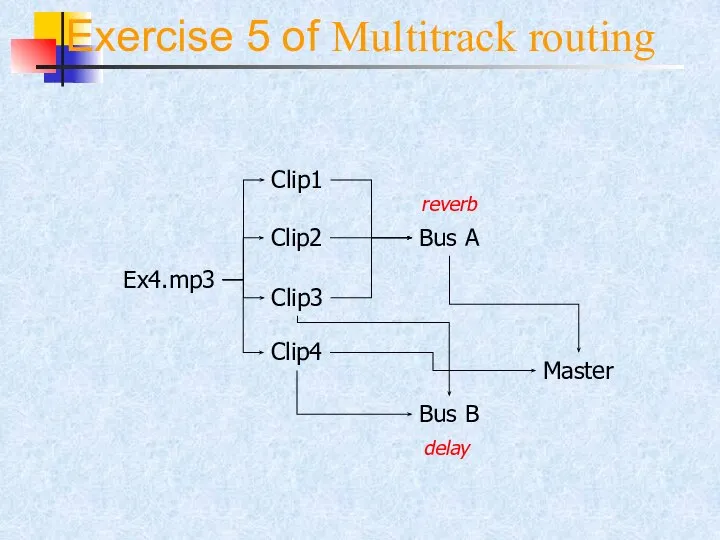
Exercise 5 of Multitrack routing
Ex4.mp3
Clip1
Clip2
Clip3
Clip4
Bus A
Master
Bus B
reverb
delay
Exercise 5 of Multitrack routing
Ex4.mp3
Clip1
Clip2
Clip3
Clip4
Bus A
Master
Bus B
reverb
delay
 Урок МХК Культурное влияние Византии и формирование русского национального стиля. Учитель МОУ СОШ № 4 Туркменского района Адонь
 Основы алгоритмизации
 Региональные компьютерные сети
 1019109
 Строение ядра
 Техническое обучение по харвестерной головке Лог Макс 6000
 Устройство стиральной машины LG. Электрика
 забавная астрономия - презентация для начальной школы
 Нормативная база ГМО
 Обязанности человека и гражданина РФ
  Античная росписная керамика
 Иррациональные уравнения «Урок-дискуссия»
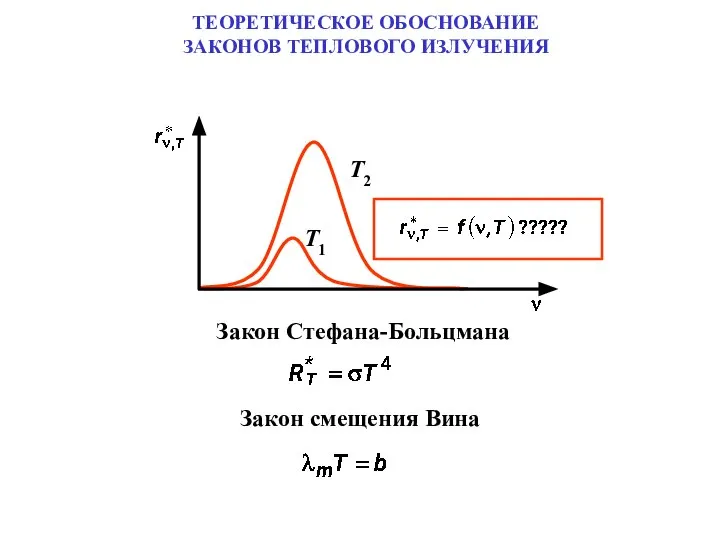 ТЕОРЕТИЧЕСКОЕ ОБОСНОВАНИЕ ЗАКОНОВ ТЕПЛОВОГО ИЗЛУЧЕНИЯ
 Проектирование и технология ЭКБ
 Виды принтеров
 Новая конституция РФ (часть 4)
 Естественное вскармливание
 Русская культура XVII в
 Презентация на тему "Туберкулез -Чума ХХІ века" - скачать презентации по Медицине
 Презентация на тему "Объяснительная записка" - скачать презентации по Педагогике
 Источники доказательств
 Менің сыныптағы заттарым. Менің бөлмемдегі заттарым
 Презентация на тему "Правильное питание в современном мире" - скачать презентации по Медицине
 Государство и его сущность
 Основные этапы становления и развития статистической науки
 Droga krzyżowa dziecka nienarodzonego
 иерсинии
 Алгоритмы и программирование