- BН100 service training

Содержание
- 2. Capacity ’82 ~ ’94 ’97 ’98 ’99 DVD-ROM, -R, +R, +RW, -RW, RAM : 4.7GB CD-R,
- 3. Based on high density recording technology, Optical Storage Product has been developing to support playing/recording HD
- 4. 3. Concept Playable Discs
- 5. 4. Specifications
- 6. Proposed BD RPC Map Region A: North America Central America South America Korea Japan S’east Asia
- 7. 5.Front Panel
- 8. 6. VFD
- 9. 7.Back/Panel
- 10. Fig 1. Connections to your TV Fig 2. Connecting to an amplifier equipped with two channel
- 11. 9. Resolution Setting How to change the resolution using RESOLUTION button (Fig 1) How to change
- 12. 1. Initial Screen When the unit connect to TV using HDMI cable (Set TV input to
- 13. 3. Press button 3 4. TV screen shows TV HDMI resolution (EDID). EDID 5.Press RETURN twice
- 14. 1. System Block Diagram 2. Overall Wiring Block Diagram 3. Main Signal Path 4. Audio Signal
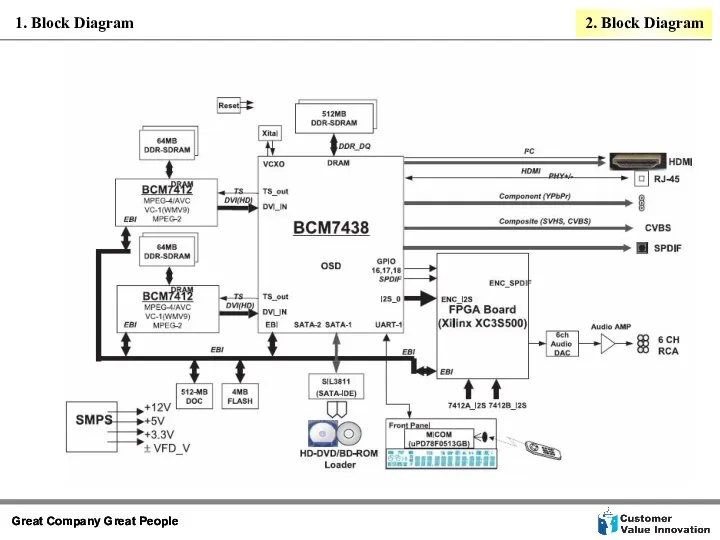
- 15. 2. Block Diagram 1. Block Diagram
- 16. 2. Overall Wiring Block Diagram 2. Block Diagram
- 17. 3. Main Signal Path Diagram 2. Block Diagram
- 18. BCM_AUD0_LEFT BCM_AUD0_RIGHT BCM7038_AUD0_SPDIF ENC_AUD0_L ENC_AUD0_R ENC_AUD1_L ENC_AUD1_R ENC_AUD2_L ENC_AUD2_R 7411A_SPDIF BCM7438 7411A_I2S_0 7411A_I2S_1 7411B_SPDIF 7411B_I2S_0 7411B_I2S_1
- 19. 5. Front- Block Diagram 2. Block Diagram
- 20. 6. SMPS - Block Diagram (1) 2. Block Diagram
- 21. SMPS Power Consumption Analysis 7. SMPS – Voltage Load & Power Consumption Analysis (2) 2. Block
- 22. Solder side Comp side 8. Component Position(Main Board) 2. Block Diagram
- 23. 9. Component Position(Timer & Button) Comp side Comp side Solder side Solder side 2. Block Diagram
- 24. 10. Component Position (SMPS ) Comp side Solder side 2. Block Diagram
- 25. 12. Exploided Views 2. Block Diagram
- 26. 13. Packing Accessory Section 2. Block Diagram
- 27. 1. Burning Upgrade Disc 1) Use Only DVD Disc for Upgrade DVD recordable Disc (CD Not
- 28. 2. Software upgrade 1. Firmware Upgrade Method Software Upgrade Mode Current Version : BH07xxx.xx New Version
- 29. 3. Software upgrade check 1. Firmware Upgrade ★ how can check version ? 1. Move cursor
- 30. AACS : Advanced Access Content System HDCP : High-Bandwidth Digital Content Protection MAC Address : Media
- 31. 4. Service Information for EEPROM IC Setting 3. Software upgrade & check
- 32. Signal Format Disc & AV Format BD Playback HD-DVD Playback PC Contents
- 34. Скачать презентацию
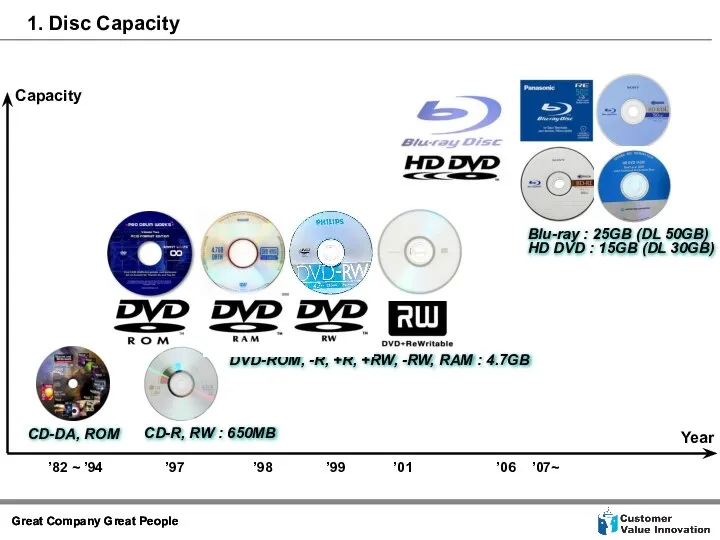
Capacity
’82 ~ ’94
’97
’98
’99
DVD-ROM, -R, +R, +RW, -RW, RAM : 4.7GB
CD-R, RW
Capacity
’82 ~ ’94
’97
’98
’99
DVD-ROM, -R, +R, +RW, -RW, RAM : 4.7GB
CD-R, RW
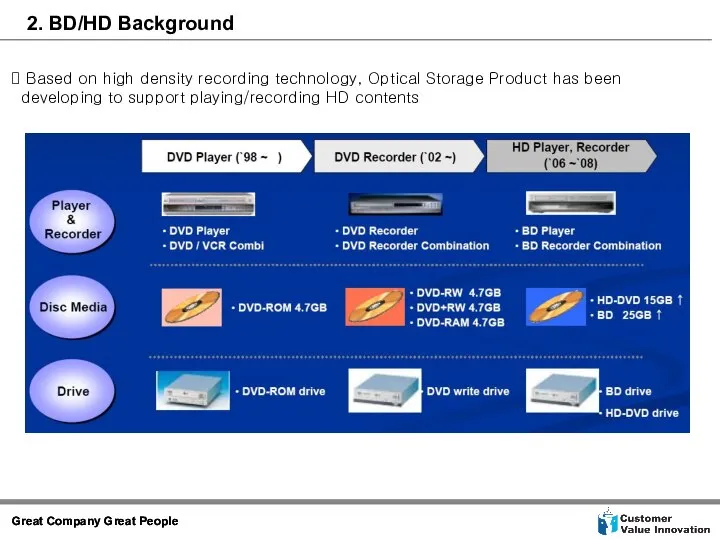
Based on high density recording technology, Optical Storage Product has
Based on high density recording technology, Optical Storage Product has
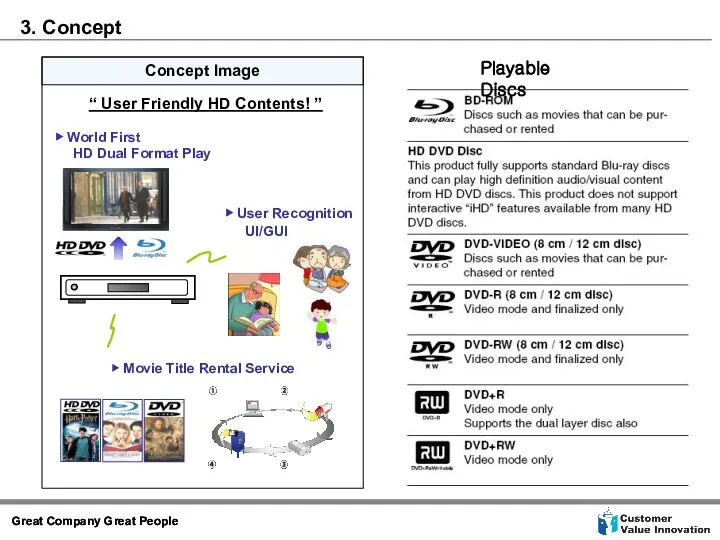
3. Concept
Playable Discs
3. Concept
Playable Discs
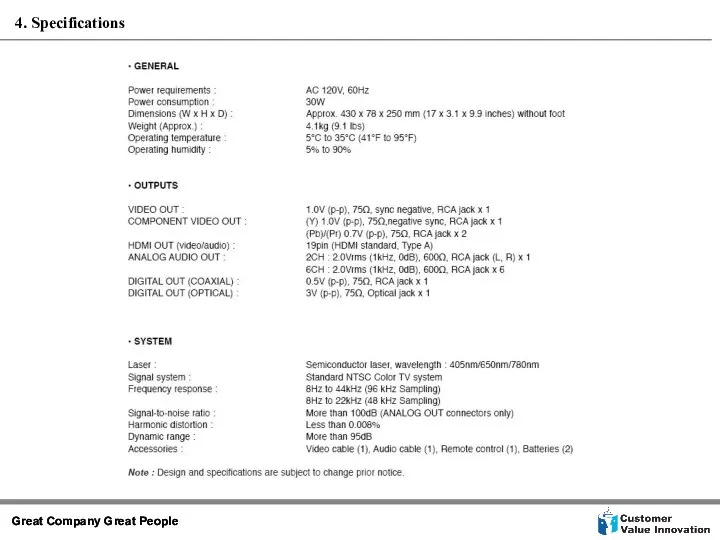
4. Specifications
4. Specifications
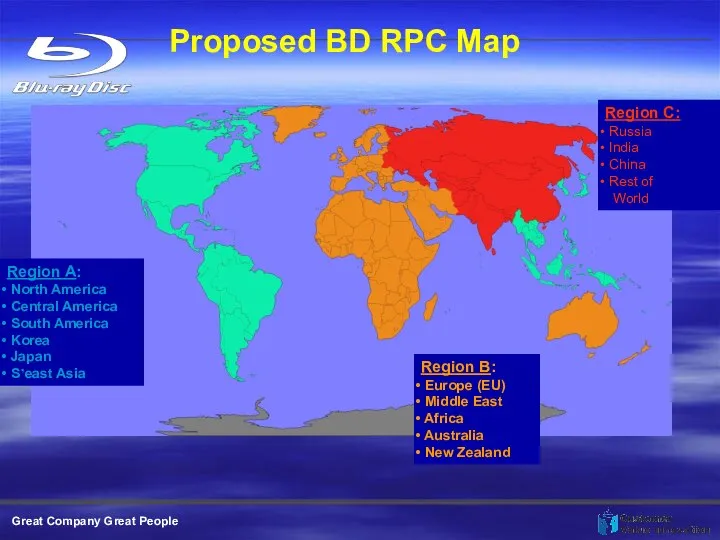
Proposed BD RPC Map
Region A:
North America
Central America
South America
Proposed BD RPC Map
Region A:
North America
Central America
South America
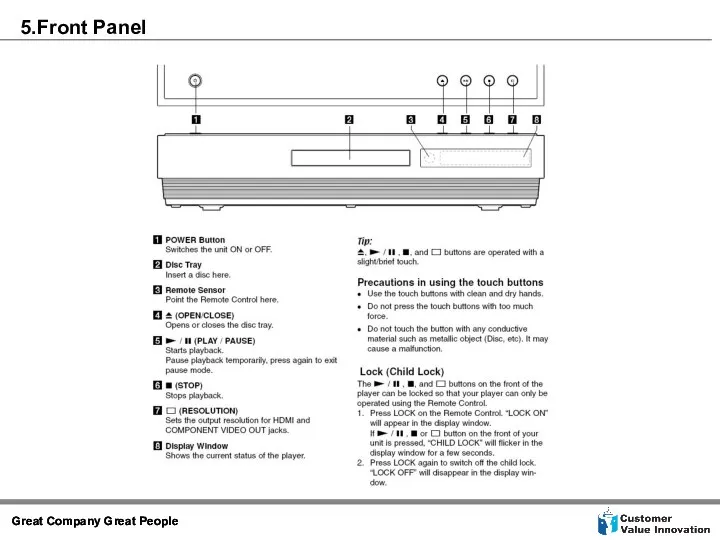
5.Front Panel
5.Front Panel
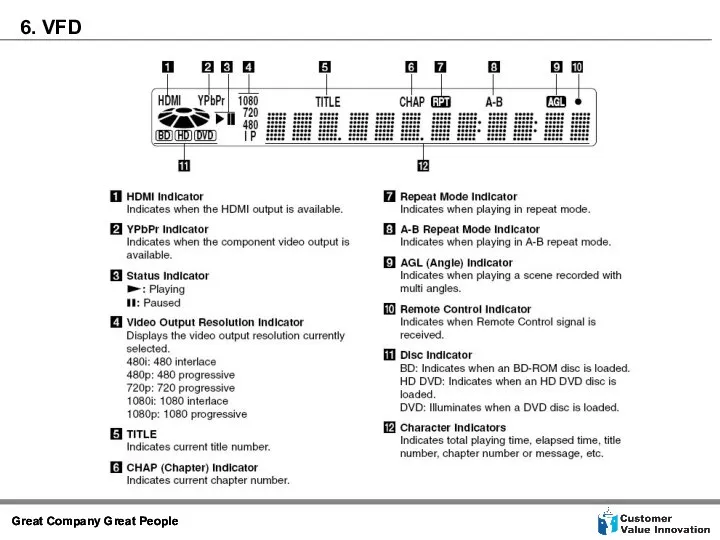
6. VFD
6. VFD
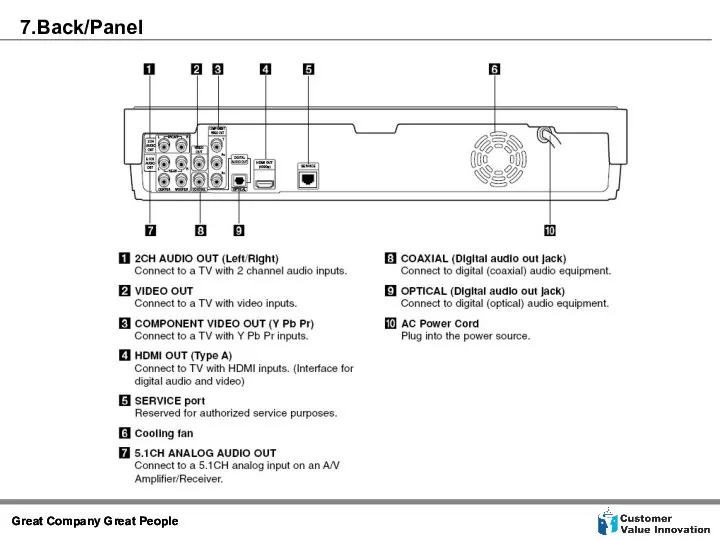
7.Back/Panel
7.Back/Panel
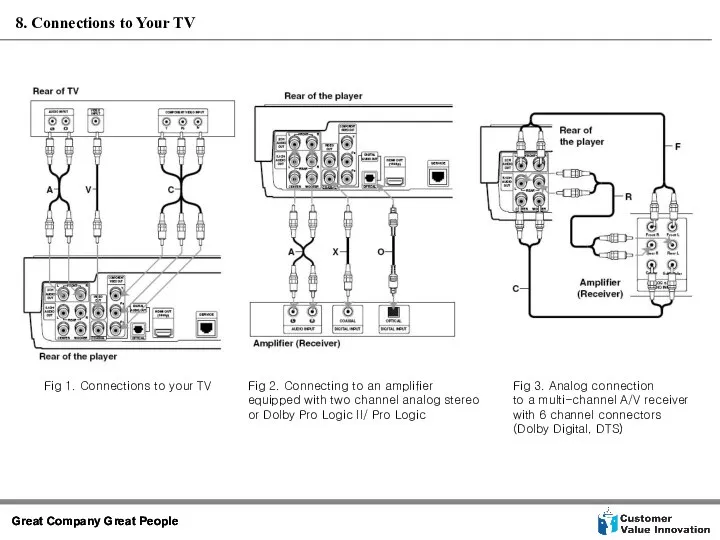
Fig 1. Connections to your TV
Fig 2. Connecting to an amplifier
Fig 1. Connections to your TV
Fig 2. Connecting to an amplifier
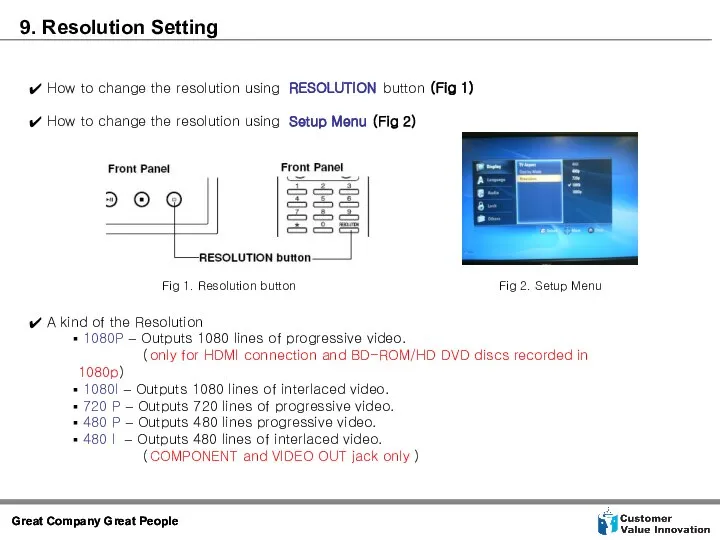
9. Resolution Setting
How to change the resolution using RESOLUTION button
9. Resolution Setting
How to change the resolution using RESOLUTION button
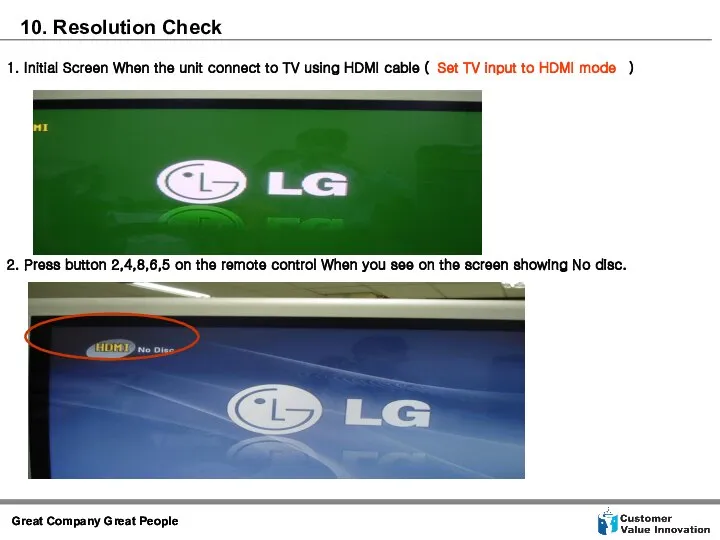
1. Initial Screen When the unit connect to TV using HDMI
1. Initial Screen When the unit connect to TV using HDMI

3. Press button 3
4. TV screen shows TV HDMI resolution (EDID).
EDID
3. Press button 3
4. TV screen shows TV HDMI resolution (EDID).
EDID
1. System Block Diagram
2. Overall Wiring Block Diagram
3.
1. System Block Diagram
2. Overall Wiring Block Diagram
3.
2. Block Diagram
1. Block Diagram
2. Block Diagram
1. Block Diagram
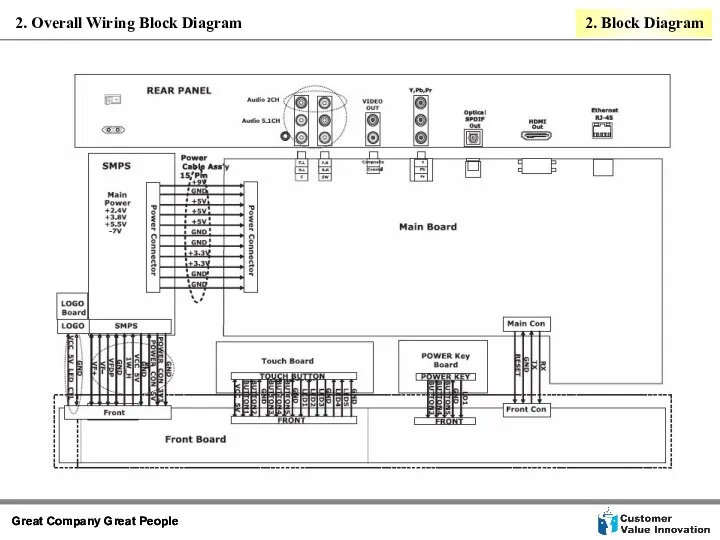
2. Overall Wiring Block Diagram
2. Block Diagram
2. Overall Wiring Block Diagram
2. Block Diagram
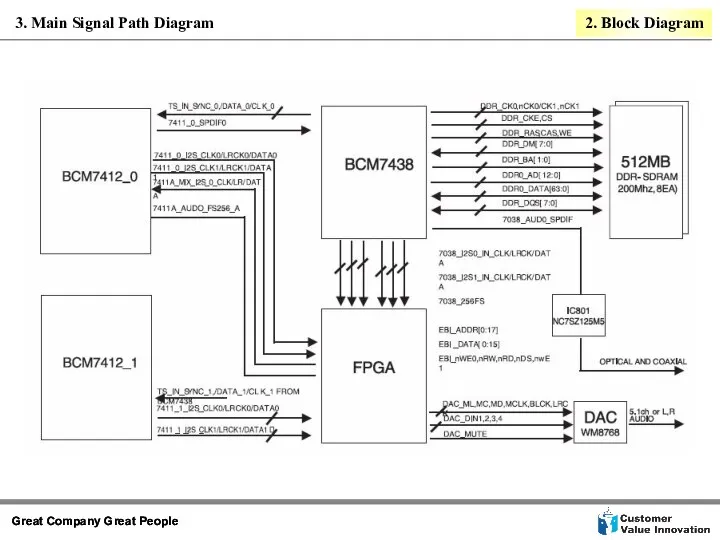
3. Main Signal Path Diagram
2. Block Diagram
3. Main Signal Path Diagram
2. Block Diagram

BCM_AUD0_LEFT
BCM_AUD0_RIGHT
BCM7038_AUD0_SPDIF
ENC_AUD0_L
ENC_AUD0_R
ENC_AUD1_L
ENC_AUD1_R
ENC_AUD2_L
ENC_AUD2_R
7411A_SPDIF
BCM7438
7411A_I2S_0
7411A_I2S_1
7411B_SPDIF
7411B_I2S_0
7411B_I2S_1
FPGA
(Xilinx XC3S400+6CH AudioDAC)
ENC_I2S
GPIO
16,17,18
ENC_AUD0_SPDIF
EBI_ADDR
EBI_DATA
I2S_0
BCM7411
BCM7411
Down-Mix I2S
of P+S+I
sound
4. Audio Signal Path
2. Block
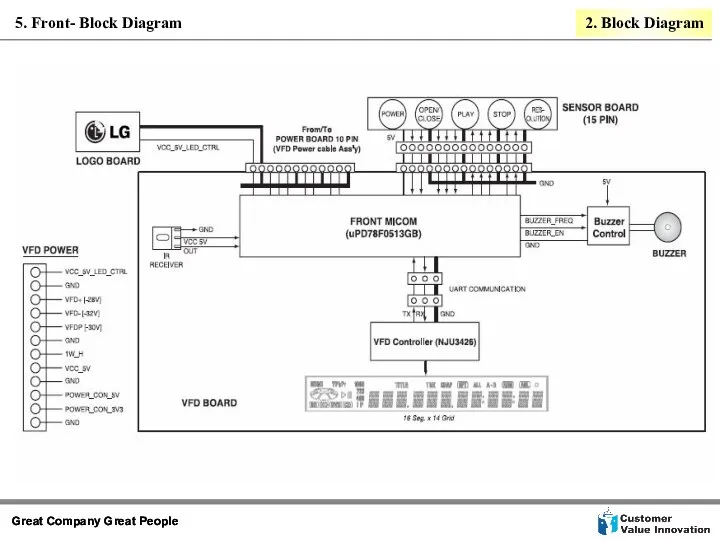
5. Front- Block Diagram
2. Block Diagram
5. Front- Block Diagram
2. Block Diagram
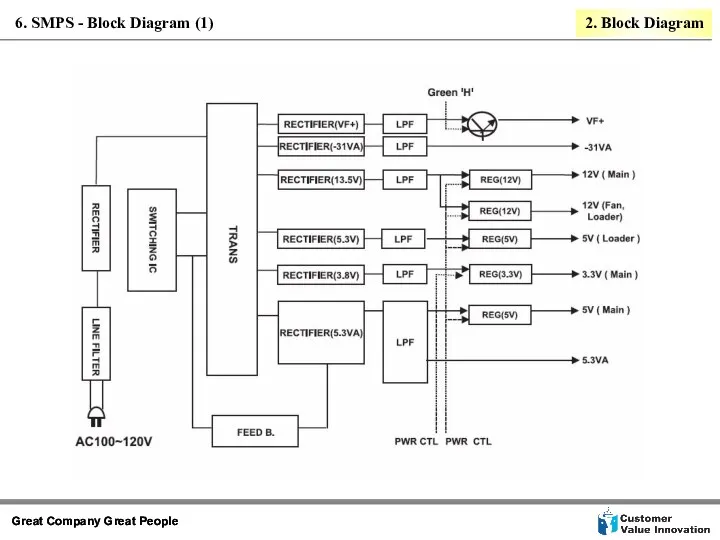
6. SMPS - Block Diagram (1)
2. Block Diagram
6. SMPS - Block Diagram (1)
2. Block Diagram
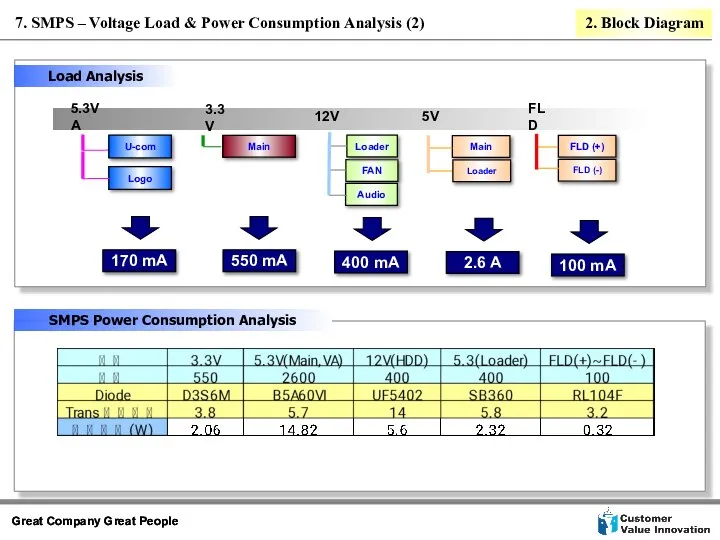
SMPS Power Consumption Analysis
7. SMPS – Voltage Load & Power Consumption
SMPS Power Consumption Analysis
7. SMPS – Voltage Load & Power Consumption
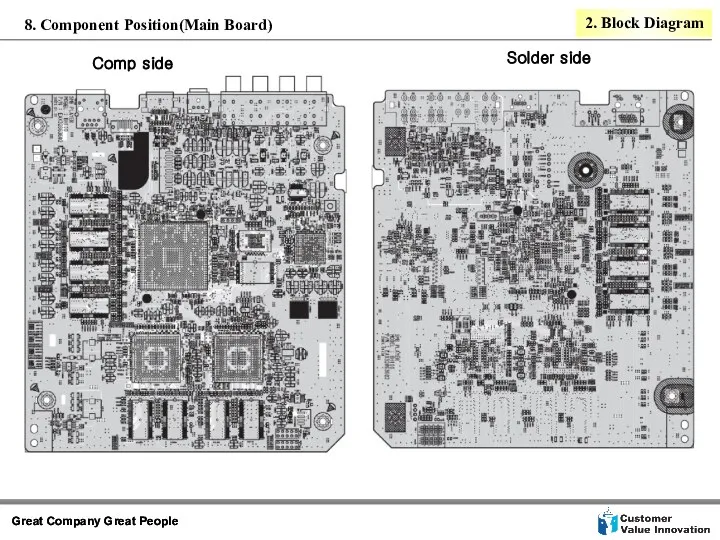
Solder side
Comp side
8. Component Position(Main Board)
2. Block Diagram
Solder side
Comp side
8. Component Position(Main Board)
2. Block Diagram
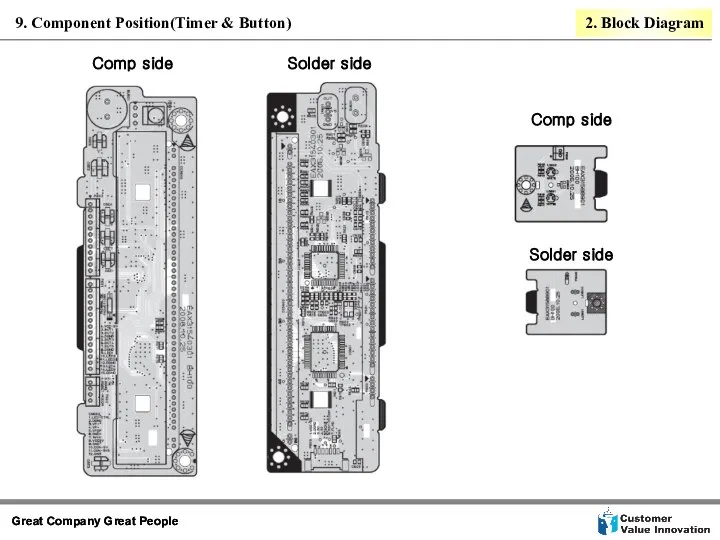
9. Component Position(Timer & Button)
Comp side
Comp side
Solder side
Solder side
2. Block Diagram
9. Component Position(Timer & Button)
Comp side
Comp side
Solder side
Solder side
2. Block Diagram
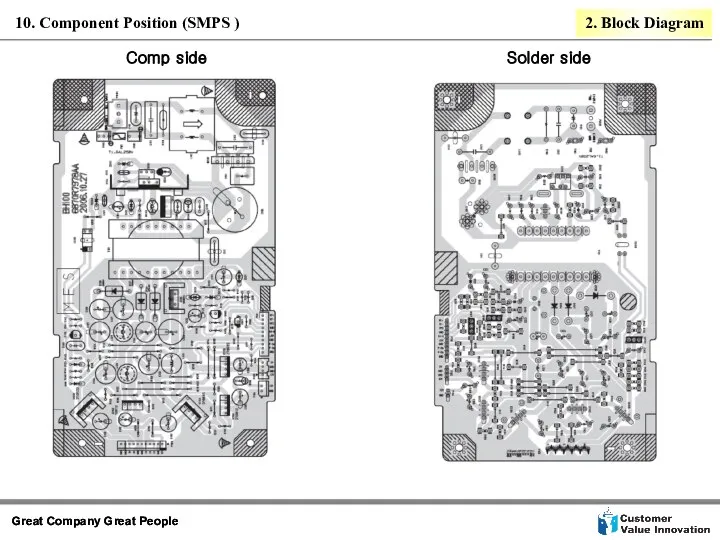
10. Component Position (SMPS )
Comp side
Solder side
2. Block Diagram
10. Component Position (SMPS )
Comp side
Solder side
2. Block Diagram
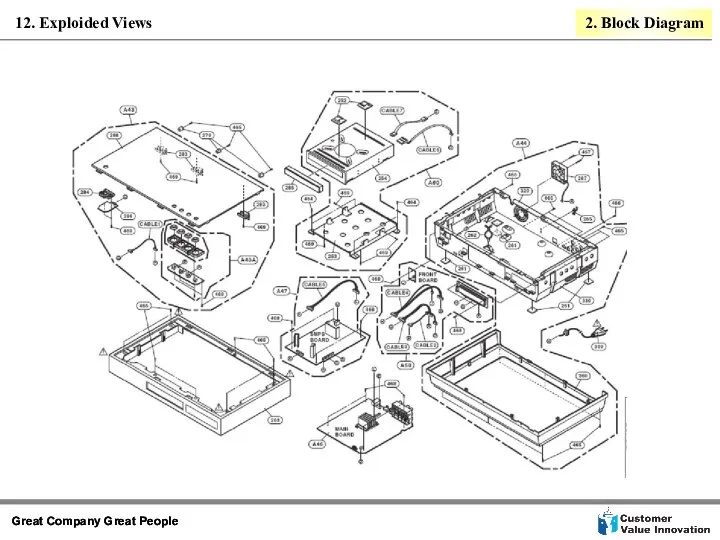
12. Exploided Views
2. Block Diagram
12. Exploided Views
2. Block Diagram
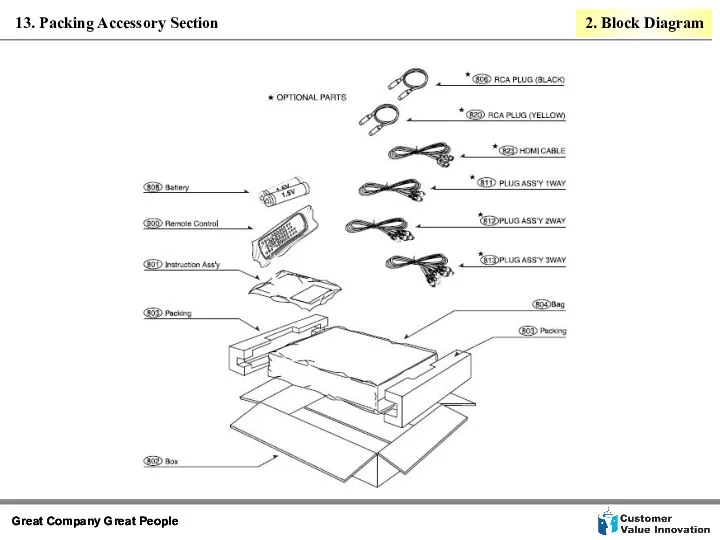
13. Packing Accessory Section
2. Block Diagram
13. Packing Accessory Section
2. Block Diagram
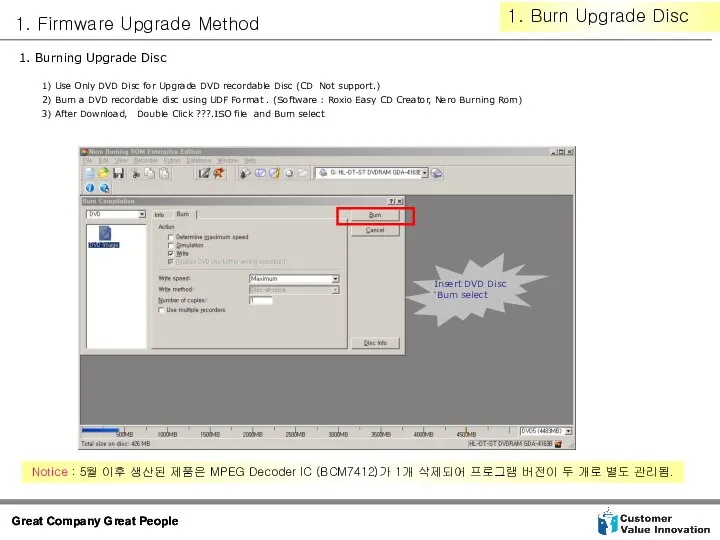
1. Burning Upgrade Disc
1) Use Only DVD Disc for Upgrade
1. Burning Upgrade Disc
1) Use Only DVD Disc for Upgrade
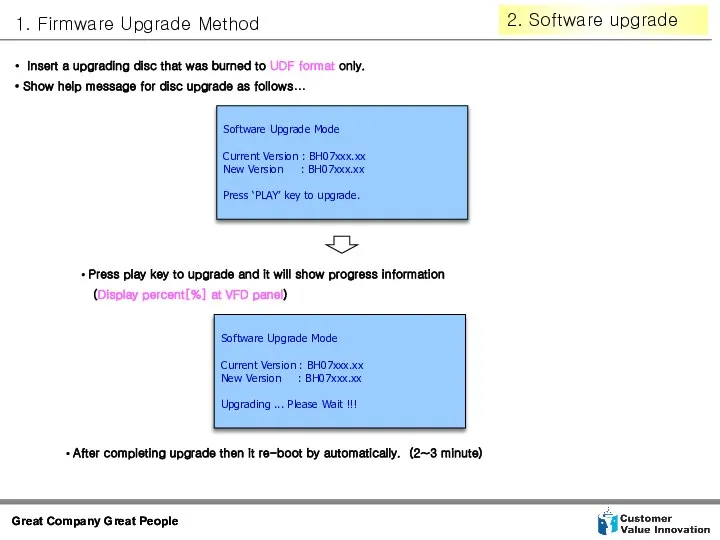
2. Software upgrade
1. Firmware Upgrade Method
Software Upgrade Mode
Current Version : BH07xxx.xx
New
2. Software upgrade
1. Firmware Upgrade Method
Software Upgrade Mode
Current Version : BH07xxx.xx
New
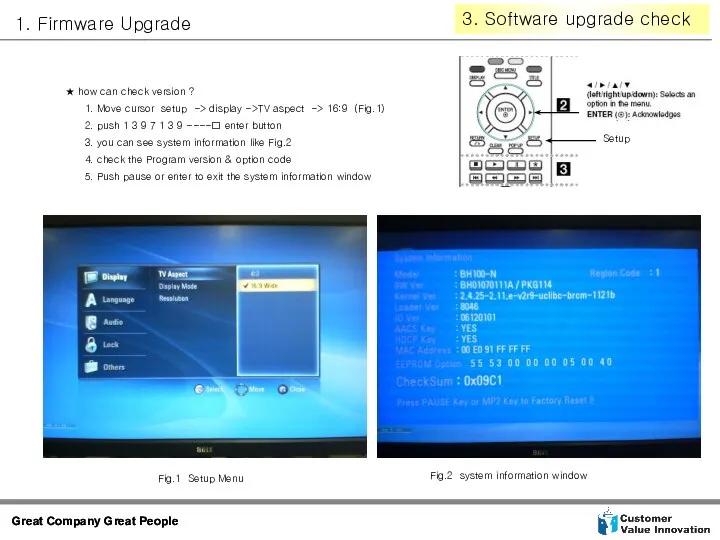
3. Software upgrade check
1. Firmware Upgrade
★ how can check
3. Software upgrade check
1. Firmware Upgrade
★ how can check
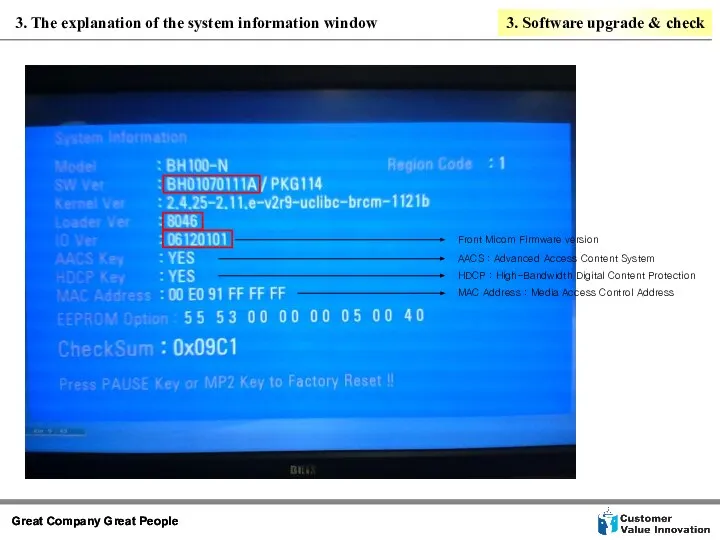
AACS : Advanced Access Content System
HDCP : High-Bandwidth Digital Content Protection
MAC
AACS : Advanced Access Content System
HDCP : High-Bandwidth Digital Content Protection
MAC
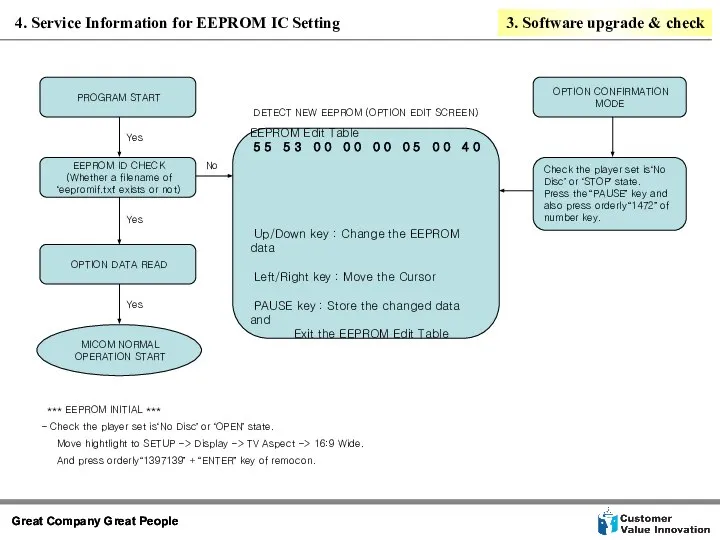
4. Service Information for EEPROM IC Setting
3. Software upgrade & check
4. Service Information for EEPROM IC Setting
3. Software upgrade & check
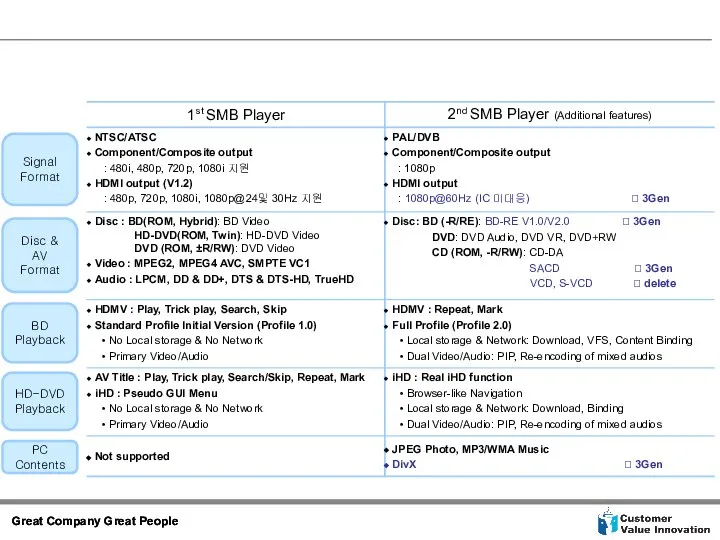
Signal
Format
Disc &
AV Format
BD
Playback
HD-DVD
Playback
PC Contents
Signal
Format
Disc &
AV Format
BD
Playback
HD-DVD
Playback
PC Contents
 Аномалии развития кишечника
  Переходная характеристика. Импульсная характеристика. ЛЧХ
 РУКОВОДСТВО ОРГАНИЗАЦИОННО-ИСПОЛНИТЕЛЬНАЯ
  Основные формы собственности на использование вод Презентацию выполнил студент 2 – го курса юридического факультета группы Ю-124
 Орындаған: Құмарбекова Н.Е Қабылдаған: Топ: 10-011-02қ Факультет: жалпы медицина
 Возбудители брюшного тифа и паратифов
  Формирования социального государства в России
 Физиология процессов адаптации
 Психолого-педагогический семинар «Как чувствует себя учитель в школе?» Педагог-психолог Эктова И.А. МОУ Уваровщинская сош 2007г
 Электрошокер. Виды электрошокеров
 МИНИСТЕРСТВО СЕЛЬСКОГО ХОЗЯЙСТВА РФ ФГБОУ ВПО РГАЗУ ЭКОНОМИЧЕСКИЙ ФАКУЛЬТЕТ КАФЕДРА «МЕНЕДЖМЕНТ И ОРГАНИЗАЦИЯ ПРОИЗВОДСТВА»
  Контент анализ программной речи Д.Трампа
 Проектная деятельность в рамках реализации федеральных государственных общеобразовательных стандартов второго поколения
 Презентация на тему "Положение научно-исследовательской деятельности учащихся общеобразовательных учреждений" - скачать пр
 Великий шелковый путь – великий путь межкультурной коммуникации
 Таможенные операции
  Без названия
 Русский интернет
 Растения – живые существа Автор презентации Коровина Ирина Николаевна учитель начальных классов МБОУ «СОШ №9» г.Сафоново С
 Селена Мари Гомес
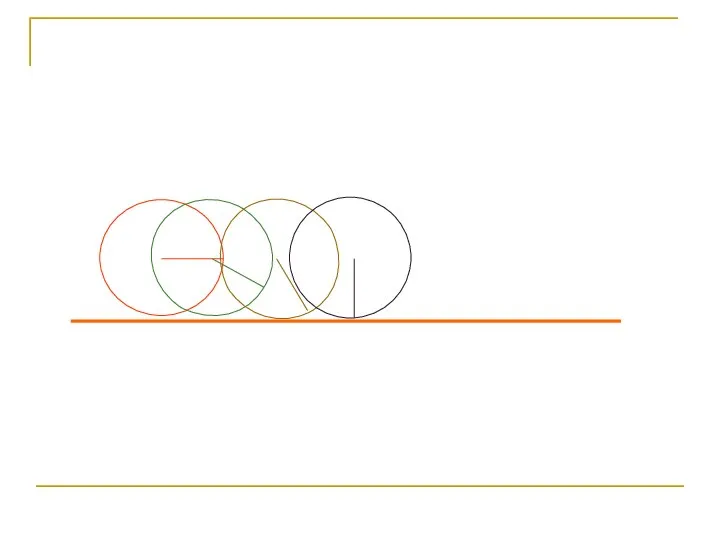 Изображение колеса и радиуса
  Эволюция подходов и принципов к управлению персоналом
 Праздники и традиции в Великобритании и Америке
 вегетативная нс
 Интерфейс графических устройств GDI
 Diagnosis and troubleshooting of automotive electrical
 WWW.IRR.BY ИЗ РУК В РУКИ on-line Лидирующий в Байнете КЛАССИФАЙД — портал частных объявлений и коммерческих предложений
 Фотоальбом. Деловая беседа