- BCS camera for DelPro 5.2

Содержание
- 2. System Software´s DelPro Server DelPro Software with BCS module Configuration Tool Farmic Tools BCS Maintenance DelPro
- 3. Connection layout CISCO RV082 DelPro Server: DelPro Software Configuration Tool Farmic Tools DelPro Xtra System Controller:
- 4. Software´s Functions
- 5. BCS Baseline for DelPro 5.2 To ensure the BCS system works correctly, follow the BCS software
- 6. BCS Downloads Please go into this link and download the required software for the installation according
- 7. Hardware installation 1.1 Check the MEMO 1.2 Check the Power Point Presentation BCS Camera – Hardware
- 8. 1.1 - Check the MEMO+ 1. Hardware Installation Here you will find all the information on
- 9. 1.2 – Check PPT BCS Camera – Hardware Installation 1. Hardware Installation Please go to the
- 10. Run As Administrator: Once Installed go to: C:\Farmic\Maintenance Run: bcsM.exe 2.1 - Install Farmic Tools 2.
- 11. Be sure that the BSC Camera is connected to the electric power and the Network. Once
- 12. Be sure that the BSC Camera is connected to the electric power and the Network. Be
- 13. An Extended Windows will be open, follow the next steps: 2.4 - BCS Maintenance Upgrade “BCS
- 14. All DeLaval body condition scoring BCS cameras with serial numbers starting with: "1523", "1524", and "1531"
- 15. All DeLaval body condition scoring BCS cameras connected with the UBIQUITI network equipment has to be
- 16. The BCS Module is available for Cow: Parlor VMS / AMR Select the “With BCS Camera”
- 17. Then the DelPro Installation will need to finish in order to proceed Remember to follow the
- 18. Ensure the device where the camera is phisically mounted was created: VMS Device MS SSG Parlour
- 19. Device Name IP Address / Hostname: Click the Icon to Search and Find the BCS Camera
- 20. Make sure to install the correct version according to the Baseline 4.1 Installing Configuration Tool 4.
- 21. Before loading the BCS software (.lom file) ensure the d-linux installed is the latest one (4.2.C.002)
- 22. Before Loading the BCS Software make sure DelPro Gateway, SC with AWE, BCS camera SC and
- 23. Once the BCS Software is loaded, on the Applications section will appear AWE and BCS as
- 24. The system configuration window will pop up and ask for: SC Internal Name System GUID Where
- 25. SC Internal Name. You need to copy this name from BCS camera SC on DelPro Device
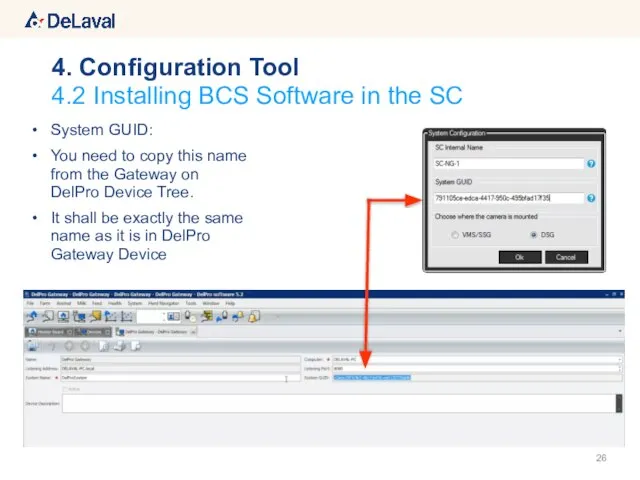
- 26. 4.2 Installing BCS Software in the SC 4. Configuration Tool System GUID: You need to copy
- 27. Choose where the Camera Is mounted: This must match with the ID Source for the BCS
- 28. Once Configuration Tool finish the Process of Configuration (approximately will take 5 minutes) The AWE and
- 29. To do the First Synchronization it is needed to do the following steps in this specific
- 30. Wait until DelPro Gateway and BCS Camera SC have 100% synch on System Monitor. Synchronizing DelPro
- 31. Go to Configuration Tool: Reboot the System Controller Wait until all Devices are Synchronized 100% and
- 32. If you have the Delpro Xtra license already (for ISO Link for instance) After ordering the
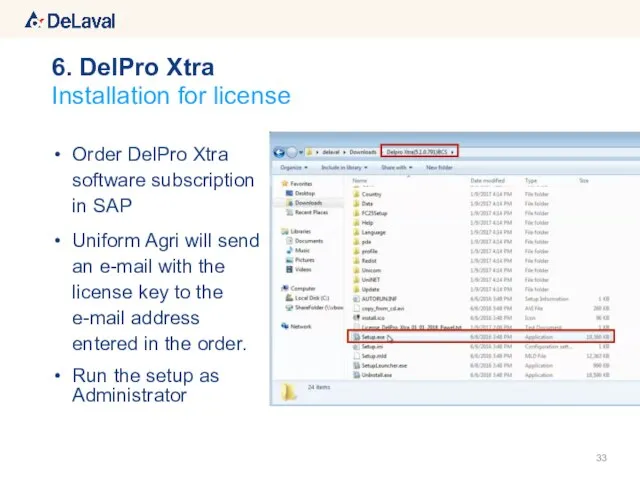
- 33. Order DelPro Xtra software subscription in SAP Uniform Agri will send an e-mail with the license
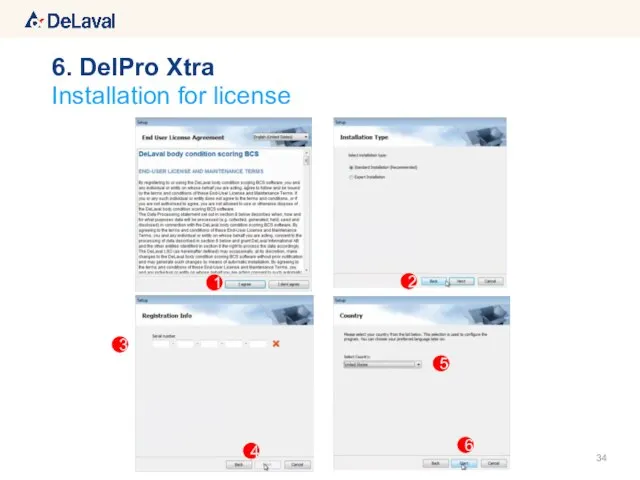
- 34. Installation for license 6. DelPro Xtra 1 2 3 5 4 6
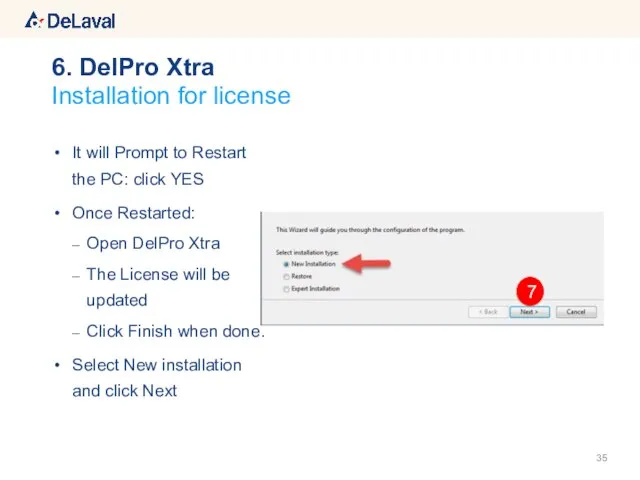
- 35. It will Prompt to Restart the PC: click YES Once Restarted: Open DelPro Xtra The License
- 36. Fill Up the Required Data Herd Number: UBN (Unique Herd Number) Installation for license 6. DelPro
- 37. Do Not Check: UniNET DataSafe International Farm Comparison Select the Country where is installed DONE Installation
- 38. Congratulations You have installed the BCS Camera System The first data can be seen in DelPro
- 40. Скачать презентацию
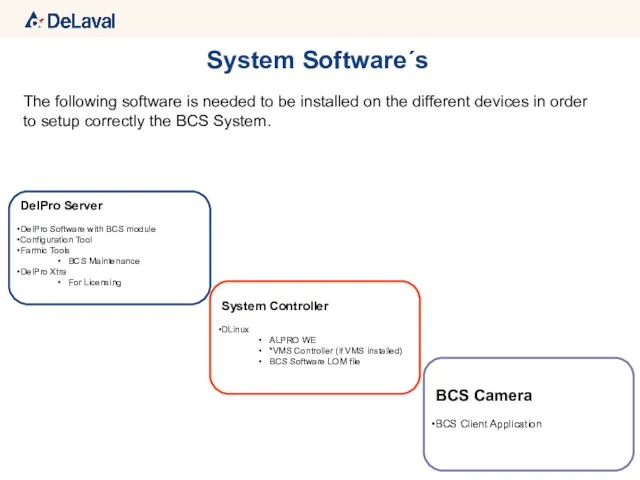
System Software´s
DelPro Server
DelPro Software with BCS module
Configuration Tool
Farmic Tools
BCS Maintenance
DelPro Xtra
For
System Software´s
DelPro Server
DelPro Software with BCS module
Configuration Tool
Farmic Tools
BCS Maintenance
DelPro Xtra
For
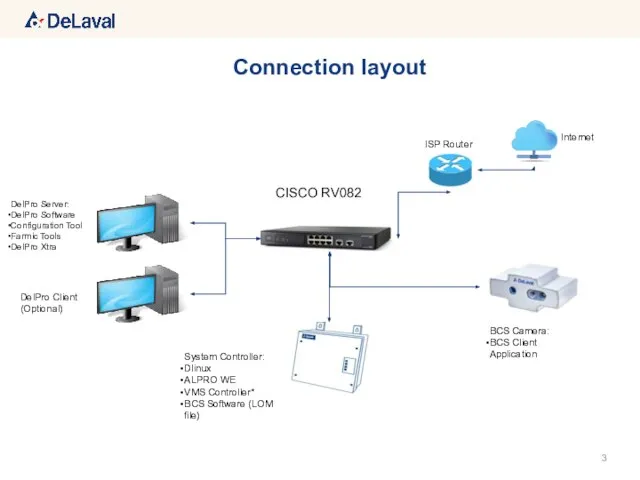
Connection layout
CISCO RV082
DelPro Server:
DelPro Software
Configuration Tool
Farmic Tools
DelPro Xtra
System Controller:
Dlinux
ALPRO WE
VMS Controller*
BCS
Connection layout
CISCO RV082
DelPro Server:
DelPro Software
Configuration Tool
Farmic Tools
DelPro Xtra
System Controller:
Dlinux
ALPRO WE
VMS Controller*
BCS
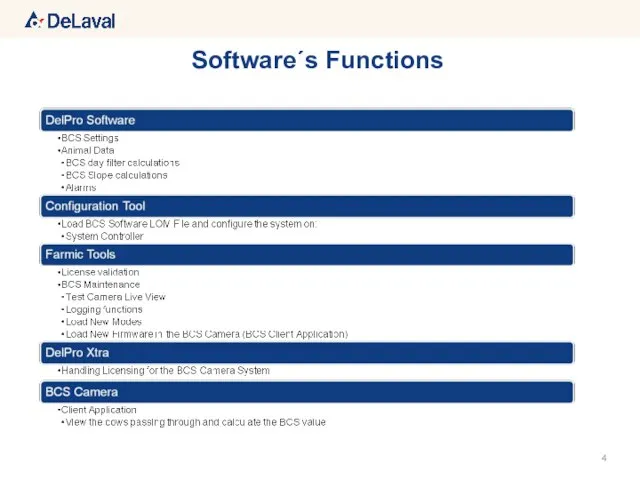
Software´s Functions
Software´s Functions
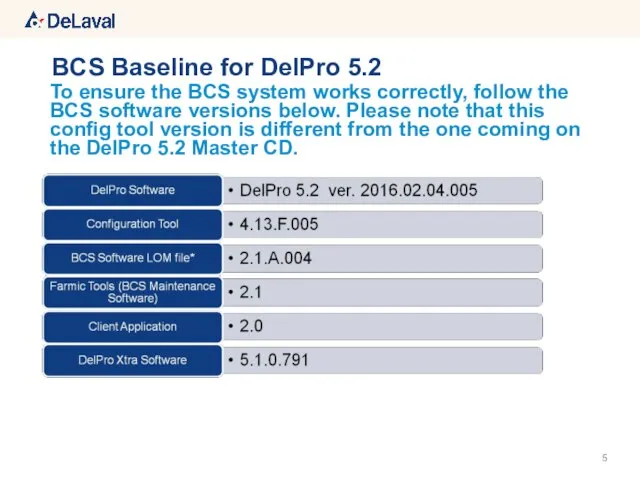
BCS Baseline for DelPro 5.2
To ensure the BCS system works correctly,
BCS Baseline for DelPro 5.2
To ensure the BCS system works correctly,
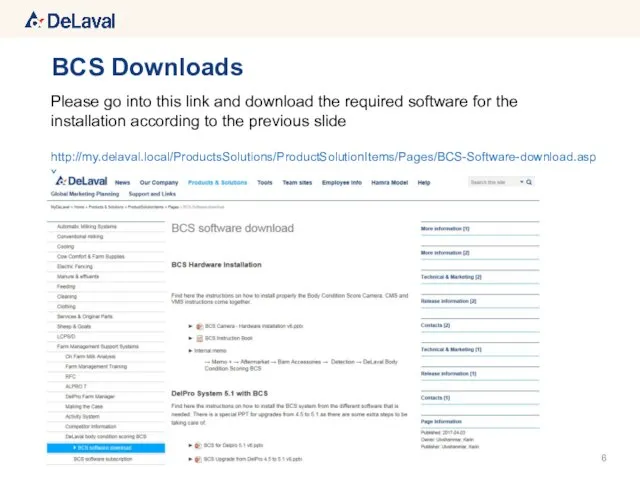
BCS Downloads
Please go into this link and download the required software
BCS Downloads
Please go into this link and download the required software
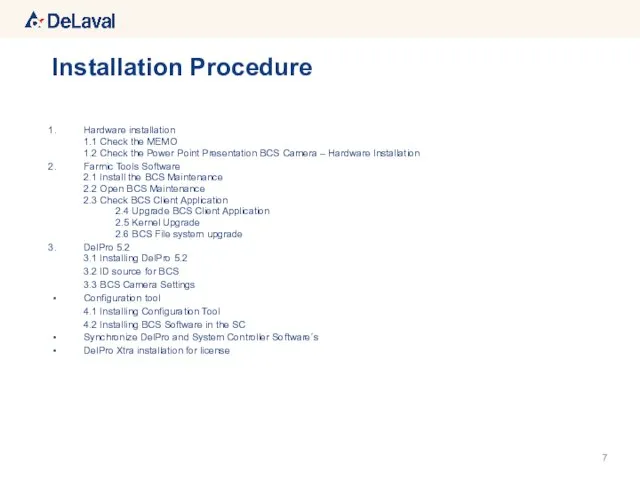
Hardware installation
1.1 Check the MEMO
1.2 Check the Power Point Presentation BCS
Hardware installation
1.1 Check the MEMO
1.2 Check the Power Point Presentation BCS
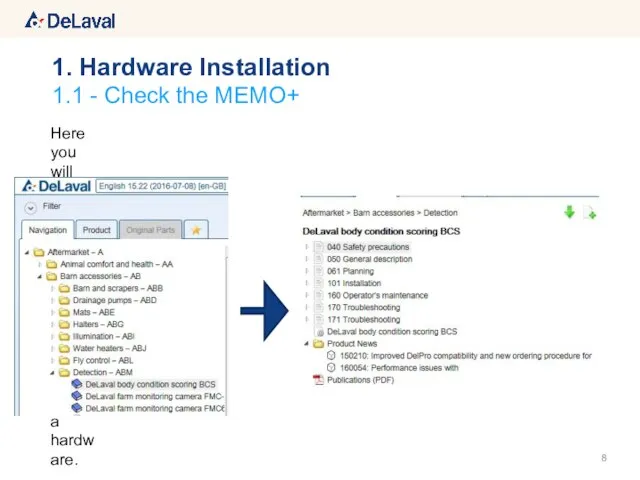
1.1 - Check the MEMO+
1. Hardware Installation
Here you will find all
1.1 - Check the MEMO+
1. Hardware Installation
Here you will find all
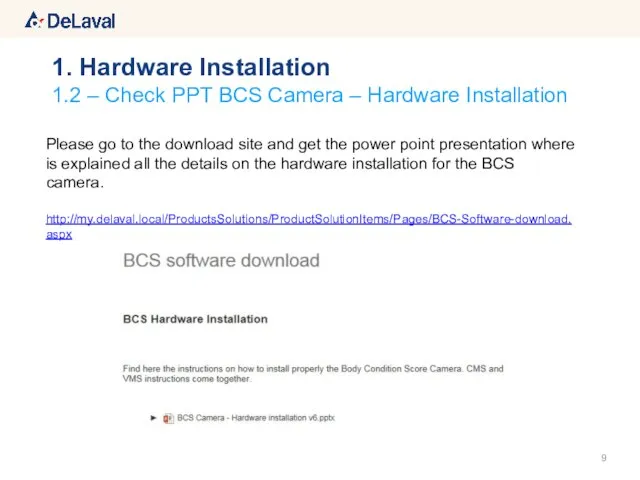
1.2 – Check PPT BCS Camera – Hardware Installation
1. Hardware Installation
Please
1.2 – Check PPT BCS Camera – Hardware Installation
1. Hardware Installation
Please
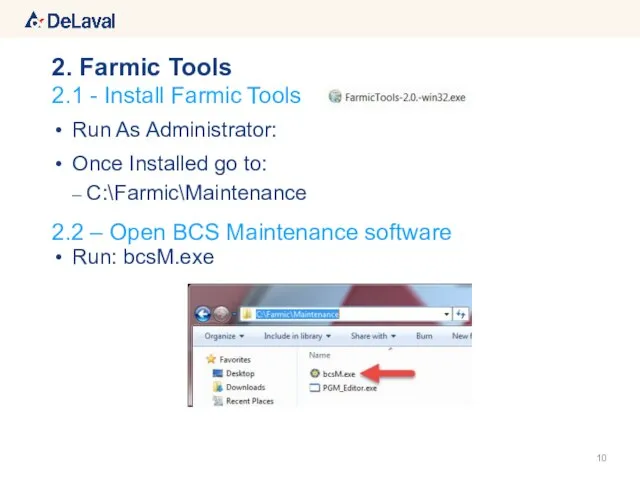
Run As Administrator:
Once Installed go to:
C:\Farmic\Maintenance
Run: bcsM.exe
2.1 - Install Farmic
Run As Administrator:
Once Installed go to:
C:\Farmic\Maintenance
Run: bcsM.exe
2.1 - Install Farmic
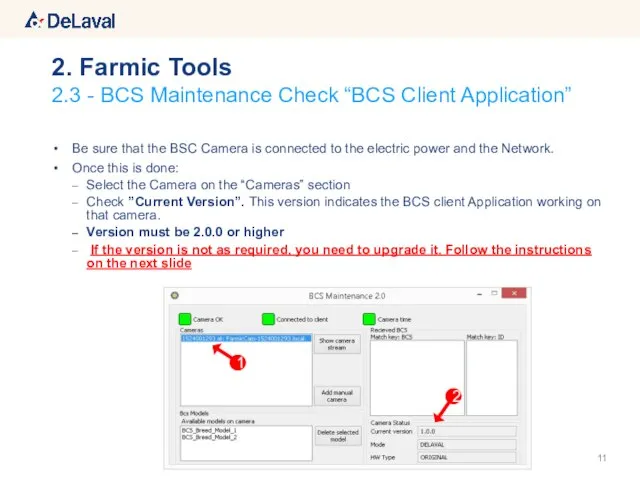
Be sure that the BSC Camera is connected to the electric
Be sure that the BSC Camera is connected to the electric
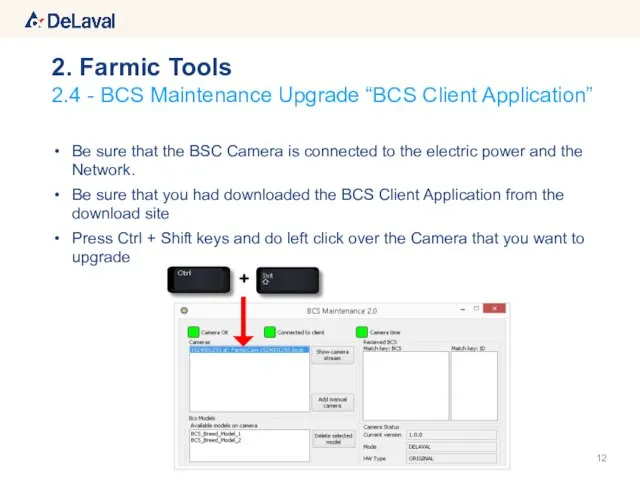
Be sure that the BSC Camera is connected to the electric
Be sure that the BSC Camera is connected to the electric

An Extended Windows will be open, follow the next steps:
2.4 -
An Extended Windows will be open, follow the next steps:
2.4 -
All DeLaval body condition scoring BCS cameras
with serial numbers starting with:
All DeLaval body condition scoring BCS cameras
with serial numbers starting with:
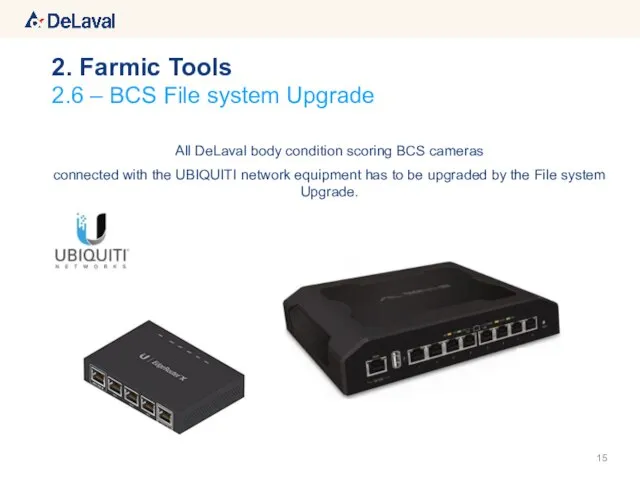
All DeLaval body condition scoring BCS cameras
connected with the UBIQUITI network
All DeLaval body condition scoring BCS cameras
connected with the UBIQUITI network
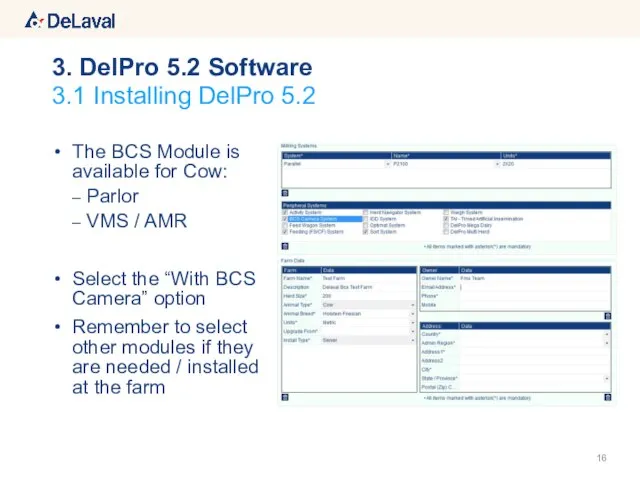
The BCS Module is available for Cow:
Parlor
VMS / AMR
Select the “With
The BCS Module is available for Cow:
Parlor
VMS / AMR
Select the “With
Then the DelPro Installation will need to finish in order to
Then the DelPro Installation will need to finish in order to
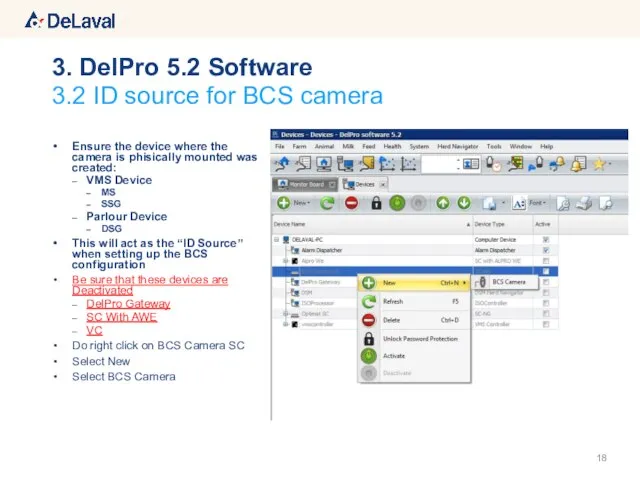
Ensure the device where the camera is phisically mounted was created:
VMS
Ensure the device where the camera is phisically mounted was created:
VMS

Device Name
IP Address / Hostname:
Click the Icon to Search and Find
Device Name
IP Address / Hostname:
Click the Icon to Search and Find
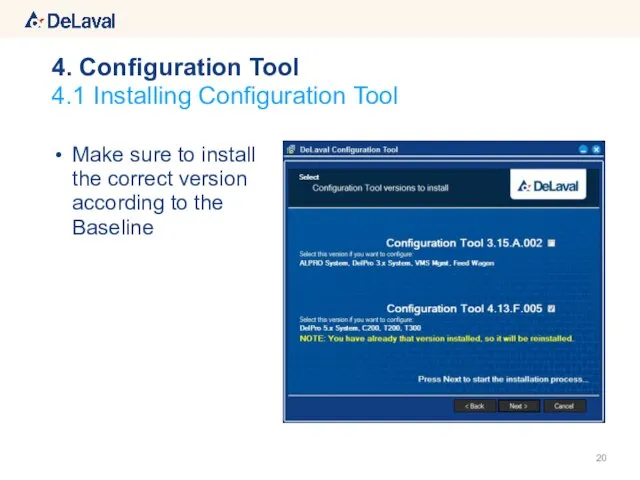
Make sure to install the correct version according to the Baseline
Make sure to install the correct version according to the Baseline
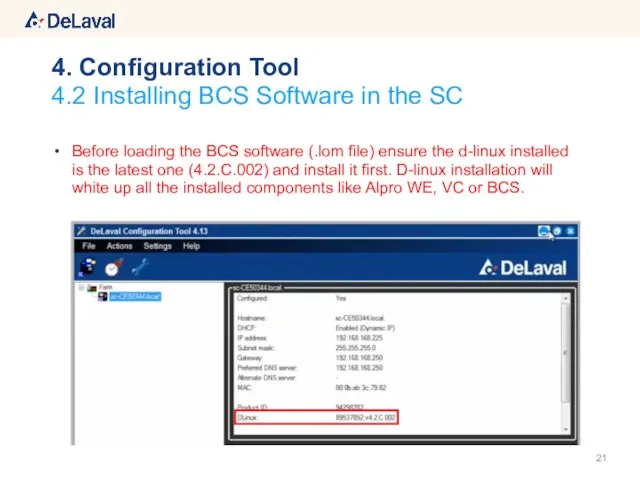
Before loading the BCS software (.lom file) ensure the d-linux installed
Before loading the BCS software (.lom file) ensure the d-linux installed
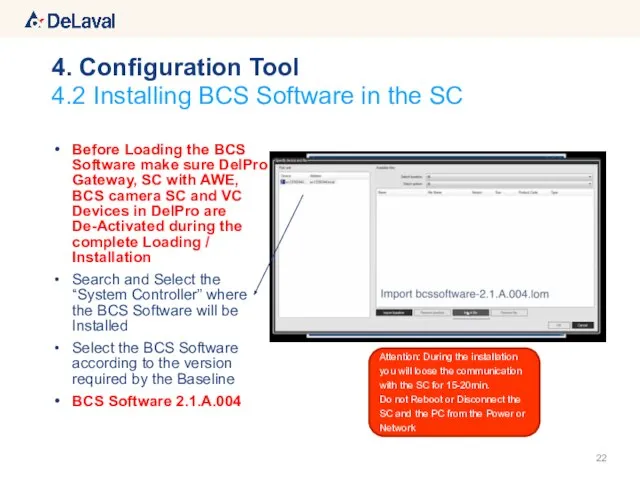
Before Loading the BCS Software make sure DelPro Gateway, SC with
Before Loading the BCS Software make sure DelPro Gateway, SC with
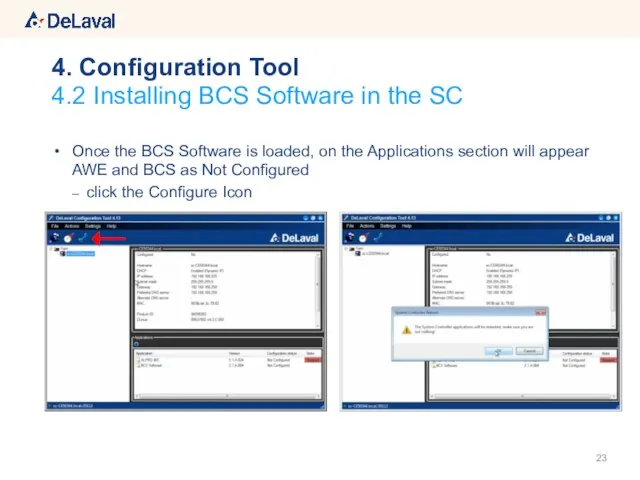
Once the BCS Software is loaded, on the Applications section will
Once the BCS Software is loaded, on the Applications section will
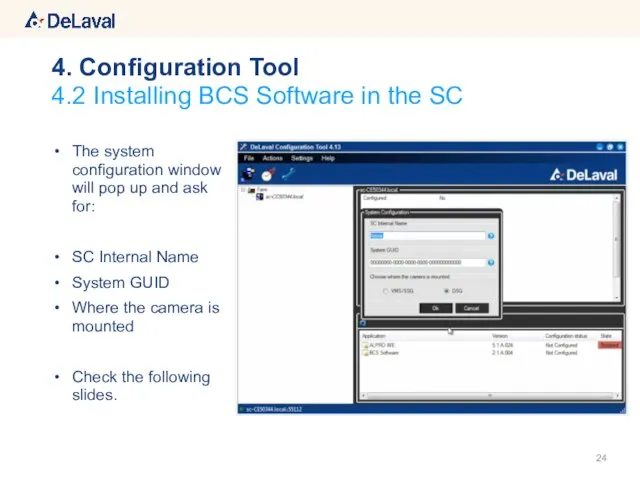
The system configuration window will pop up and ask for:
SC Internal
The system configuration window will pop up and ask for:
SC Internal
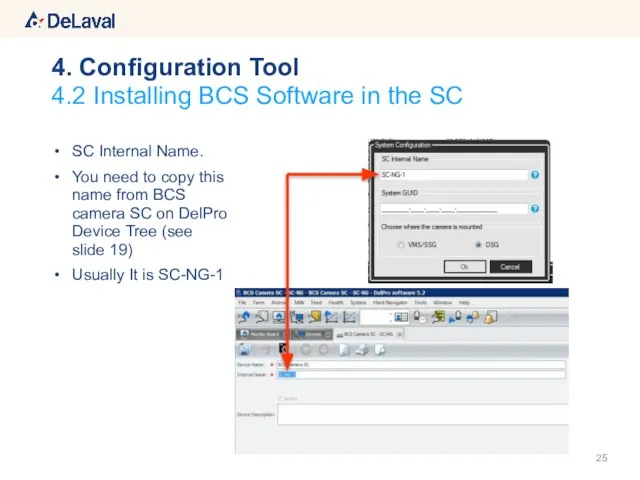
SC Internal Name.
You need to copy this name from BCS camera
SC Internal Name.
You need to copy this name from BCS camera
4.2 Installing BCS Software in the SC
4. Configuration Tool
System GUID:
You need
4.2 Installing BCS Software in the SC
4. Configuration Tool
System GUID:
You need
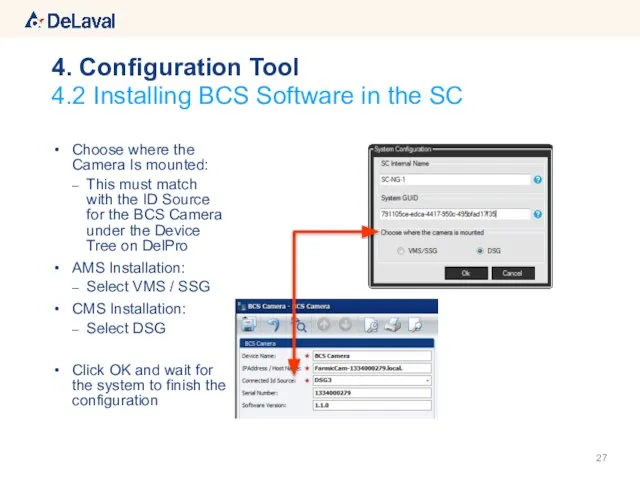
Choose where the Camera Is mounted:
This must match with the ID
Choose where the Camera Is mounted:
This must match with the ID
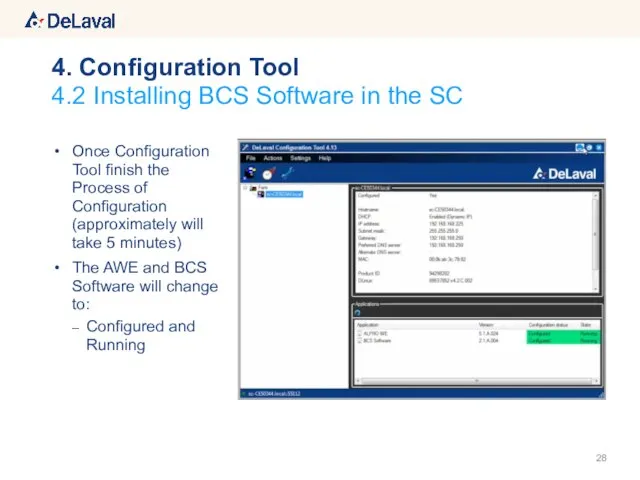
Once Configuration Tool finish the Process of Configuration (approximately will take
Once Configuration Tool finish the Process of Configuration (approximately will take
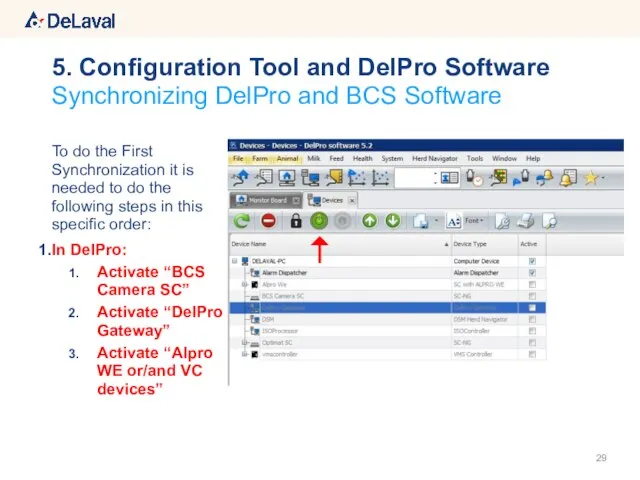
To do the First Synchronization it is needed to do the
To do the First Synchronization it is needed to do the
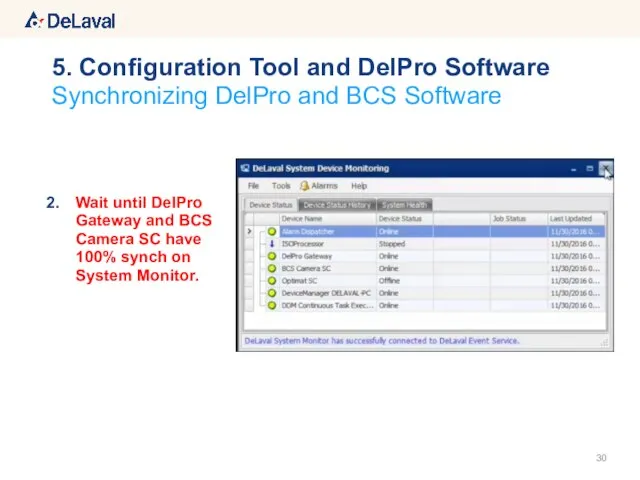
Wait until DelPro Gateway and BCS Camera SC have 100% synch
Wait until DelPro Gateway and BCS Camera SC have 100% synch
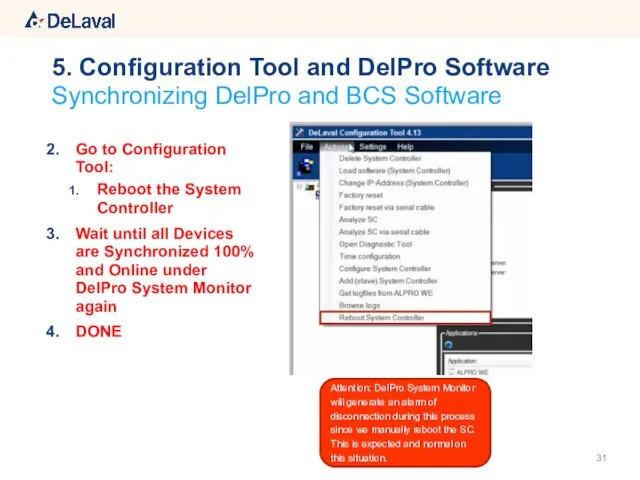
Go to Configuration Tool:
Reboot the System Controller
Wait until all Devices are
Go to Configuration Tool:
Reboot the System Controller
Wait until all Devices are
If you have the Delpro Xtra license already
(for ISO Link
If you have the Delpro Xtra license already
(for ISO Link
Order DelPro Xtra software subscription in SAP
Uniform Agri will send an
Order DelPro Xtra software subscription in SAP
Uniform Agri will send an
Installation for license
6. DelPro Xtra
1
2
3
5
4
6
Installation for license
6. DelPro Xtra
1
2
3
5
4
6
It will Prompt to Restart the PC: click YES
Once Restarted:
Open DelPro
It will Prompt to Restart the PC: click YES
Once Restarted:
Open DelPro
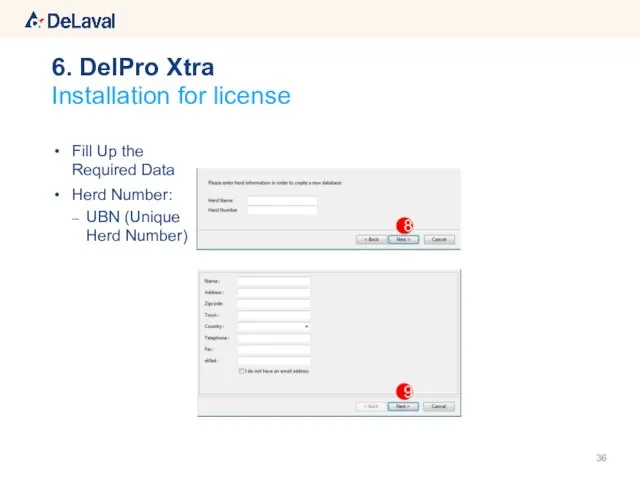
Fill Up the Required Data
Herd Number:
UBN (Unique Herd Number)
Installation for license
6.
Fill Up the Required Data
Herd Number:
UBN (Unique Herd Number)
Installation for license
6.
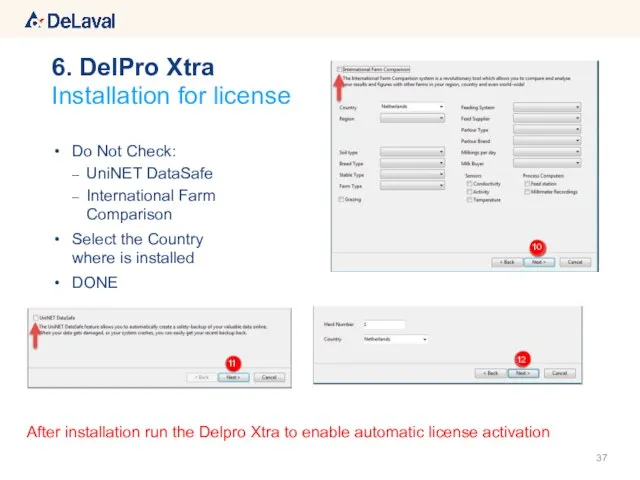
Do Not Check:
UniNET DataSafe
International Farm Comparison
Select the Country where is installed
DONE
Installation
Do Not Check:
UniNET DataSafe
International Farm Comparison
Select the Country where is installed
DONE
Installation
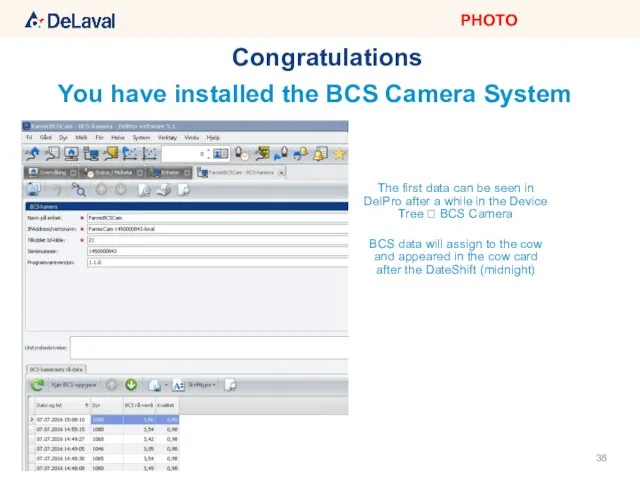
Congratulations
You have installed the BCS Camera System
The first data can be
Congratulations
You have installed the BCS Camera System
The first data can be
 Алгоритмы работы с величинами. 9 класс
 WORD простейшие операции с текстом
 Машина Чарльза Бэббиджа
 Семенюк МВ
 Решение текстовых логических задач Раздел: алгебра логики и логические основы ПК
  Гаджимурадова Жанна Магомедовна учитель информатики МБОУ «СОШ №11» г. Чебоксары Всероссийский сетевой педагогический проект: «А
 Работа с файлами
 Программирование линейных алгоритмов
 Основы программирования в начальной школе
 Презентация "«Состав персонального компьютера»" - скачать презентации по Информатике
 Изменения на сайте
 Andmebaasisüsteemide Oracle ja PostgreSQL kasutamine
 BumerBoom
 Двоичное кодирование. Измерение информации
 Архитектура ORACLE. Лекция 4. Внешняя память
 Кодирование информации в компьютере
 Методическое пособие по массивам Одномерные массивы Двухмерные массивы
 Администрирование информационных систем. Установка и начальная настройка SQL. Server 2000
 ТОП-5 приложений для изучения иностранных языков для iOS и Android
 Информационная система учета и планирования работы салона красоты
 Многоканальные телекоммуникационные системы. (Лабораторная работа 2)
 АЛГОРИТМЫ Способы представления алгоритмов
 Основы мобильной техники
 Требования к подготовке презентации
 Кодирование информации. Информация и информационные процессы. Кодирование и декодирование
 Презентация "MSC.Dytran - 03" - скачать презентации по Информатике
 Что такое компьютерная графика?
 Отчетность по агрегированным данным с использованием групповых функций