- Introduction to Windows Forms Applications

Содержание
- 2. The following slides are courtesy of Ms. Stephany Coffman-Wolph (2/9/09) NOTE: Formatting changed, some other changes
- 3. 1. GUI Introduction GUI = Graphical User Interface Allows the user to interact visually with a
- 4. Building GUI GUI's are built from GUI controls Also known as components or widgets They are
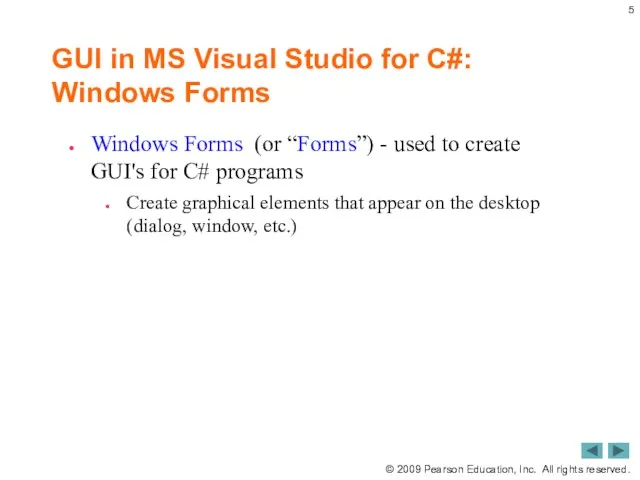
- 5. GUI in MS Visual Studio for C#: Windows Forms Windows Forms (or “Forms”) - used to
- 6. Components for GUI For future use: Component is an instance of a class that implements the
- 7. 2. Using Toolbox in Visual Studio to Create GUIs The controls and components of C# are
- 8. Using the Toolbox - Basics (After you open it with: View>>Toolbox), the toolbox is located on
- 9. 3. Properties and Methods for GUI Controls Each control has properties (and some methods) Example properties:
- 10. Editing the Properties Click on the control for which you want to change the properties E.g.,
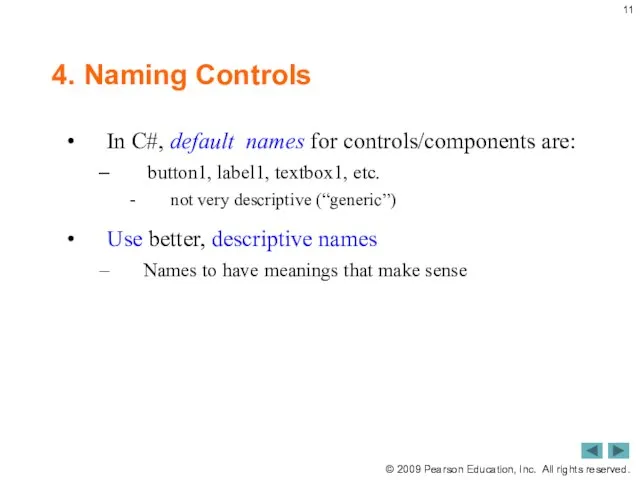
- 11. 4. Naming Controls In C#, default names for controls/components are: button1, label1, textbox1, etc. not very
- 12. Conventions for Naming Controls - Start the control name with... Control Button TextBox ListBox Label SaveFileDialog
- 13. The following slides are based on textbook slides NOTE: Formatting changed, some other changes made by
- 14. 5. In-class Exercise: Using Visual Programming to Create a Simple Program that Displays Text and an
- 15. Using Visual Programming to Create a Simple Program that Displays Text and an Image (Cont.) This
- 16. Using Visual Programming to Create a Simple Program that Displays Text and an Image (Cont.) Start
- 17. Using Visual Programming to Create … (Cont.) Select File > New Project… and select Windows Forms
- 18. Using Visual Programming to Create a Simple Program that …(Cont.) The following Project Location dialog shows
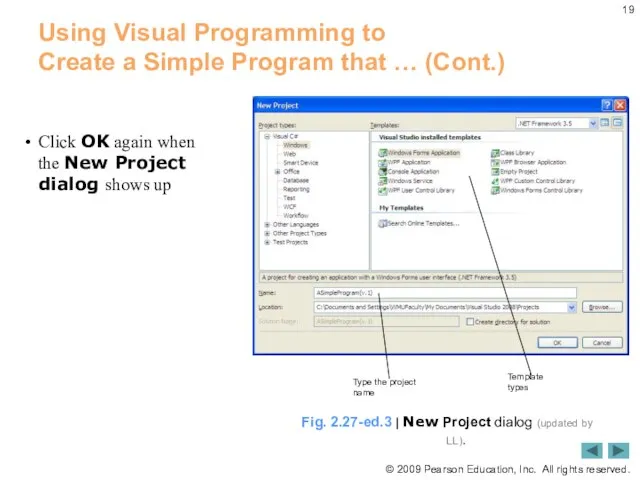
- 19. Using Visual Programming to Create a Simple Program that … (Cont.) Click OK again when the
- 20. Using Visual Programming to Create … (Cont.) Right-click anywhere on the Form to display the Form’s
- 21. Using Visual Programming to Create … (Cont.) Resize the Form by clicking and dragging one of
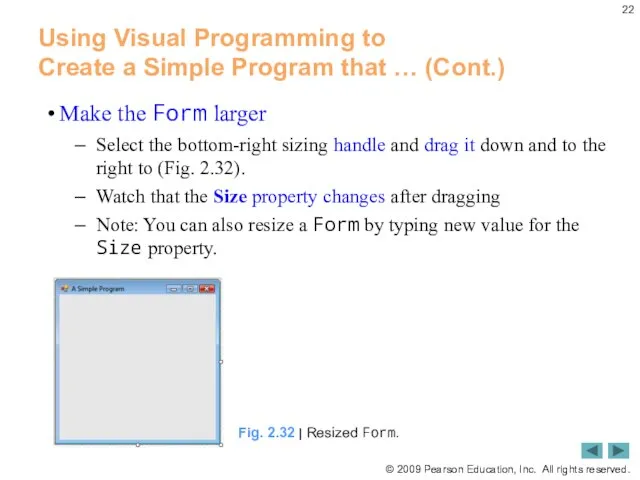
- 22. Using Visual Programming to Create a Simple Program that … (Cont.) Make the Form larger Select
- 23. Using Visual Programming to Create a Simple Program Program that …(Cont.) In the Properties window, click
- 24. Using Visual Programming to Create a Simple Program that Displays Text and an Image (Cont.) Once
- 25. Using Visual Programming to Create a Simple Program that Displays Text and an Image (Cont.) If
- 26. Using Visual Programming to Create … (Cont.) Click on the Label to make its properties appear
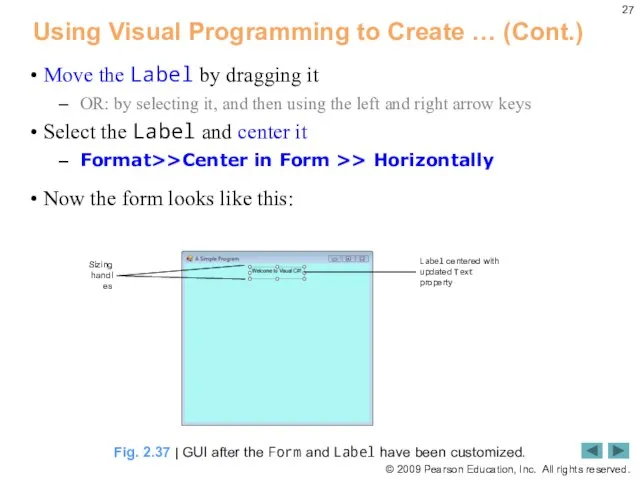
- 27. Using Visual Programming to Create … (Cont.) Move the Label by dragging it OR: by selecting
- 28. Using Visual Programming to Create … (Cont.) Set the AutoSize property to False If the AutoSize
- 29. Using Visual Programming to Create … (Cont.) Change the font of the Label’s text Click on
- 30. Using Visual Programming to Create a Simple Program that … (Cont.) The Font dialog (Fig. 2.39)
- 31. Using Visual Programming to Create a Simple Program that Displays Text and an Image (Cont.) Select
- 32. Using Visual Programming to Create …(Cont.) Make sure that text in the label is in two
- 33. Using Visual Programming to Create a Simple Program that Displays Text and an Image (Cont.) Click
- 34. Using Visual Programming to Create … (Cont.) From the instructor’s web page, get the file with
- 35. Using Visual Programming to Create … (Cont.) Click the Image property. The ellipsis button appears Click
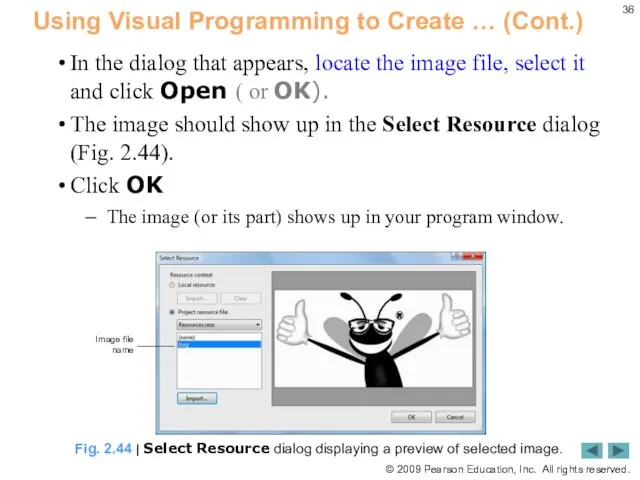
- 36. Using Visual Programming to Create … (Cont.) In the dialog that appears, locate the image file,
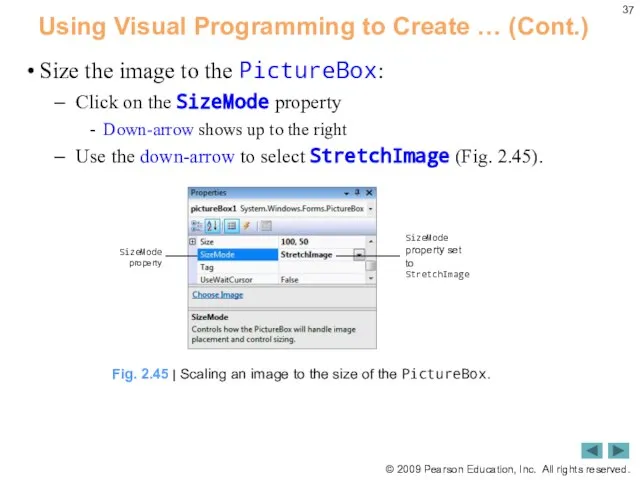
- 37. Using Visual Programming to Create … (Cont.) Size the image to the PictureBox: Click on the
- 38. Using Visual Programming to Create … (Cont.) Adjust the size of the image to visually match
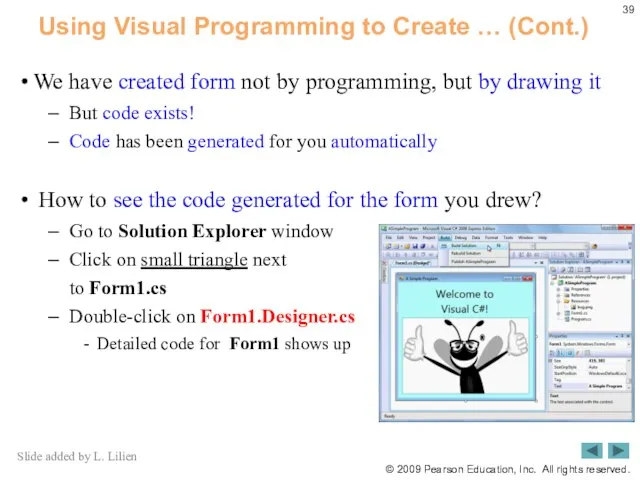
- 39. Using Visual Programming to Create … (Cont.) We have created form not by programming, but by
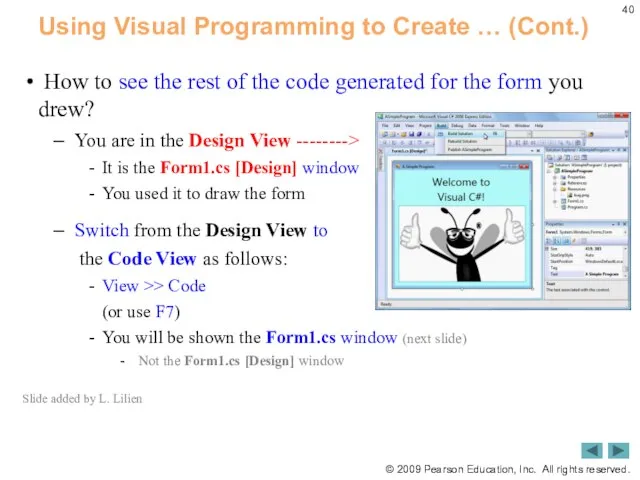
- 40. Using Visual Programming to Create … (Cont.) How to see the rest of the code generated
- 41. Using Visual Programming to Create …(Cont.) You are now in the Code View --------> It is
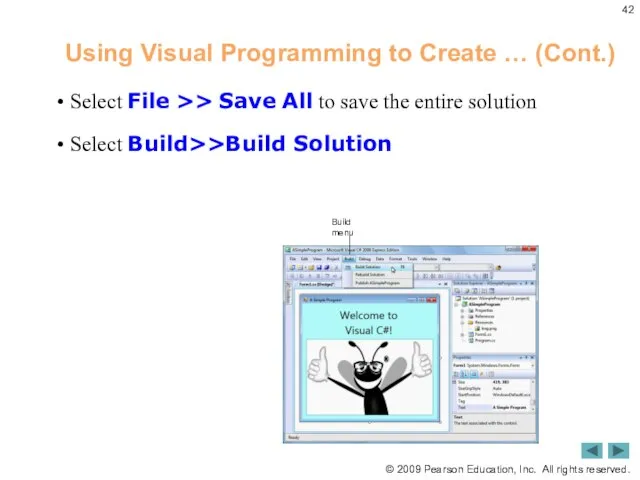
- 42. Using Visual Programming to Create … (Cont.) Select File >> Save All to save the entire
- 43. Using Visual Programming to Create … (Cont.) Select Debug >> Start Debugging to compile and execute
- 44. The following slides are again courtesy of Ms. Stephany Coffman-Wolph (2/9/09) NOTE: Formatting changed, some other
- 45. 6. Event Handling When a user interacts with a form, this causes an event to occur
- 46. Event Handler for Clicking a Button The following code is for a button named btnQuit Function:
- 47. How to write code for an event... Suppose that you are working on the design of
- 48. 7. Fun with Textboxes A textbox is an area in which text can be displayed or
- 49. Example: Log-in Screen Drag two Label controls from Toolbox onto the form Use the properties to
- 50. Example: Log-in Screen (Cont.) Making the Textbox for Typing in Passwords Click on the second of
- 51. How to Get Info From/ToTextbox Suppose that your textbox is named txtUserName To get information typed
- 52. 8. Using Multiple Forms Can a program have multiple forms? Yes! How is this accomplished? By
- 53. When it starts, it shows Form1 After clicking on Go! on Form1, it hides Form1, and
- 54. Code for the Form1 form Slide modified by L. Lilien RECALL: After user clicks on Quit
- 55. Code for the FormLogin form Slide modified by L. Lilien RECALL: The user enters his name
- 56. Running the 2-form WFA Example in 27 easy steps IMPORTANT Follow this procedure exactly. Changing the
- 57. Running the 2-form WFA Example … (Cont.) 10) Select Add in the menu. Another pop-up menu
- 58. Running the 2-form WFA Example … (Cont.) 18) Go to the Form1.cs [Design] window. Change view
- 59. 8. In-class Self-evaluation Exercise Consider the program implementing the Point3-Circle4 hierarchy from Lecture 4, defined in
- 60. ++ READ THE REMAINING SLIDES ON YOUR OWN ++ The following slides are textbook slides for
- 61. 2.1 … 2.2 RECALL: Overview of the Visual Studio 2008 IDE 2.3 RECALL: Menu Bar and
- 62. The New Project dialog (Fig. 2.3) displays. Templates are project types users can create in Visual
- 63. 2.2 Overview of the Visual Studio 2008 IDE (Cont.) The gray rectangle (called a Form) represents
- 64. Figure 2.5 shows where the Form’s name can be modified in the Properties window. 2.2 Overview
- 65. Figure 2.6 shows a dialog in which a control’s font properties can be modified. 2.2 Overview
- 66. RECALL: 2.3 Menu Bar and Toolbar Commands for managing the IDE are contained in menus on
- 67. Fig. 2.8 | Summary of Visual Studio 2008 IDE menus. 2.3 Menu Bar and Toolbar (Cont.)
- 68. RECALL: 2.4 Navigating the Visual Studio IDE The IDE provides windows for accessing project files and
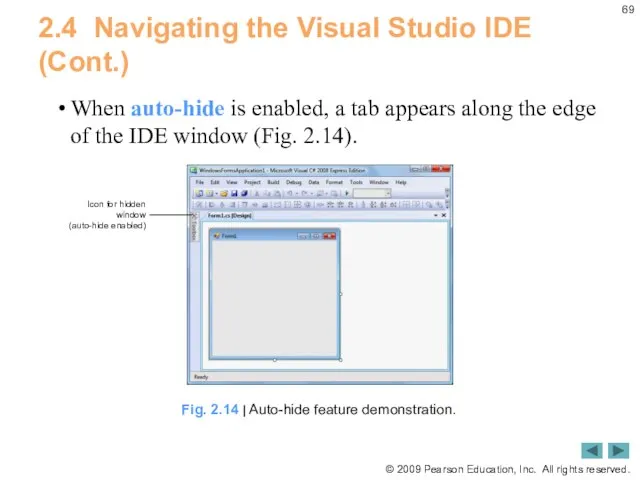
- 69. 2.4 Navigating the Visual Studio IDE (Cont.) When auto-hide is enabled, a tab appears along the
- 70. 2.4 Navigating the Visual Studio IDE (Cont.) Placing the mouse pointer over one of these icons
- 71. 2.4 Navigating the Visual Studio IDE (Cont.) To disable auto-hide and keep the window open, click
- 72. 2.4 Navigating the Visual Studio IDE (Cont.) 2.4.1 Solution Explorer The Solution Explorer window (Fig. 2.17)
- 73. 2.4 Navigating the Visual Studio IDE (Cont.) Clicking the Show All Files icon displays all the
- 74. 2.4 Navigating the Visual Studio IDE (Cont.) Click a plus box small triangle to display grouped
- 75. 2.4 Navigating the Visual Studio IDE (Cont.) Click the minus box small triangle to collapse the
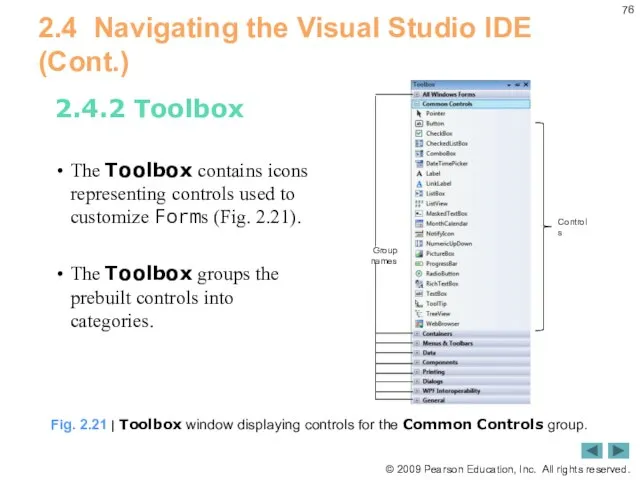
- 76. 2.4 Navigating the Visual Studio IDE (Cont.) 2.4.2 Toolbox The Toolbox contains icons representing controls used
- 77. 2.4 Navigating the Visual Studio IDE (Cont.) 2.4.2 Toolbox To display the Properties window, select View
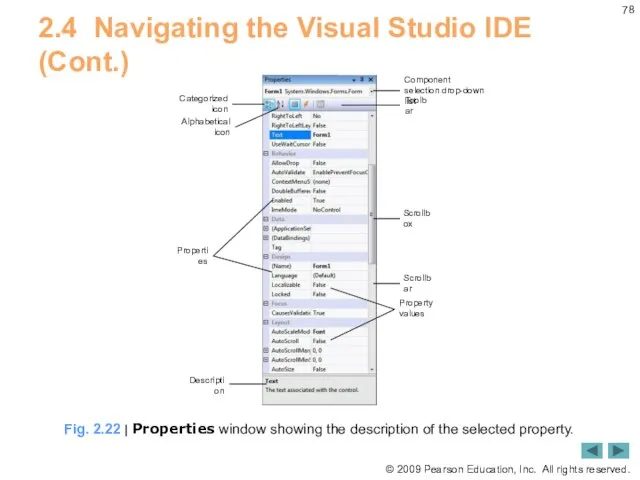
- 78. 2.4 Navigating the Visual Studio IDE (Cont.) Fig. 2.22 | Properties window showing the description of
- 79. Fig. 2.23 | Help menu commands. The Help menu commands are summarized in Fig. 2.23. RECALL:
- 80. 2.5 Using Help (Cont.) Help in VS 2010 is a disaster! Microsoft should be ashamed of
- 81. 2.5 Using Help (Cont.) Select Tools > Options… Make sure that the Show all settings checkbox
- 82. 2.5 Using Help (Cont.) Fig. 2.25 | Options dialog displaying Help settings. Show Help using drop-down
- 84. Скачать презентацию

The following slides are courtesy of
Ms. Stephany Coffman-Wolph
(2/9/09)
NOTE:
Formatting changed,
The following slides are courtesy of Ms. Stephany Coffman-Wolph (2/9/09) NOTE: Formatting changed,

1. GUI
Introduction
GUI = Graphical User Interface
Allows the user to interact
1. GUI
Introduction
GUI = Graphical User Interface
Allows the user to interact

Building GUI
GUI's are built from GUI controls
Also known as components or
Building GUI
GUI's are built from GUI controls
Also known as components or
GUI in MS Visual Studio for C#: Windows Forms
Windows Forms (or
GUI in MS Visual Studio for C#: Windows Forms
Windows Forms (or

Components for GUI
For future use:
Component is an instance of
Components for GUI
For future use:
Component is an instance of

2. Using Toolbox in Visual Studio to Create GUIs
The controls and
2. Using Toolbox in Visual Studio to Create GUIs
The controls and

Using the Toolbox - Basics
(After you open it with: View>>Toolbox), the
Using the Toolbox - Basics
(After you open it with: View>>Toolbox), the

3. Properties and Methods for GUI Controls
Each control has properties (and
3. Properties and Methods for GUI Controls
Each control has properties (and

Editing the Properties
Click on the control for which you want to
Editing the Properties
Click on the control for which you want to
4. Naming Controls
In C#, default names for controls/components are:
button1, label1,
4. Naming Controls
In C#, default names for controls/components are:
button1, label1,

Conventions for Naming Controls - Start the control name with...
Control
Button
TextBox
ListBox
Label
SaveFileDialog
Begin name
Conventions for Naming Controls - Start the control name with...
Control
Button
TextBox
ListBox
Label
SaveFileDialog
Begin name

The following slides are based on textbook slides
NOTE:
Formatting changed,
The following slides are based on textbook slides NOTE: Formatting changed,

5. In-class Exercise:
Using Visual Programming to
Create a Simple Program that
5. In-class Exercise: Using Visual Programming to Create a Simple Program that

Using Visual Programming to Create a Simple Program that Displays Text
Using Visual Programming to Create a Simple Program that Displays Text

Using Visual Programming to
Create a Simple Program that Displays Text and
Using Visual Programming to Create a Simple Program that Displays Text and

Using Visual Programming to Create … (Cont.)
Select File > New Project… and select
Using Visual Programming to Create … (Cont.)
Select File > New Project… and select

Using Visual Programming to
Create a Simple Program that …(Cont.)
The following Project
Using Visual Programming to
Create a Simple Program that …(Cont.)
The following Project
Using Visual Programming to
Create a Simple Program that … (Cont.)
Click OK
Using Visual Programming to
Create a Simple Program that … (Cont.)
Click OK

Using Visual Programming to Create … (Cont.)
Right-click anywhere on the Form
Using Visual Programming to Create … (Cont.)
Right-click anywhere on the Form

Using Visual Programming to Create … (Cont.)
Resize the Form by clicking
Using Visual Programming to Create … (Cont.)
Resize the Form by clicking
Using Visual Programming to
Create a Simple Program that … (Cont.)
Make the
Using Visual Programming to
Create a Simple Program that … (Cont.)
Make the

Using Visual Programming to Create a Simple Program Program that …(Cont.)
In
Using Visual Programming to Create a Simple Program Program that …(Cont.)
In

Using Visual Programming to
Create a Simple Program that Displays Text and
Using Visual Programming to Create a Simple Program that Displays Text and

Using Visual Programming to
Create a Simple Program that Displays Text and
Using Visual Programming to Create a Simple Program that Displays Text and

Using Visual Programming to Create … (Cont.)
Click on the Label to
Using Visual Programming to Create … (Cont.)
Click on the Label to
Using Visual Programming to Create … (Cont.)
Move the Label by dragging
Using Visual Programming to Create … (Cont.)
Move the Label by dragging

Using Visual Programming to Create … (Cont.)
Set the AutoSize property to
Using Visual Programming to Create … (Cont.)
Set the AutoSize property to

Using Visual Programming to Create … (Cont.)
Change the font of the
Using Visual Programming to Create … (Cont.)
Change the font of the

Using Visual Programming to
Create a Simple Program that … (Cont.)
The Font
Using Visual Programming to
Create a Simple Program that … (Cont.)
The Font

Using Visual Programming to
Create a Simple Program that Displays Text and
Using Visual Programming to Create a Simple Program that Displays Text and

Using Visual Programming to Create …(Cont.)
Make sure that text in the
Using Visual Programming to Create …(Cont.)
Make sure that text in the

Using Visual Programming to
Create a Simple Program that Displays Text and
Using Visual Programming to Create a Simple Program that Displays Text and

Using Visual Programming to Create … (Cont.)
From the instructor’s web page,
Using Visual Programming to Create … (Cont.)
From the instructor’s web page,

Using Visual Programming to Create … (Cont.)
Click the Image property.
The ellipsis
Using Visual Programming to Create … (Cont.)
Click the Image property.
The ellipsis
Using Visual Programming to Create … (Cont.)
In the dialog that appears,
Using Visual Programming to Create … (Cont.)
In the dialog that appears,
Using Visual Programming to Create … (Cont.)
Size the image to the
Using Visual Programming to Create … (Cont.)
Size the image to the

Using Visual Programming to Create … (Cont.)
Adjust the size of the
Using Visual Programming to Create … (Cont.)
Adjust the size of the
Using Visual Programming to Create … (Cont.)
We have created form not
Using Visual Programming to Create … (Cont.)
We have created form not
Using Visual Programming to Create … (Cont.)
How to see the
Using Visual Programming to Create … (Cont.)
How to see the

Using Visual Programming to Create …(Cont.)
You are now in the Code
Using Visual Programming to Create …(Cont.)
You are now in the Code
Using Visual Programming to Create … (Cont.)
Select File >> Save All to save
Using Visual Programming to Create … (Cont.)
Select File >> Save All to save

Using Visual Programming to Create … (Cont.)
Select Debug >> Start Debugging to compile
Using Visual Programming to Create … (Cont.)
Select Debug >> Start Debugging to compile

The following slides are again courtesy of
Ms. Stephany Coffman-Wolph
(2/9/09)
NOTE:
Formatting
The following slides are again courtesy of Ms. Stephany Coffman-Wolph (2/9/09) NOTE: Formatting

6. Event Handling
When a user interacts with a form, this causes
6. Event Handling
When a user interacts with a form, this causes

Event Handler for
Clicking a Button
The following code is for a
Event Handler for
Clicking a Button
The following code is for a

How to write code for an event...
Suppose that you are working
How to write code for an event...
Suppose that you are working

7. Fun with Textboxes
A textbox is an area in which text
7. Fun with Textboxes
A textbox is an area in which text

Example: Log-in Screen
Drag two Label controls from Toolbox onto the form
Use
Example: Log-in Screen
Drag two Label controls from Toolbox onto the form
Use

Example: Log-in Screen (Cont.)
Making the Textbox for Typing in Passwords
Click on
Example: Log-in Screen (Cont.)
Making the Textbox for Typing in Passwords
Click on

How to Get Info From/ToTextbox
Suppose that your textbox is named txtUserName
To
How to Get Info From/ToTextbox
Suppose that your textbox is named txtUserName
To

8. Using Multiple Forms
Can a program have multiple forms?
Yes!
How is this
8. Using Multiple Forms
Can a program have multiple forms?
Yes!
How is this

When it starts, it shows Form1
After clicking on Go! on Form1,
When it starts, it shows Form1
After clicking on Go! on Form1,

Code for the Form1 form
Slide modified by L. Lilien
RECALL:
After user clicks
Code for the Form1 form
Slide modified by L. Lilien
RECALL:
After user clicks

Code for the FormLogin form
Slide modified by L. Lilien
RECALL:
The user enters
Code for the FormLogin form
Slide modified by L. Lilien
RECALL:
The user enters

Running the 2-form WFA Example in 27 easy steps
IMPORTANT Follow this
Running the 2-form WFA Example in 27 easy steps
IMPORTANT Follow this

Running the 2-form WFA Example … (Cont.)
10) Select Add in the
Running the 2-form WFA Example … (Cont.)
10) Select Add in the

Running the 2-form WFA Example … (Cont.)
18) Go to the Form1.cs
Running the 2-form WFA Example … (Cont.)
18) Go to the Form1.cs

8. In-class Self-evaluation Exercise
Consider the program implementing the Point3-Circle4 hierarchy from
8. In-class Self-evaluation Exercise
Consider the program implementing the Point3-Circle4 hierarchy from

++ READ THE REMAINING SLIDES ON YOUR OWN ++
The following slides
++ READ THE REMAINING SLIDES ON YOUR OWN ++ The following slides

2.1 …
2.2 RECALL: Overview of the Visual Studio 2008 IDE
2.3 RECALL: Menu Bar and
2.1 …
2.2 RECALL: Overview of the Visual Studio 2008 IDE
2.3 RECALL: Menu Bar and

The New Project dialog (Fig. 2.3) displays.
Templates are project types users can
The New Project dialog (Fig. 2.3) displays.
Templates are project types users can

2.2 Overview of the Visual Studio 2008 IDE (Cont.)
The gray rectangle (called
2.2 Overview of the Visual Studio 2008 IDE (Cont.)
The gray rectangle (called

Figure 2.5 shows where the Form’s name can be modified in the
Figure 2.5 shows where the Form’s name can be modified in the

Figure 2.6 shows a dialog in which a control’s font properties can
Figure 2.6 shows a dialog in which a control’s font properties can

RECALL: 2.3 Menu Bar and Toolbar
Commands for managing the IDE are
RECALL: 2.3 Menu Bar and Toolbar
Commands for managing the IDE are

Fig. 2.8 | Summary of Visual Studio 2008 IDE menus.
2.3 Menu
Fig. 2.8 | Summary of Visual Studio 2008 IDE menus.
2.3 Menu

RECALL: 2.4 Navigating the Visual Studio IDE
The IDE provides windows for
RECALL: 2.4 Navigating the Visual Studio IDE
The IDE provides windows for
2.4 Navigating the Visual Studio IDE (Cont.)
When auto-hide is enabled, a tab
2.4 Navigating the Visual Studio IDE (Cont.)
When auto-hide is enabled, a tab

2.4 Navigating the Visual Studio IDE (Cont.)
Placing the mouse pointer over one
2.4 Navigating the Visual Studio IDE (Cont.)
Placing the mouse pointer over one

2.4 Navigating the Visual Studio IDE (Cont.)
To disable auto-hide and keep the
2.4 Navigating the Visual Studio IDE (Cont.)
To disable auto-hide and keep the

2.4 Navigating the Visual Studio IDE (Cont.)
2.4.1 Solution Explorer
The Solution Explorer window (Fig. 2.17)
2.4 Navigating the Visual Studio IDE (Cont.)
2.4.1 Solution Explorer
The Solution Explorer window (Fig. 2.17)

2.4 Navigating the Visual Studio IDE (Cont.)
Clicking the Show All Files icon
2.4 Navigating the Visual Studio IDE (Cont.)
Clicking the Show All Files icon

2.4 Navigating the Visual Studio IDE (Cont.)
Click a plus box small triangle
2.4 Navigating the Visual Studio IDE (Cont.)
Click a plus box small triangle

2.4 Navigating the Visual Studio IDE (Cont.)
Click the minus box small triangle
2.4 Navigating the Visual Studio IDE (Cont.)
Click the minus box small triangle
2.4 Navigating the Visual Studio IDE (Cont.)
2.4.2 Toolbox
The Toolbox contains icons representing controls
2.4 Navigating the Visual Studio IDE (Cont.)
2.4.2 Toolbox
The Toolbox contains icons representing controls

2.4 Navigating the Visual Studio IDE (Cont.)
2.4.2 Toolbox
To display the Properties window, select
2.4 Navigating the Visual Studio IDE (Cont.)
2.4.2 Toolbox
To display the Properties window, select
2.4 Navigating the Visual Studio IDE (Cont.)
Fig. 2.22 | Properties window showing
2.4 Navigating the Visual Studio IDE (Cont.)
Fig. 2.22 | Properties window showing
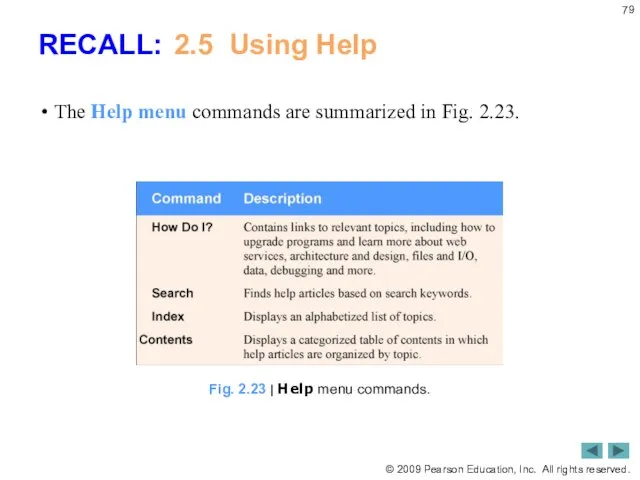
Fig. 2.23 | Help menu commands.
The Help menu commands are
Fig. 2.23 | Help menu commands.
The Help menu commands are

2.5 Using Help (Cont.)
Help in VS 2010 is a disaster!
Microsoft
2.5 Using Help (Cont.)
Help in VS 2010 is a disaster!
Microsoft

2.5 Using Help (Cont.)
Select Tools > Options…
Make sure that the
2.5 Using Help (Cont.)
Select Tools > Options…
Make sure that the

2.5 Using Help (Cont.)
Fig. 2.25 | Options dialog displaying Help settings.
Show
2.5 Using Help (Cont.)
Fig. 2.25 | Options dialog displaying Help settings.
Show
 Решение задачи №8 Линейный алгоритм. Информатика ОГЭ 9 класс
 Семинар по 1С:ERP
 lektsia_1
 Линейные программы. Лекция 4
 ПО для виртуализации. Виртуальные машины
 Множество. Подмножество.
  Тема 13 Понятие об алгоритме 1. Понятие об алгоритме 2. Способы записи алгоритмов 3. Алгоритмы ветвления 4. Циклические алгоритмы 5.
  Презентация "MSC.Flightloads 5.4" - скачать презентации по Информатике
 ИСТОРИЯ РАЗВИТИЯ вычислительной техники Информатика, 8 класс
 Доработки эквайринга
 Adyna geçirme buýrugy. Arifmetiki amallar (goşmak, aýyrmak, köpeltmek, bölmek, bütünleýin bölmek amallary) we aňlatmalar
 Анализ дискуссионной программы. Программа Открытый эфир
 Моделирование подражательного поведения и викарного научения в группах мобильных роботов
 Лекция 3. Описание классов, модификаторы доступа.
  Имена и типы файлов Презентацию подготовила преподаватель ГБОУ СПО «Баймакский сельскохозяйственный техникум» Мусина Ж.М.
 Intro to Python. Visual studio code
 Представление чисел в памяти компьютера Табличные вычисления на компьютере
 Программирование компьютерной игры “Red Square” на игровом движке Game Maker Studio
 Естественный языковой интерфейс
 Системы счисления. Двоичное кодирование в компьютере
 Cisco ASA (Adaptive Security Appliance) – межсетевой экран
 Муниципальный военно-патриотический интернет- квест орленок, посвященный памяти героев-земляков ,
 Дополнительные возможности курсоров (PL/SQL)
 Часы
Часы Создание и валидация моделей для предотвращения мошенничества в банковской сфере
 Формы записи алгоритмов. Линейный алгоритм
 Настройки параметров Word
 Опасности в интернете