- F-F-Fiddle Assembly Instructions

Содержание
- 2. 1. Assemble materials PARTS 1. Bout part (Print 3 shells at least 10% infill) 2. Neck
- 3. 1. Assemble materials TOOLS - Needle-nose pliers - Small files (I use a triangular one 90%)
- 4. 2. Prepare Truss Rod If you haven't already, cut down 5/16” drill rod to about 355mm.
- 5. 3. Check Truss Rod Fit If the truss rod hole on your part is too small
- 6. 4. Clean and Deburr Parts Use a combination of a flat file, deburring tool, and exacto
- 7. 5. Flatten Ends These two ends contact, and it's good to make them as flat as
- 8. 6. Install Truss Rod WEAR SAFETY GLASSES You should already know how well the truss rod
- 9. 6. Install Truss Rod WEAR SAFETY GLASSES This is the hardest part of the build!
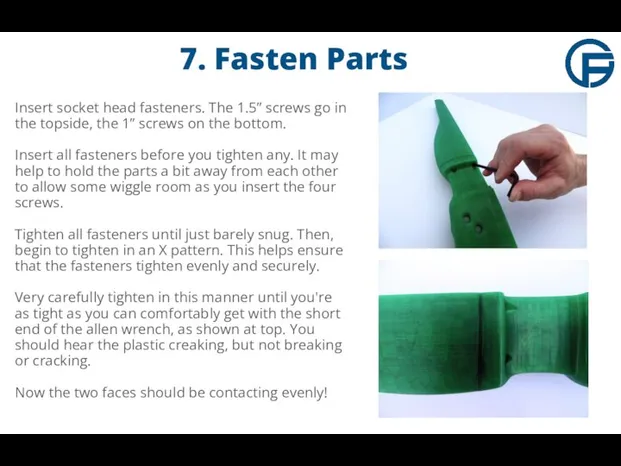
- 10. 7. Fasten Parts Due mainly to part warp during printing, the neck and bout parts may
- 11. 7. Fasten Parts Insert socket head fasteners. The 1.5” screws go in the topside, the 1”
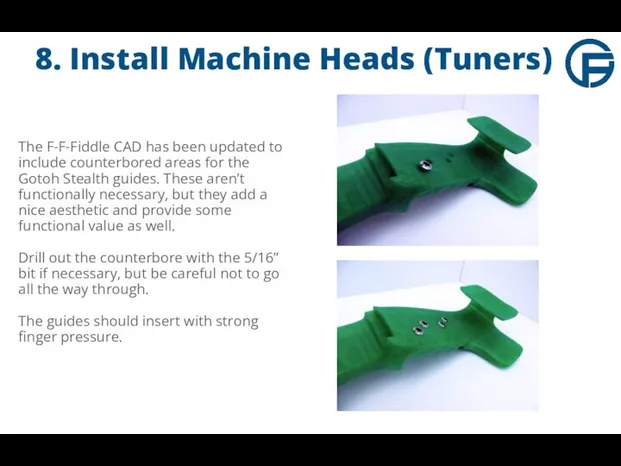
- 12. 8. Install Machine Heads (Tuners) The F-F-Fiddle CAD has been updated to include counterbored areas for
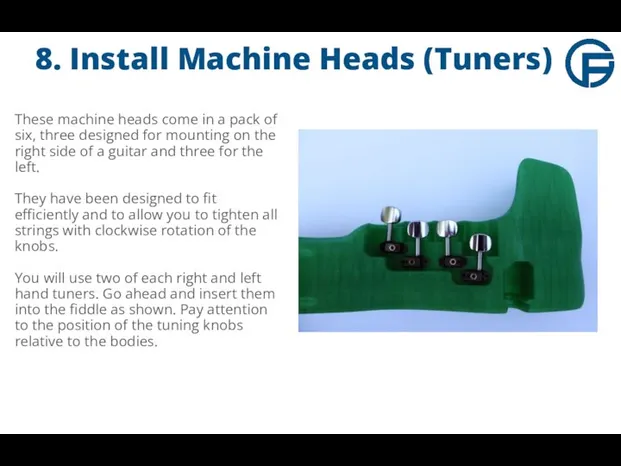
- 13. 8. Install Machine Heads (Tuners) These machine heads come in a pack of six, three designed
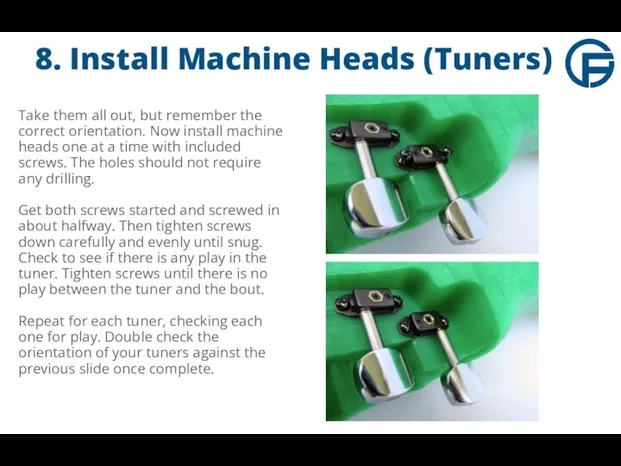
- 14. 8. Install Machine Heads (Tuners) Take them all out, but remember the correct orientation. Now install
- 15. 9. Prepare Pickups Whether you have the internal or external K-Spot Twin pickups, you will need
- 16. 10. Prepare Bridge You'll need (OR NOT) to flatten the bridge part much the same way
- 17. 11. Prepare Bridge Area Clean up the bridge area as shown with a file and exacto
- 18. 12. Install Pickups Install pickups one at a time by threading wires through internal routing channel.
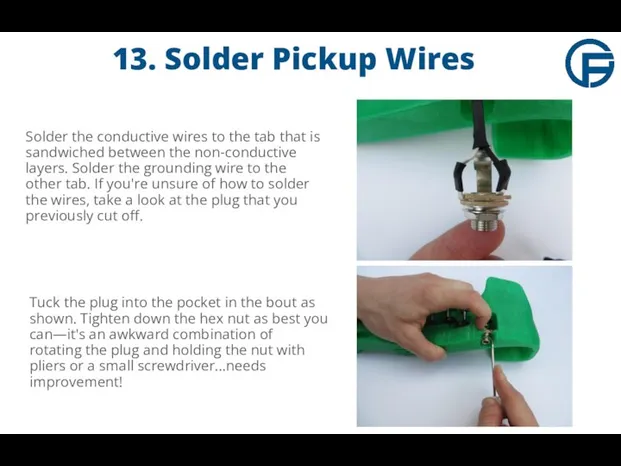
- 19. 13. Solder Pickup Wires Cut wires to approximately the length shown, left. Strip the outer sheath
- 20. 13. Solder Pickup Wires Twist the conductors (white) together, and twist the grounding wires together. Pass
- 21. 13. Solder Pickup Wires Solder the conductive wires to the tab that is sandwiched between the
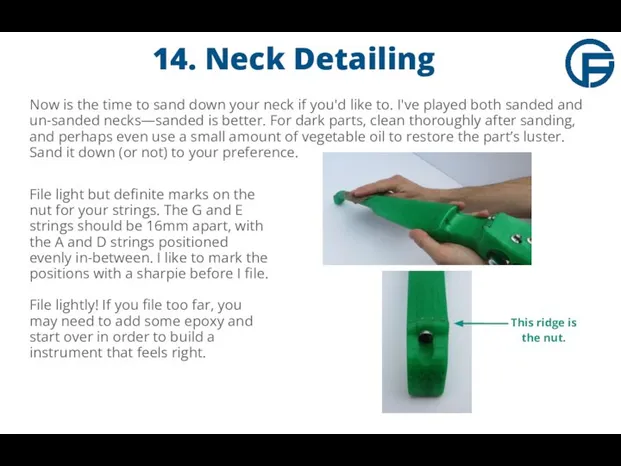
- 22. 14. Neck Detailing Now is the time to sand down your neck if you'd like to.
- 23. Almost Done! These should be your remaining parts—you're almost done! Lay out and identify your strings,
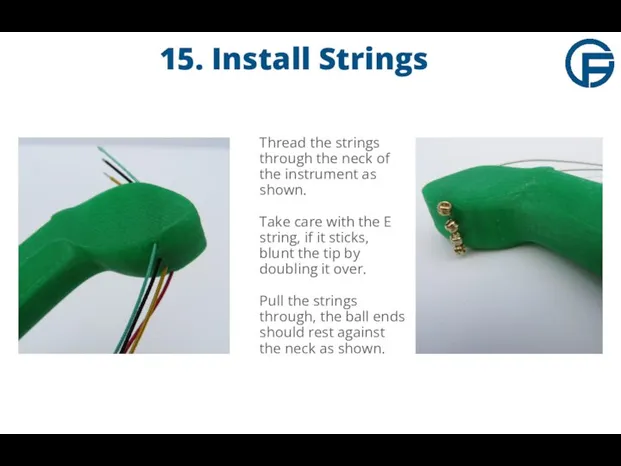
- 24. 15. Install Strings Thread the strings through the neck of the instrument as shown. Take care
- 25. 15. Install Strings Pay close attention to the direction of the wrap of each string—it alternates.
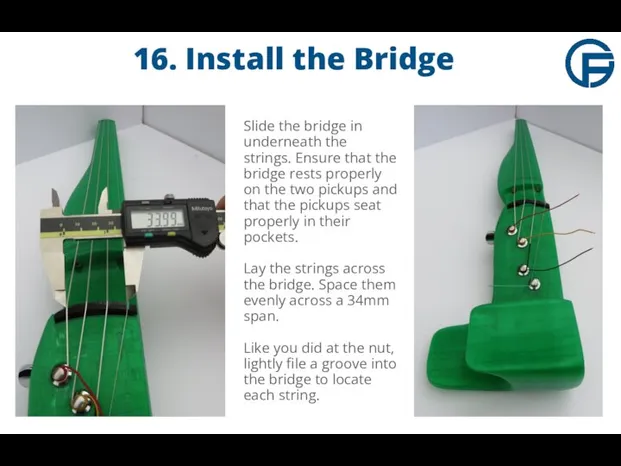
- 26. 16. Install the Bridge Slide the bridge in underneath the strings. Ensure that the bridge rests
- 28. Скачать презентацию
1. Assemble materials
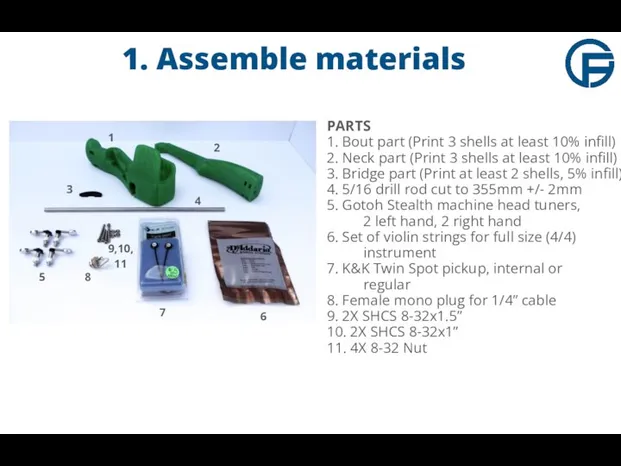
PARTS
1. Bout part (Print 3 shells at least 10%
1. Assemble materials
PARTS 1. Bout part (Print 3 shells at least 10%
1. Assemble materials
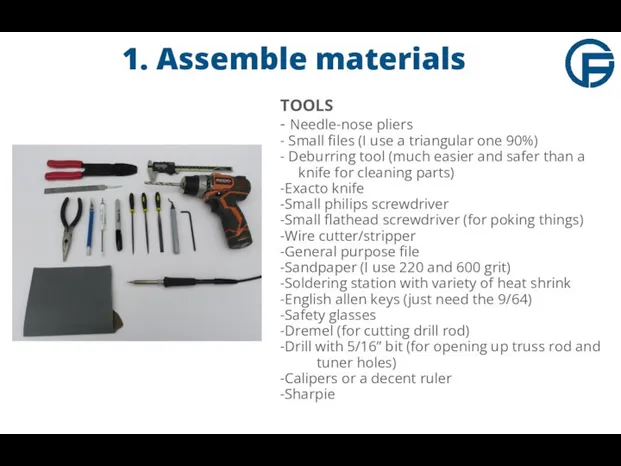
TOOLS
- Needle-nose pliers
- Small files (I use a triangular
1. Assemble materials
TOOLS
- Needle-nose pliers
- Small files (I use a triangular
2. Prepare Truss Rod
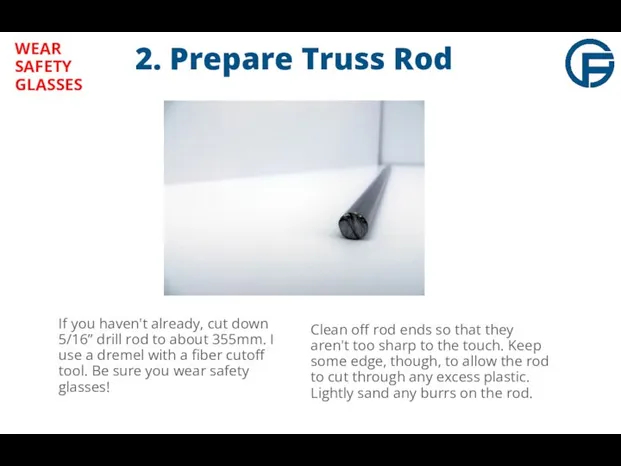
If you haven't already, cut down 5/16” drill
2. Prepare Truss Rod
If you haven't already, cut down 5/16” drill
3. Check Truss Rod Fit
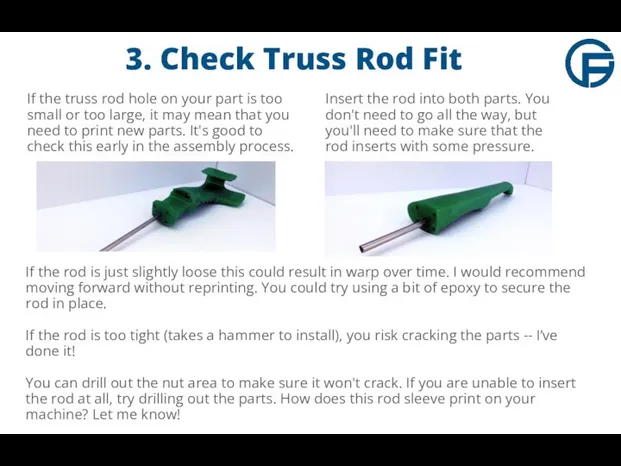
If the truss rod hole on your
3. Check Truss Rod Fit
If the truss rod hole on your
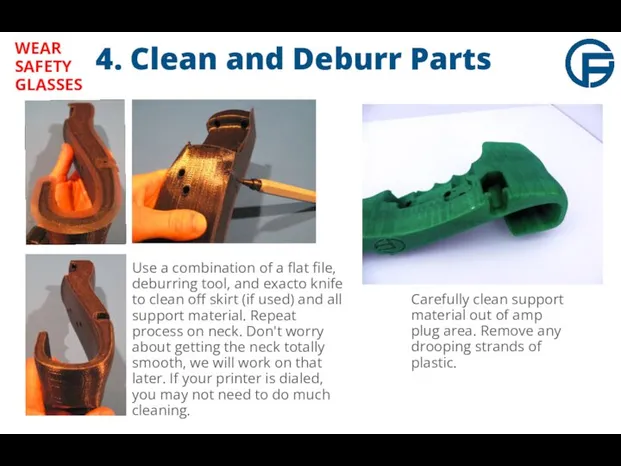
4. Clean and Deburr Parts
Use a combination of a flat file,
4. Clean and Deburr Parts
Use a combination of a flat file,
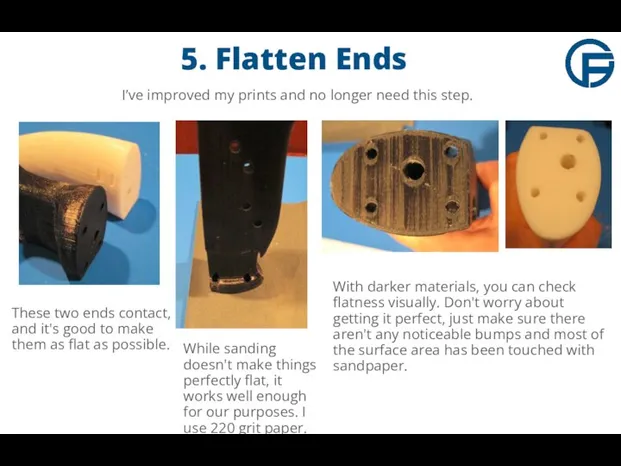
5. Flatten Ends
These two ends contact, and it's good to make
5. Flatten Ends
These two ends contact, and it's good to make
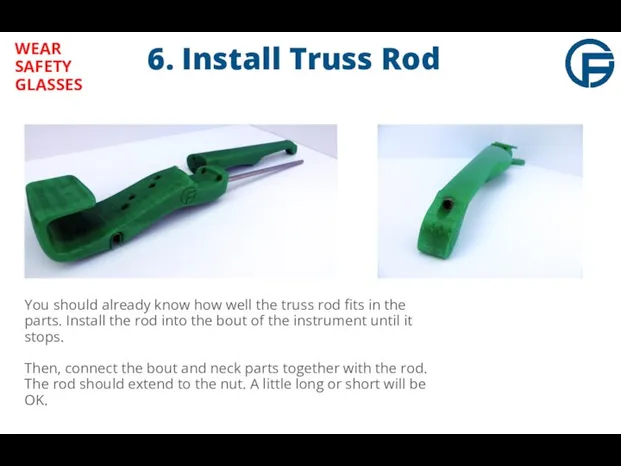
6. Install Truss Rod
WEAR SAFETY GLASSES
You should already know how well
6. Install Truss Rod
WEAR SAFETY GLASSES
You should already know how well
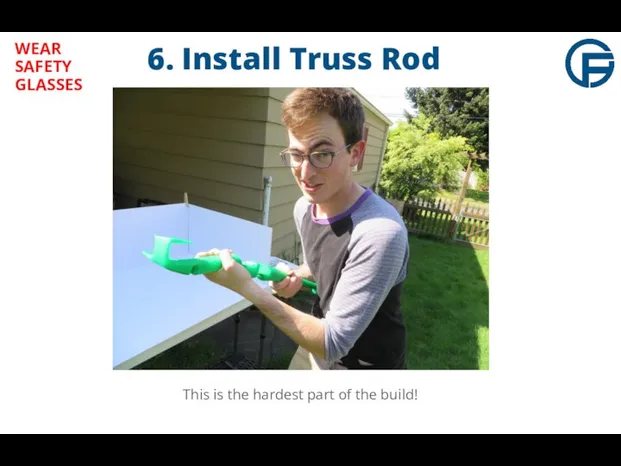
6. Install Truss Rod
WEAR SAFETY GLASSES
This is the hardest part of
6. Install Truss Rod
WEAR SAFETY GLASSES
This is the hardest part of

7. Fasten Parts
Due mainly to part warp during printing, the neck
7. Fasten Parts
Due mainly to part warp during printing, the neck
7. Fasten Parts
Insert socket head fasteners. The 1.5” screws go in
7. Fasten Parts
Insert socket head fasteners. The 1.5” screws go in
8. Install Machine Heads (Tuners)
The F-F-Fiddle CAD has been updated to
8. Install Machine Heads (Tuners)
The F-F-Fiddle CAD has been updated to
8. Install Machine Heads (Tuners)
These machine heads come in a pack
8. Install Machine Heads (Tuners)
These machine heads come in a pack
8. Install Machine Heads (Tuners)
Take them all out, but remember the
8. Install Machine Heads (Tuners)
Take them all out, but remember the

9. Prepare Pickups
Whether you have the internal or external K-Spot Twin
9. Prepare Pickups
Whether you have the internal or external K-Spot Twin
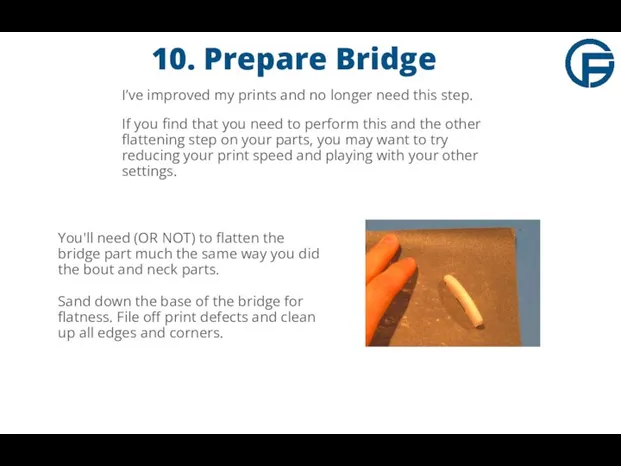
10. Prepare Bridge
You'll need (OR NOT) to flatten the bridge part
10. Prepare Bridge
You'll need (OR NOT) to flatten the bridge part
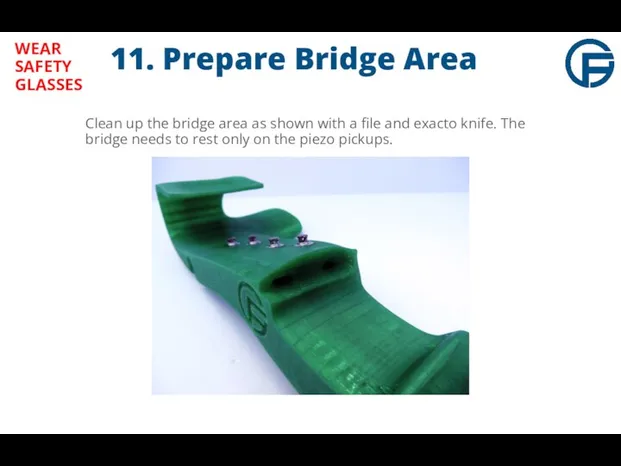
11. Prepare Bridge Area
Clean up the bridge area as shown with
11. Prepare Bridge Area
Clean up the bridge area as shown with
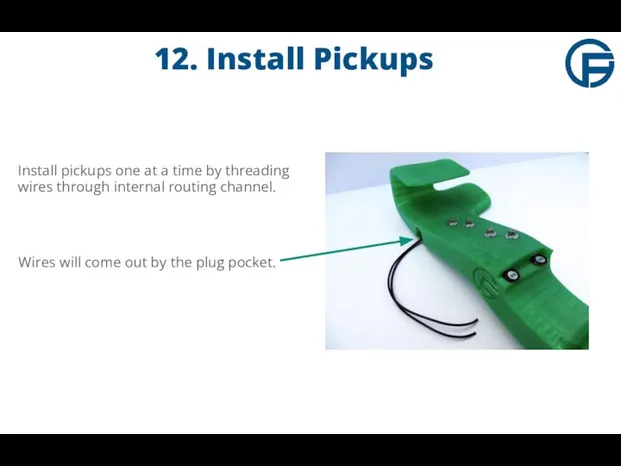
12. Install Pickups
Install pickups one at a time by threading wires
12. Install Pickups
Install pickups one at a time by threading wires

13. Solder Pickup Wires
Cut wires to approximately the length shown, left.
Strip
13. Solder Pickup Wires
Cut wires to approximately the length shown, left.
Strip
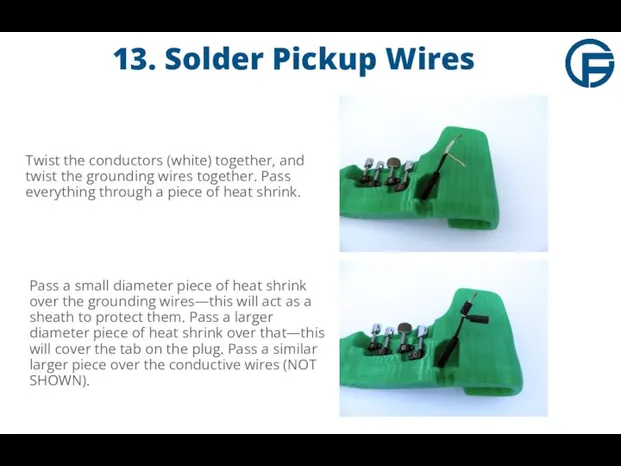
13. Solder Pickup Wires
Twist the conductors (white) together, and twist the
13. Solder Pickup Wires
Twist the conductors (white) together, and twist the
13. Solder Pickup Wires
Solder the conductive wires to the tab that
13. Solder Pickup Wires
Solder the conductive wires to the tab that
14. Neck Detailing
Now is the time to sand down your neck
14. Neck Detailing
Now is the time to sand down your neck

Almost Done!
These should be your remaining parts—you're almost done! Lay out
Almost Done!
These should be your remaining parts—you're almost done! Lay out
15. Install Strings
Thread the strings through the neck of the instrument
15. Install Strings
Thread the strings through the neck of the instrument

15. Install Strings
Pay close attention to the direction of the wrap
15. Install Strings
Pay close attention to the direction of the wrap
16. Install the Bridge
Slide the bridge in underneath the strings. Ensure
16. Install the Bridge
Slide the bridge in underneath the strings. Ensure
 Основы кормления собак
 Изготовление стекла
 Праздник урожая или золотая осень
 технология
 Мої друзі
 Дополнительный_материал_12.13_21.01.2022_5b2a8b22
 Определение содержания органических кислот в апельсиновом соке Добрый
 Магистерская
 SAMOIZOLYaTsIYaYaYaYaYa
 Тепловые и атомные электростанции
 Геокешинг
 Гипотеза о внеземном происхождении человека
 Отчет Донской Олимп
 Аттестационная работа Большаковой Л. Ю
 День учителя! История праздника и мини-викторина
 Открытка на 9 мая
 Дерево целей организации
 NOTs_KAMAZ-BAUMAN
 Интерактивная доска как средство повышения мотивации познавательной деятельности младших школьников
 Приозерное ЛПУМГ. Служба автоматизации и метрологии. Монтаж и наладка систем контроля вибрации на ГПА-Ц-16
 Prezentatsia_po_khimii_Tela_i_ikh_veschestva
 Развитие транспортной и дорожной сети города Июль 2021
 Спецификация одежды по назначению. Тема 1
 Группы бывают разные, но такая-одна
 Творчество Валентина Серова (1865-1911)
 Репина_АТ19-11МДК01-01_23.03
 Разработка электрической схемы модуля МПВ-Д. Шаблон
 О возрасте с юмором