- Serial Communications

Содержание
- 2. Communicating with Others Arduino can use same USB cable for programming and to talk with computers
- 3. Serial Communications Sends “Hello world!” to your computer Click on “Serial Monitor” button to see output
- 4. Arduino Communications Is just serial communications Arduino doesn’t really do USB It really is “serial”, like
- 5. Serial Communications “Serial” because data is broken down into bits, each sent one after the other
- 6. Arduino & USB-to-serial A standard Arduino has a single hardware serial port But serial communication is
- 7. Arduino Mini Arduino Mini separates the two circuits Arduino Mini USB adapter Arduino Mini
- 8. Arduino Mega The Arduino Mega has four hardware serial ports Only one of these has a
- 9. Arduino to Computer USB is totally optional for Arduino, but it makes things easier Original Arduino
- 10. Arduino & USB Since Arduino is all about serial, and not USB, Interfacing to things like
- 11. Serial Message Protocol Where each message begins and ends? Sides must agree how information is organized
- 12. Sending Debug Information from Arduino to Your Computer This sketch prints sequential numbers on the Serial
- 13. Baud rate First call the Serial.begin() The function takes a single parameter: the desired communication speed
- 14. Sending information You can display text using the Serial.print()or Serial.println() function println() – prints the data
- 15. Strings String message = "This string"; //C++ type strings message.length() //provides thenumber of characters) in the
- 16. Comparing C type Strings char str1[ ] = "left"; char str2[ ] = "right"; if(strcmp(str1, str2)
- 17. String Object charAt(n) or [n] - Access a particular character of the String concat(parameter) or +
- 18. Mathematical Operators
- 19. Comparing Character and Numeric Values
- 20. Logical and Bitwise operators Logical operators Bitwise operators
- 21. Combining Operations and Assignment
- 22. Advanced Mathematical Operators
- 23. Other Useful Operators
- 24. Functions Functions are declared by first declaring the function type. This is the type of value
- 25. Receiving Serial Data in Arduino Serial.available() - Get the number of bytes (characters) available for reading
- 26. Controlling Arduino int ledPin = 13; // choose a pin for LED int val = 0;
- 27. Tasks Part 1 Concatenate two strings (Name, Surname) with space between them and output to serial
- 28. Tasks Part 2 Write function that sorts array of integers Read the number N from Serial
- 30. Скачать презентацию
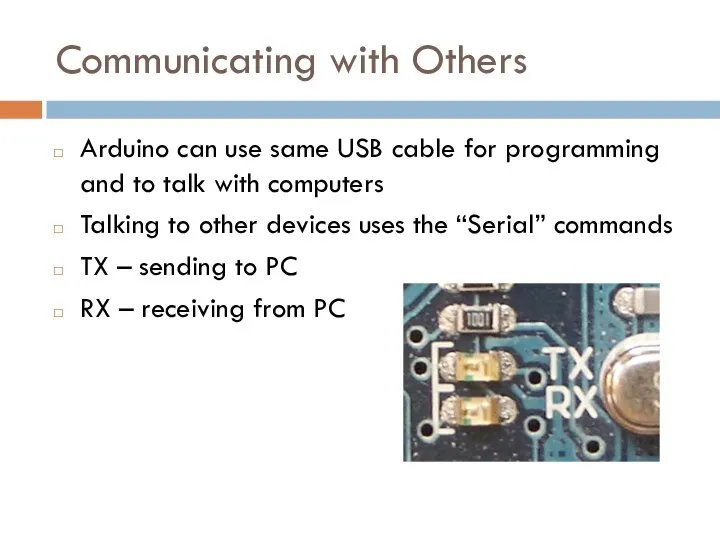
Communicating with Others
Arduino can use same USB cable for programming and
Communicating with Others
Arduino can use same USB cable for programming and
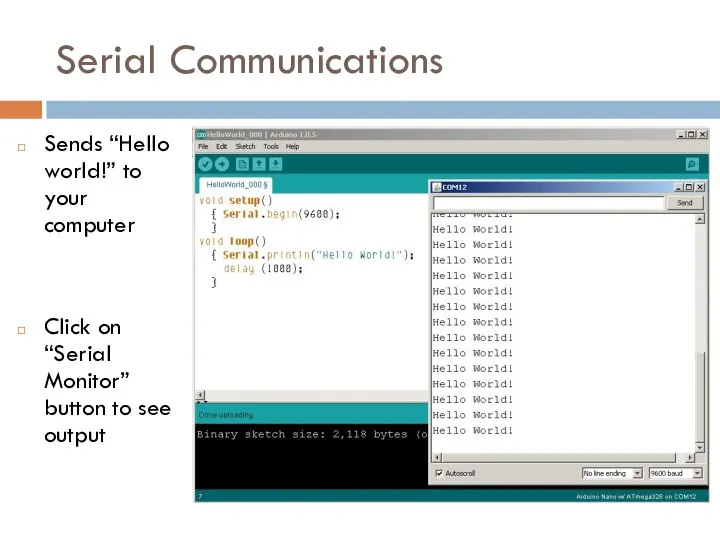
Serial Communications
Sends “Hello world!” to your computer
Click on “Serial Monitor” button
Serial Communications
Sends “Hello world!” to your computer
Click on “Serial Monitor” button
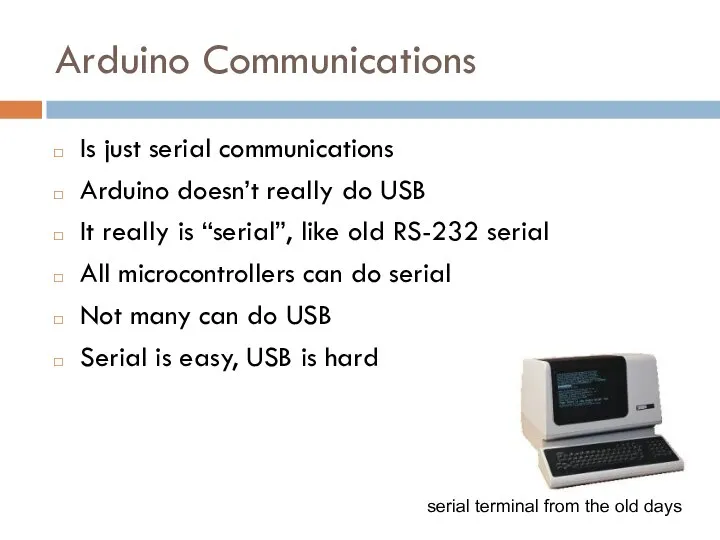
Arduino Communications
Is just serial communications
Arduino doesn’t really do USB
It really is
Arduino Communications
Is just serial communications
Arduino doesn’t really do USB
It really is
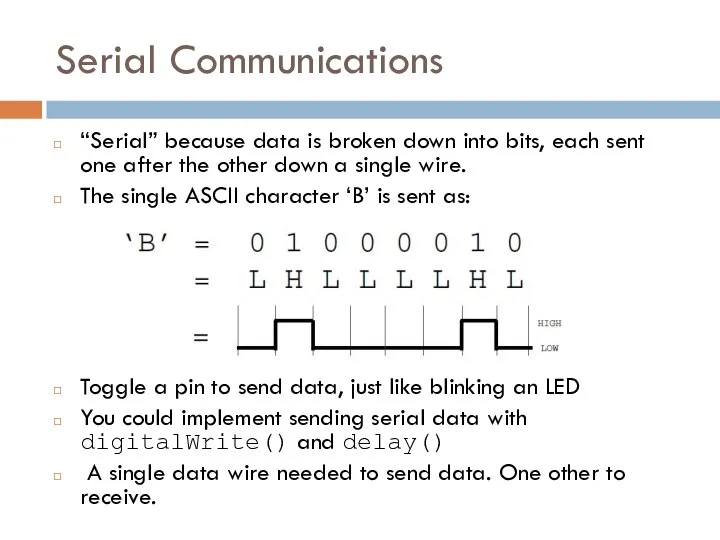
Serial Communications
“Serial” because data is broken down into bits, each sent
Serial Communications
“Serial” because data is broken down into bits, each sent
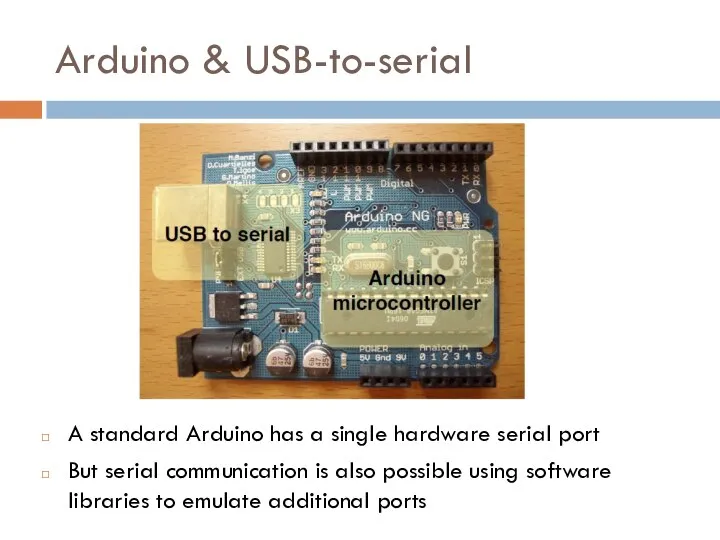
Arduino & USB-to-serial
A standard Arduino has a single hardware serial port
But
Arduino & USB-to-serial
A standard Arduino has a single hardware serial port
But
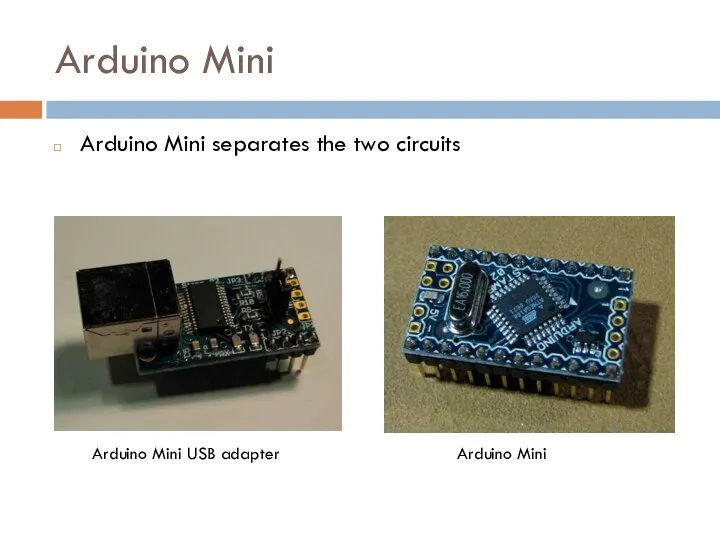
Arduino Mini
Arduino Mini separates the two circuits
Arduino Mini USB adapter
Arduino Mini
Arduino Mini
Arduino Mini separates the two circuits
Arduino Mini USB adapter
Arduino Mini
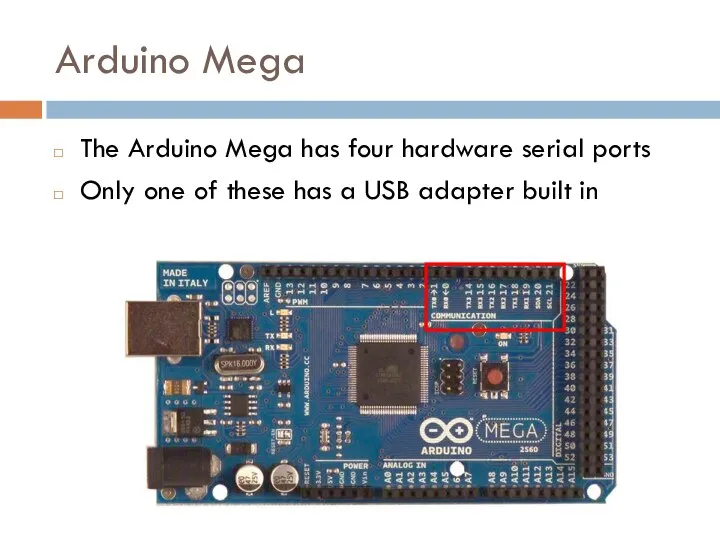
Arduino Mega
The Arduino Mega has four hardware serial ports
Only one of
Arduino Mega
The Arduino Mega has four hardware serial ports
Only one of
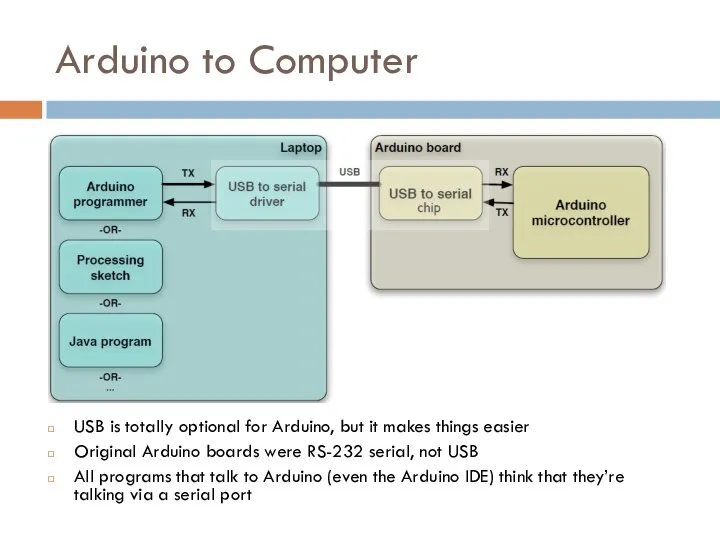
Arduino to Computer
USB is totally optional for Arduino, but it makes
Arduino to Computer
USB is totally optional for Arduino, but it makes
Arduino & USB
Since Arduino is all about serial, and not USB,
Arduino & USB
Since Arduino is all about serial, and not USB,
Serial Message Protocol
Where each message begins and ends?
Sides must agree how
Serial Message Protocol
Where each message begins and ends?
Sides must agree how
Sending Debug Information from Arduino to Your Computer
This sketch prints sequential
Sending Debug Information from Arduino to Your Computer
This sketch prints sequential
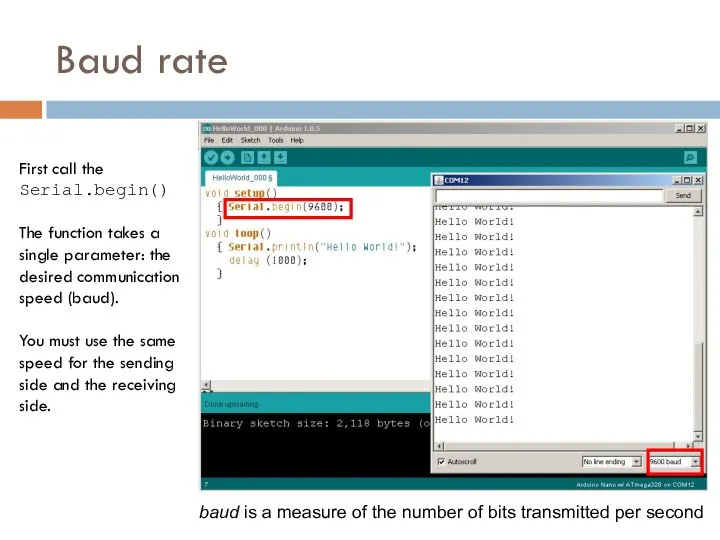
Baud rate
First call the
Serial.begin()
The function takes a single parameter: the desired
Baud rate
First call the
Serial.begin()
The function takes a single parameter: the desired
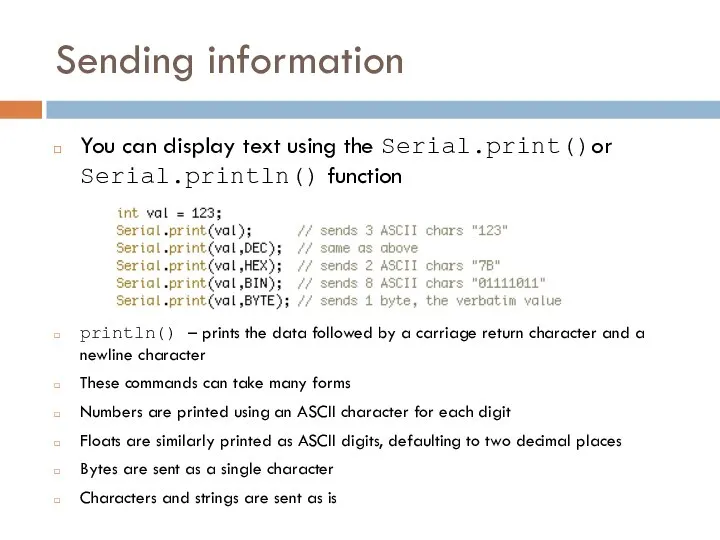
Sending information
You can display text using the Serial.print()or Serial.println() function
println() –
Sending information
You can display text using the Serial.print()or Serial.println() function
println() –
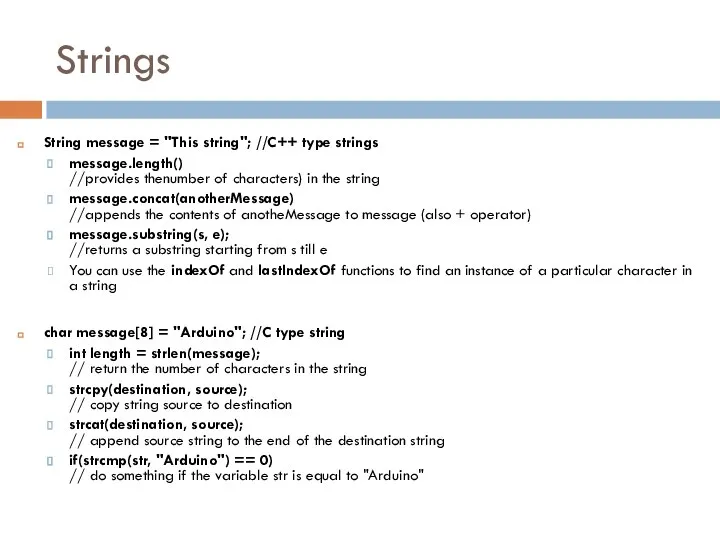
Strings
String message = "This string"; //C++ type strings
message.length()
//provides thenumber of
Strings
String message = "This string"; //C++ type strings
message.length()
//provides thenumber of
![Comparing C type Strings char str1[ ] = "left"; char str2[](/_ipx/f_webp&q_80&fit_contain&s_1440x1080/imagesDir/jpg/1474826/slide-15.jpg)
Comparing C type Strings
char str1[ ] = "left";
char str2[ ] =
Comparing C type Strings
char str1[ ] = "left";
char str2[ ] =
![String Object charAt(n) or [n] - Access a particular character of](/_ipx/f_webp&q_80&fit_contain&s_1440x1080/imagesDir/jpg/1474826/slide-16.jpg)
String Object
charAt(n) or [n] - Access a particular character of the
String Object
charAt(n) or [n] - Access a particular character of the
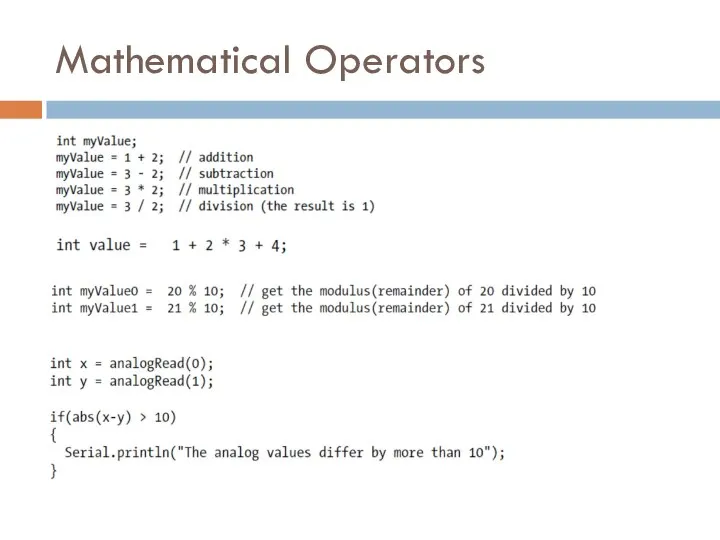
Mathematical Operators
Mathematical Operators
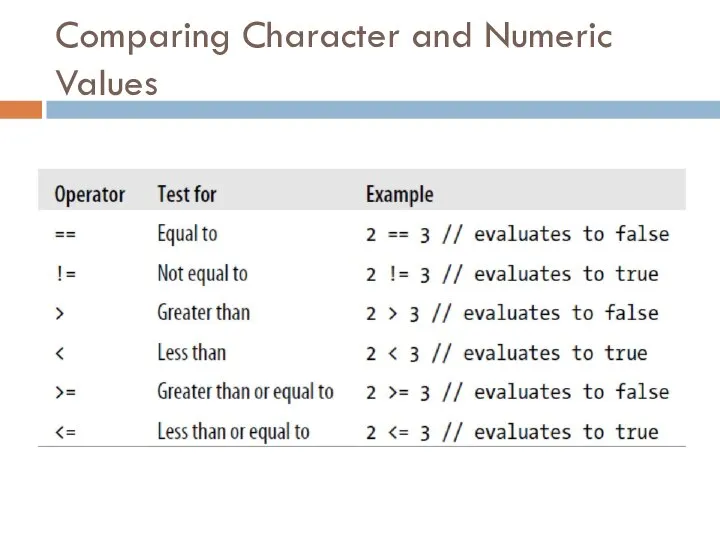
Comparing Character and Numeric Values
Comparing Character and Numeric Values
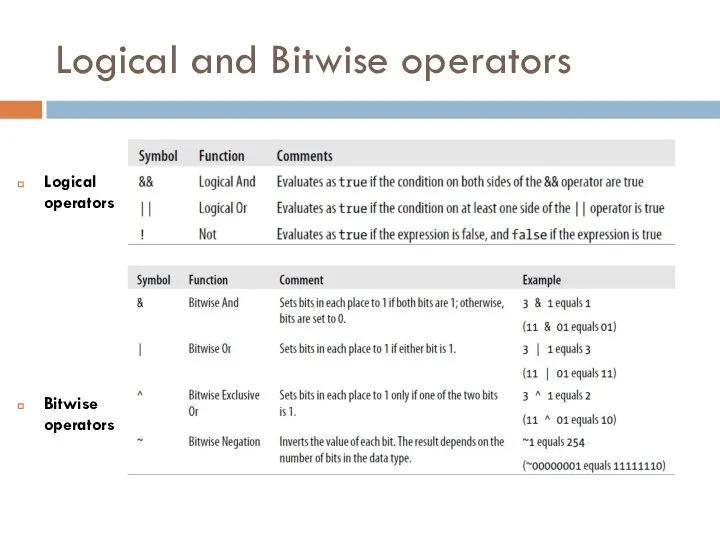
Logical and Bitwise operators
Logical operators
Bitwise operators
Logical and Bitwise operators
Logical operators
Bitwise operators
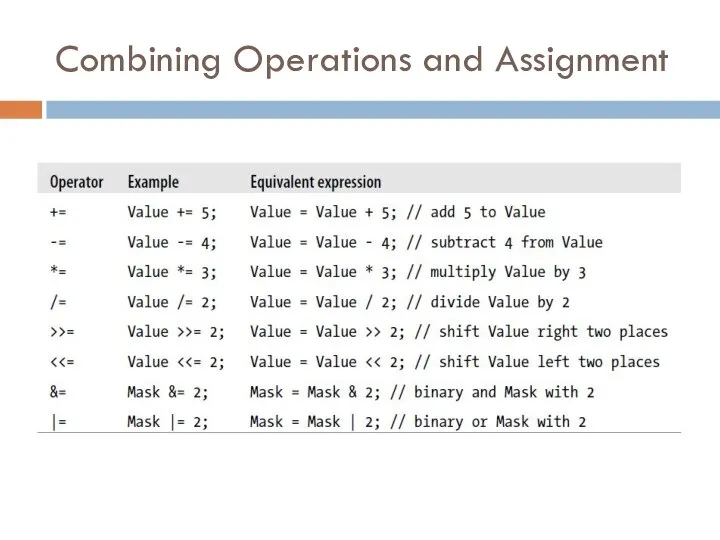
Combining Operations and Assignment
Combining Operations and Assignment

Advanced Mathematical Operators
Advanced Mathematical Operators

Other Useful Operators
Other Useful Operators
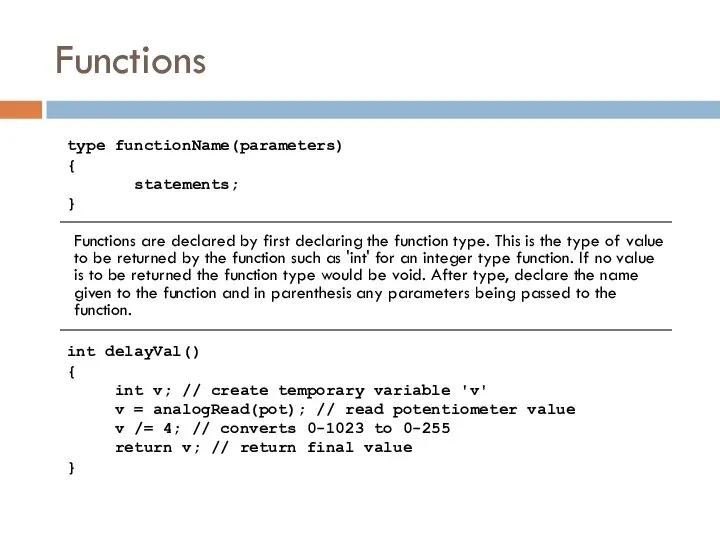
Functions
Functions are declared by first declaring the function type. This is
Functions
Functions are declared by first declaring the function type. This is
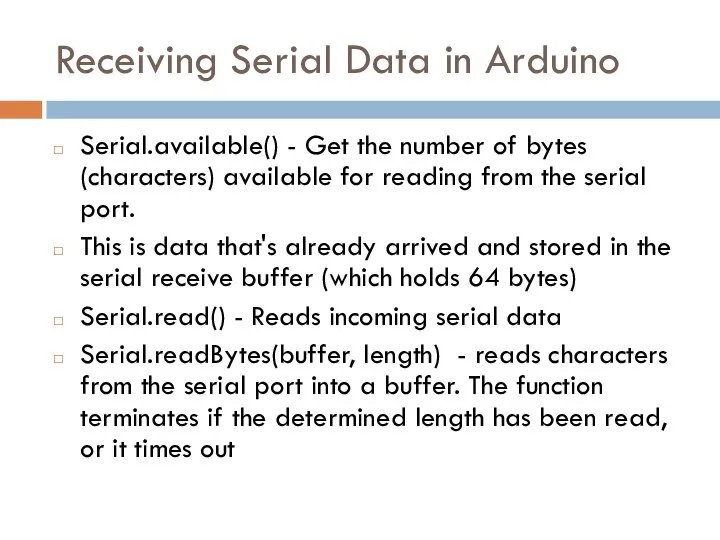
Receiving Serial Data in Arduino
Serial.available() - Get the number of bytes
Receiving Serial Data in Arduino
Serial.available() - Get the number of bytes
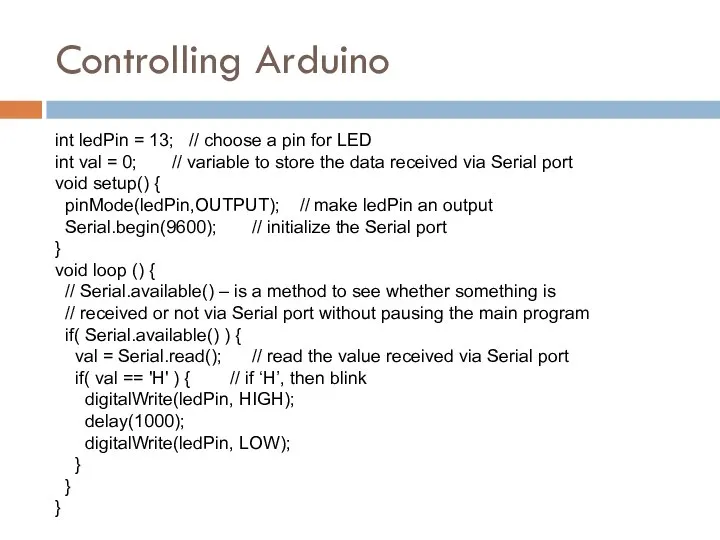
Controlling Arduino
int ledPin = 13; // choose a pin for LED
int
Controlling Arduino
int ledPin = 13; // choose a pin for LED
int
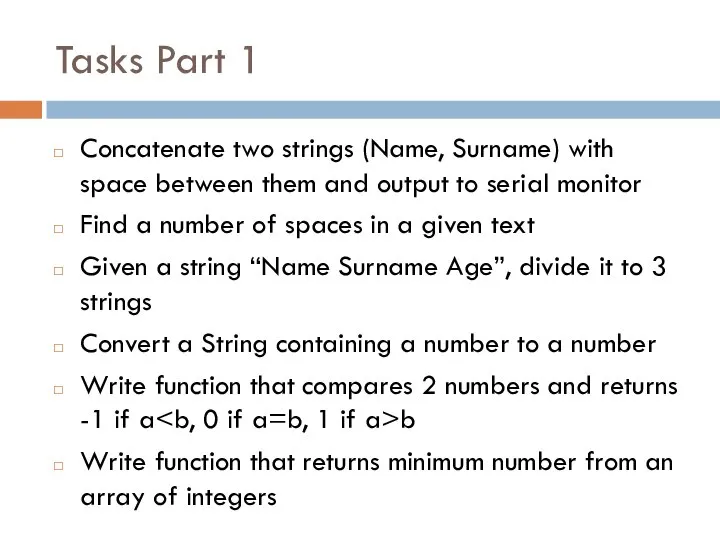
Tasks Part 1
Concatenate two strings (Name, Surname) with space between them
Tasks Part 1
Concatenate two strings (Name, Surname) with space between them
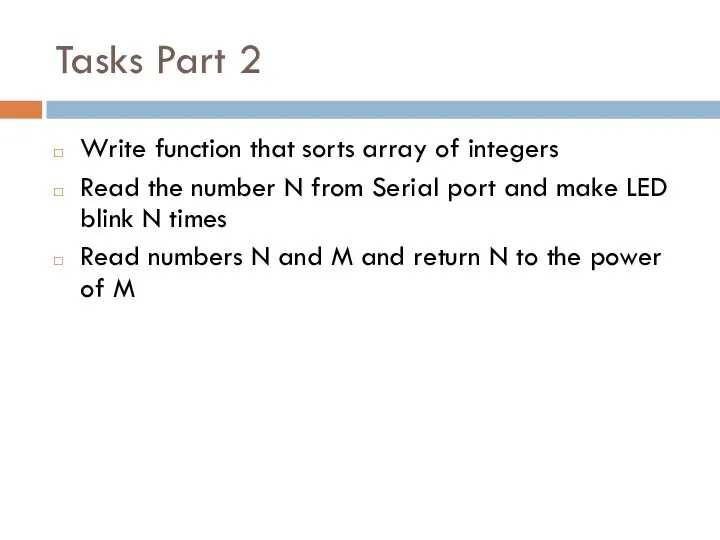
Tasks Part 2
Write function that sorts array of integers
Read the number
Tasks Part 2
Write function that sorts array of integers
Read the number
 Рождественские узоры Поволжья. Порядок участия в Межрегиональной выставке-ярмарке
 Заболевания глотки
 трехфазные цепи
 АДМИНИСТРАТИВНО-ЮРИСДИКЦИОННЫЙ ПРОЦЕСС
  Лекция 8 Марксизм как теория исторического процесса
  Я і мая сям’я. Адзенне і абутак. (Тэма 10)
 Спутниковые навигационные системы. (Тема 9)
 Комплексна оцінка туристичного потенціалу обласного регіону Львів, України
 Анализ сертификата соответствия системы добровольной сертификации
 Тестирование аэробной мощности у спортсменов
 День инвестора Центральной и Восточной Европы (IDCEE) Интернет-технологии и инновации 25-26 октября, 2011 Киев, Украина
  Физическая культура стран Древнего Востока
 Автоматическая система водоохлаждения на АЭС
 Презентация на тему "Творческая группа "Современный урок "" - скачать презентации по Педагогике
 Геодезические работы при строительстве мостов
 Растворы
  Презентация Методы очистки питьевой воды,
 Политические партии и общественные объединения
 «Построение кривой Лоренца и расчет коэффициента Джини» Подготовила студентка Житкова Екатерина 1 курса экономического факуль
 У Казахстані на основі гібридизації тонкорунних овець з диким гірським бараном Архар створена нова порода тонкорунних
 Настройка струи на принтере Citronix
 Классификация стабилизаторов
 Презентация Основные положения Таможенного кодекса по соблюдению запретов и ограничений по перемещаемым товарам через таможенну
 Составление задач на сложение и вычитание по одному рисунку - презентация для начальной школы_
 Презентация "Дмитрий Григорьевич Левицкий. «Портрет М.А, Дьяковой» , 1778, ГТГ" - скачать презентации по МХК
 Федеральная служба по интеллектуальной собственности и патентам
 Проект скловарної печі для виробництва склопрофіліту продуктивнiстю 160 т/добу
 Основы организации аварийно-спасательных и других неотложных работ в ЧС