- Advance BBMA

Содержание
- 2. Advance BBMA Multiple Time Frame – Ema50 Re-entry situation Ema50 is a strong indicator for Trend,
- 3. Situation 1 BBEMA – H1 TF
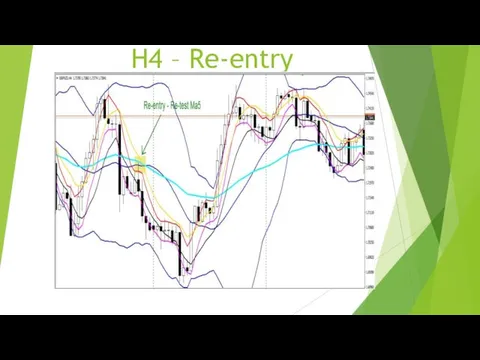
- 4. H4 – Re-entry
- 5. Situation 2 BBEMA – H4 TF
- 6. Daily TF – Re-entry
- 7. Situation 3 BBEMA – H1 TF
- 8. H4 – Re-entry
- 9. Multiple TF; Major and Manor Movement This Movement is for tracking down 80-90% unfinished trend. To
- 10. Example; Major (weekly – H1 but manor is from H1-m1) This is the standard SOP of
- 11. Illustration of Major Movement Daily – Feature/marking, BB horizontal = sideways market - Tp when market
- 12. H4 – Has to be an MLV
- 13. H1 – Extreme – Double bottom
- 14. Extreme “C” signal Extreme “c” is more of a hidden Re-entry We see it using Ma5/10,
- 15. Extreme “C” Illustration H4 – CS Momentum – outside Ma5
- 16. H1 – Re-entry
- 17. M15 – Extreme C/BBEMA
- 18. Diamond Setup Diamond Setup is 100% accurate. It happens when Ma5/10, Ema50 are parallel to Mid
- 19. Diamond setup Illustration
- 20. Diamond Setup – Sell Illustration
- 21. Golden Setup Golden Setup is a powerful Re-entry situation There’s Two kinds of Golden Setup Golden
- 22. Extreme “C” Golden Setup Illustration H4 – Extreme “C” ( cs nearly touch Ma5, but for
- 23. H1 – Re-entry
- 24. M30 - BBEMA
- 25. M15 – Extreme (Ema50 unit with Extreme. As long as Ema50 is within the extreme zone,
- 26. BBEMA Golden Setup H4 – BBEMA
- 27. H1 – Re-entry
- 28. M30 – BBEMA (as long as Ema50 is above for going down on this TF it’s
- 29. M15 – Extreme, unite with Ema50
- 30. Re-entry situation formation Uptrend - (EurUsd only) H4 – candles will retest and reject Ema50 while
- 31. H1 – Extreme
- 32. M15 – There has to be an Extreme I couldn’t go back on M15 where there
- 34. Скачать презентацию
Advance BBMA
Multiple Time Frame – Ema50 Re-entry situation
Ema50 is a
Advance BBMA
Multiple Time Frame – Ema50 Re-entry situation
Ema50 is a
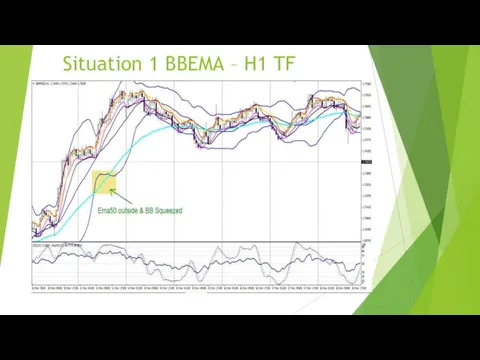
Situation 1 BBEMA – H1 TF
Situation 1 BBEMA – H1 TF
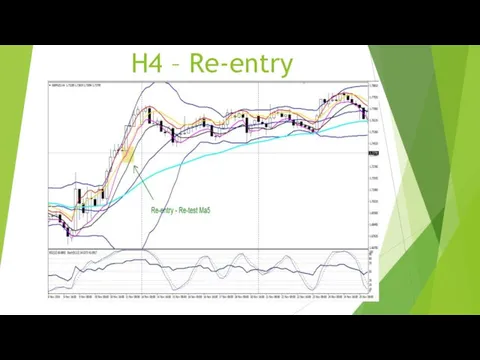
H4 – Re-entry
H4 – Re-entry
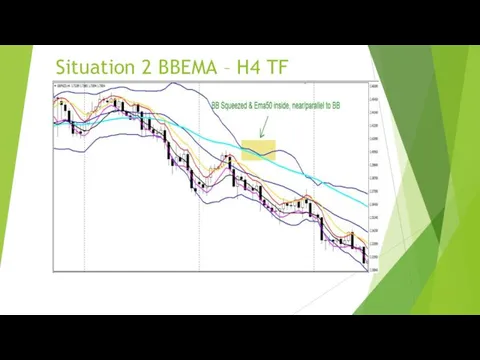
Situation 2 BBEMA – H4 TF
Situation 2 BBEMA – H4 TF
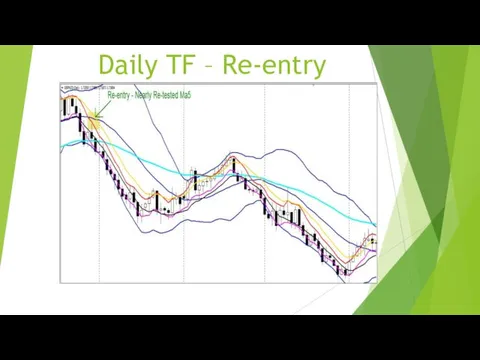
Daily TF – Re-entry
Daily TF – Re-entry
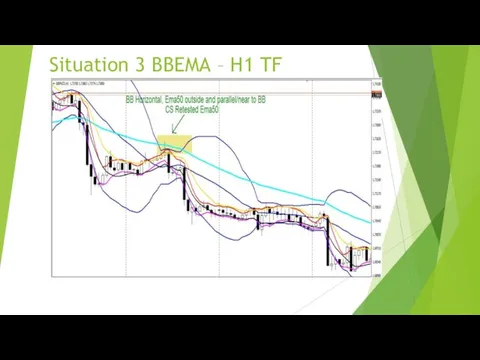
Situation 3 BBEMA – H1 TF
Situation 3 BBEMA – H1 TF
H4 – Re-entry
H4 – Re-entry
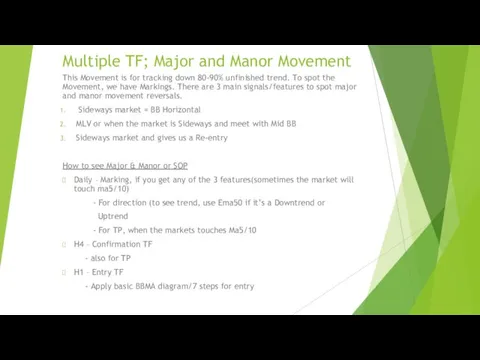
Multiple TF; Major and Manor Movement
This Movement is for tracking down
Multiple TF; Major and Manor Movement
This Movement is for tracking down
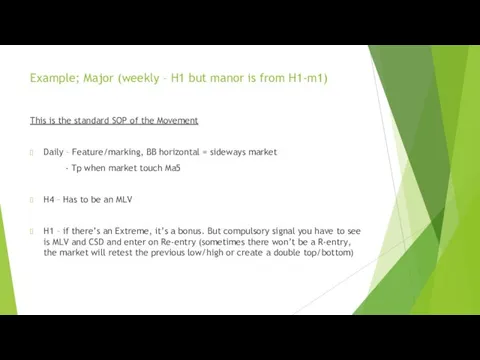
Example; Major (weekly – H1 but manor is from H1-m1)
This is
Example; Major (weekly – H1 but manor is from H1-m1)
This is
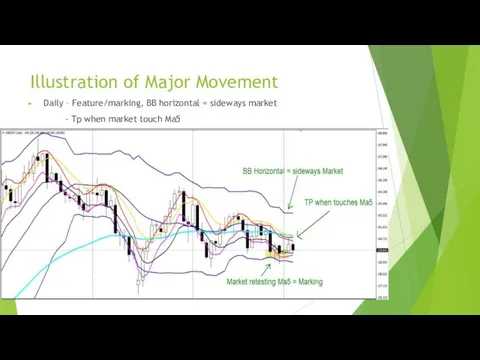
Illustration of Major Movement
Daily – Feature/marking, BB horizontal = sideways market
Illustration of Major Movement
Daily – Feature/marking, BB horizontal = sideways market
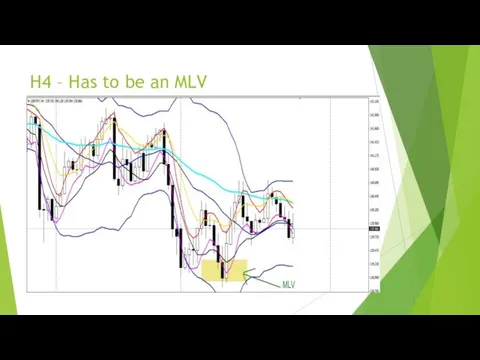
H4 – Has to be an MLV
H4 – Has to be an MLV
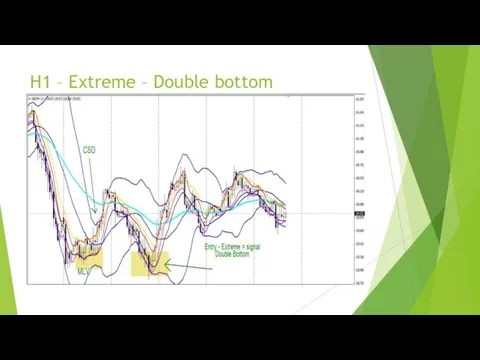
H1 – Extreme – Double bottom
H1 – Extreme – Double bottom
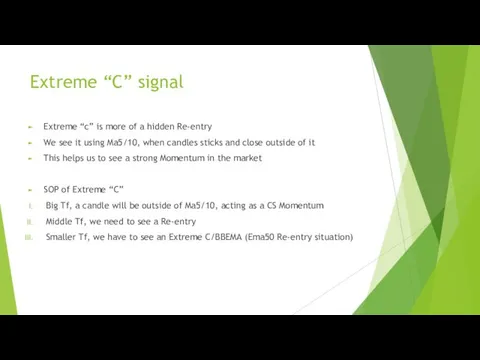
Extreme “C” signal
Extreme “c” is more of a hidden Re-entry
We see
Extreme “C” signal
Extreme “c” is more of a hidden Re-entry
We see
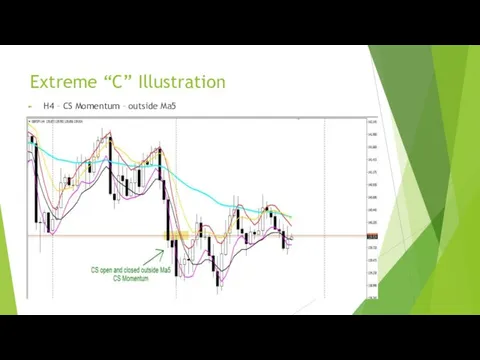
Extreme “C” Illustration
H4 – CS Momentum – outside Ma5
Extreme “C” Illustration
H4 – CS Momentum – outside Ma5
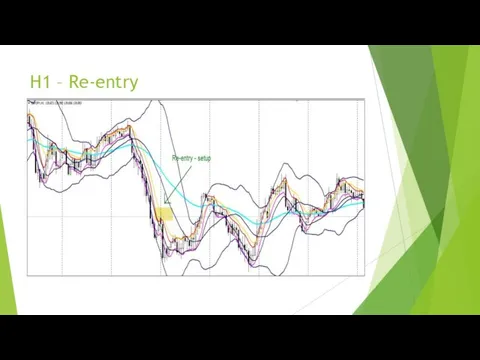
H1 – Re-entry
H1 – Re-entry
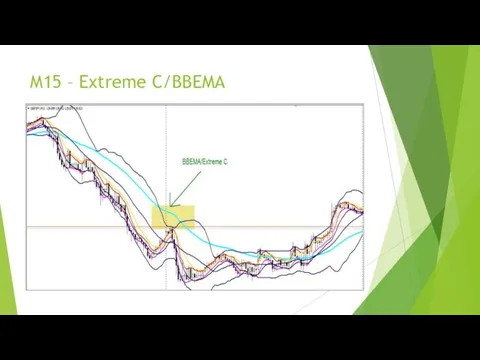
M15 – Extreme C/BBEMA
M15 – Extreme C/BBEMA
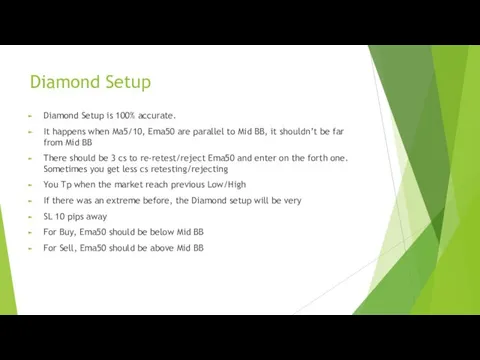
Diamond Setup
Diamond Setup is 100% accurate.
It happens when Ma5/10, Ema50 are
Diamond Setup
Diamond Setup is 100% accurate.
It happens when Ma5/10, Ema50 are
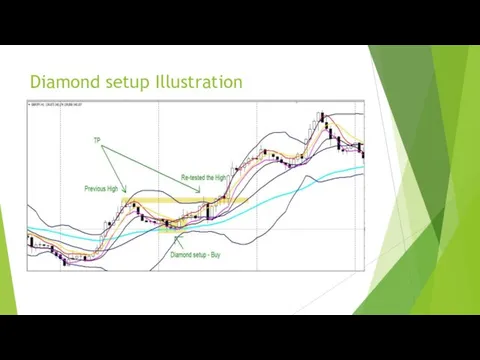
Diamond setup Illustration
Diamond setup Illustration
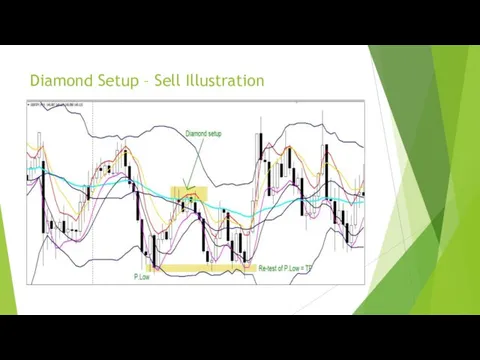
Diamond Setup – Sell Illustration
Diamond Setup – Sell Illustration
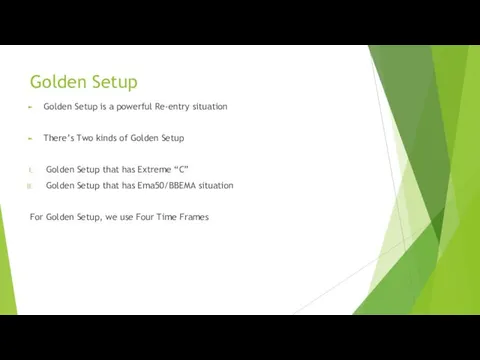
Golden Setup
Golden Setup is a powerful Re-entry situation
There’s Two kinds of
Golden Setup
Golden Setup is a powerful Re-entry situation
There’s Two kinds of
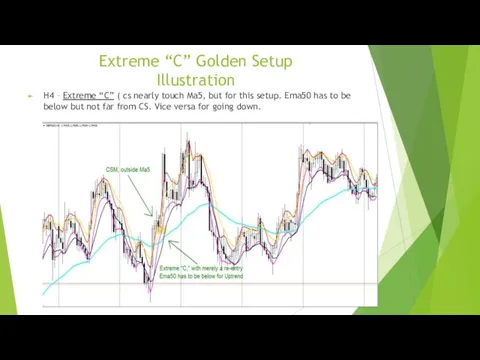
Extreme “C” Golden Setup
Illustration
H4 – Extreme “C” ( cs nearly touch
Extreme “C” Golden Setup
Illustration
H4 – Extreme “C” ( cs nearly touch
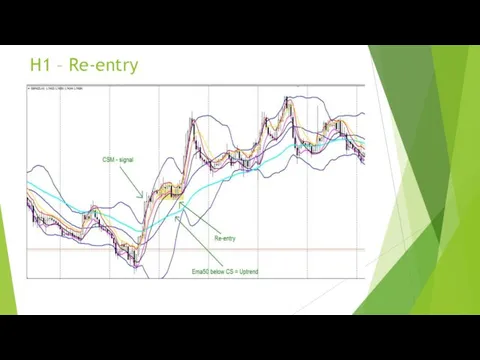
H1 – Re-entry
H1 – Re-entry
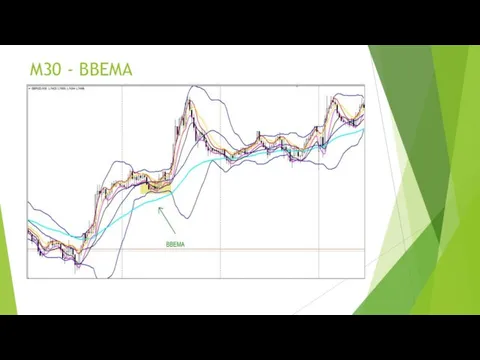
M30 - BBEMA
M30 - BBEMA
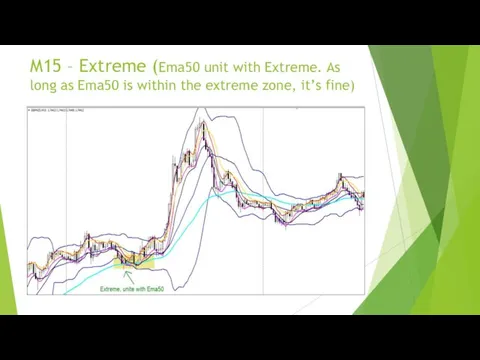
M15 – Extreme (Ema50 unit with Extreme. As long as Ema50
M15 – Extreme (Ema50 unit with Extreme. As long as Ema50
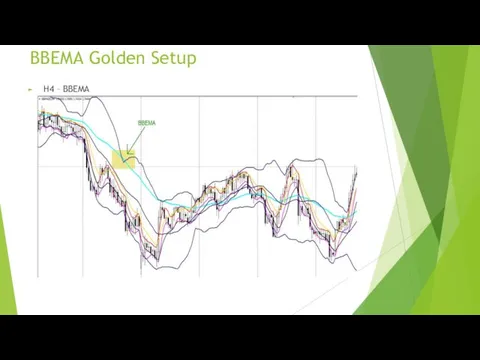
BBEMA Golden Setup
H4 – BBEMA
BBEMA Golden Setup
H4 – BBEMA
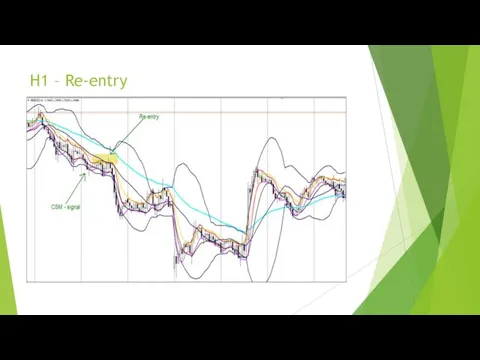
H1 – Re-entry
H1 – Re-entry
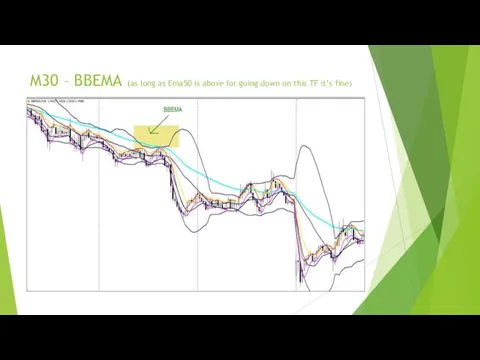
M30 – BBEMA (as long as Ema50 is above for going
M30 – BBEMA (as long as Ema50 is above for going
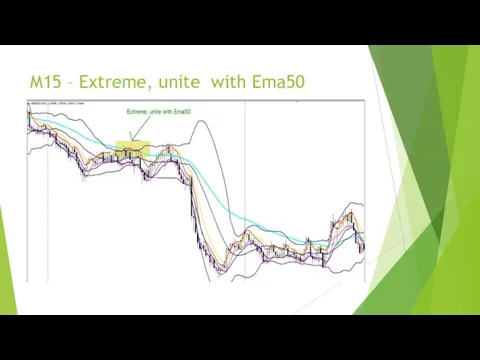
M15 – Extreme, unite with Ema50
M15 – Extreme, unite with Ema50
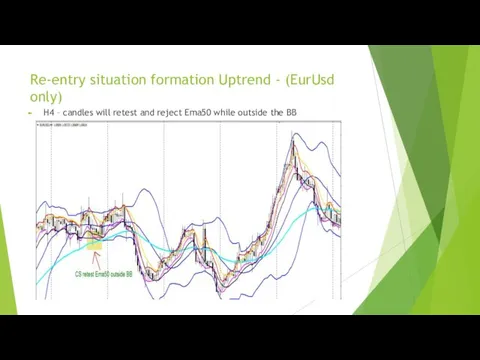
Re-entry situation formation Uptrend - (EurUsd only)
H4 – candles will retest
Re-entry situation formation Uptrend - (EurUsd only)
H4 – candles will retest
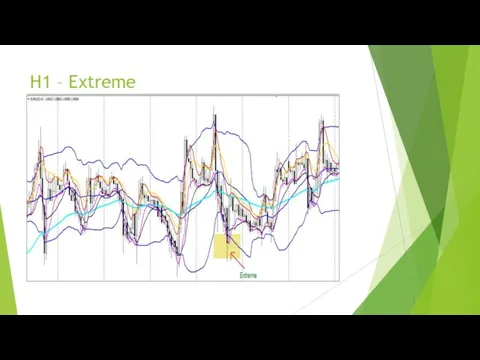
H1 – Extreme
H1 – Extreme

M15 – There has to be an Extreme
I couldn’t go back
M15 – There has to be an Extreme
I couldn’t go back
 Ветвление в построчной записи алгоритма ЕСЛИ-ТО ЕСЛИ-ТО-ИНАЧЕ
 Выпускная квалификационная работа на тему: Разработка информационной системы Стройотряд
 Преобразование презентаций PowerPoint
 PLC izvēle
 Оперативная память
 Аппаратное и программное обеспечение обработки данных на ЭВМ. Лекция 4.2
 Основы программирования на языке Pascal. Алфавит, типы данных, структура программ. Основные операторы
 Кодирование и обработка текстовой информации
 Операторы языка С++
 Prepositions of time
 Преобразование логических выражений Составила: Антонова Е.П. По задачнику-практикуму под ред. Семакина И.Г. 2008г.
 ИСКУССТВЕННЫЙ ИНТЕЛЛЕКТ В РОБОТОТЕХНИКЕ Подготовила: студентка ИТ -11 Луговая Алина
  Основные типы алгоритмов. Линейные алгоритмы.
 Медиадокументы
 Векторная графика CorelDraw Цель урока: - получить представление векторной графической программе CorelDraw, для создания изображений, д
 6. Процедуры и функции
 Презентация "Базы данных и информационные системы. Основные понятия" - скачать презентации по Информатике
 Windows 2000
 Построение базы данных
 Создание сайта салона мягкой мебели Интерьер Холл
 Презентация "Информация и информационные процессы в технике" - скачать презентации по Информатике_
 Оператор повторения Цикл for…to…do Цикл for…downto…do
 Системы цифровой обработки изображений
 Microsoft® Office Access 2007. Быстрое освоение программы
 Создание интерактивной игры с помощью онлайн-платформы Canva и онлайн-сервиса LearningApps
 Функциональные зависимости в реляционной модели данных. Декомпозиция. Нормальные формы
 Обработка текста на компьютере
 Рубрикатор 2GIS